
The world is full of vulnerable computers. As you learn how to interact with them, it will be both tempting and necessary to test out these newfound skills on a real target. To help you get to that goal, we have a deliberately vulnerable Raspberry Pi image designed for practicing and taking your hacking skills to the next level.
Many of us are hands-on learners, and the best way to learn a skill is to try what you're being taught to gain a real understanding; This can get legally complicated when learning about cybersecurity, due to complex and beginner-unfriendly computer hacking laws in the US and other countries.
With hacking constantly in the news and on the national radar, police are less and less understanding when dealing with issues of computer intrusion. As many of the principals you will learn are designed to compromise or break computers, learning about ransomware on your sister's laptop or local library computer may not be the best place to make your first mistakes as a hacker.
The solution is a computer with no valuable data inside, one which is deliberately vulnerable and specially made for attacking. So where do you get this vulnerable computer? Do you buy an old one and hope that it has some interesting vulnerabilities? Ten years ago, that was exactly how you'd practice hacking older systems. Today, specially designed vulnerable operating systems are used to practice hacking tools against common vulnerable software services.

Since Null Byte is a white hat hacking community, it's essential we provide every opportunity to practice lawfully and safely as we learn to break things. The Raspberry Pi is a cheap, flexible computer that can run a wide variety of popular software and backend applications; This makes it a perfect alternative to running a virtual machine as a "firing range" computer for practicing attacks.
VM Versus Native Installation
So why not just run it on your laptop in a virtual machine? I've always hesitated to unleash the fury on a virtual machine nestled inside my precious hacking laptop. Virtual machines can be complicated for beginners, and the price of running that logic bomb on your mom's HP versus the virtual machine could be destroying the computer.
Physical separation is desirable, but until recently, it was rather expensive to buy another computer for testing when a free VM is available. That has changed with the availability and price point of the Raspberry Pi. Now, for $35, you can get started hacking safe and legal targets thanks to the hard work of the InfoSec community!
Re4son's Damn Vulnerable Pi
Australian security researcher Re4son runs Whitedome Consulting, a site featuring custom Raspberry Pi images developed in support of both cybersecurity learning and active penetration testing. He also builds things with the Raspberry Pi that blue teams see hovering in their darkest nightmares. Offering both offensive and practice images, Re4son's Damn Vulnerable Pi image caught my eye after relying on his excellent "Re4son Kernel" to solve many problems running Kali on the Pi Zero W.

The Damn Vulnerable Pi image is a perfect companion to an offensive Kali Linux build, simulating a target computer running vulnerable services for you to destroy. The setup is simple and using it is elegant with an optional touchscreen, although we will be using the "dv-pi" tool to control our DV-Pi over SSH from any laptop or smartphone for the sake of simplicity and compatibility. This tool is perfect for practicing at home, running hacking competitions, or demonstrating at live hacking events.
Re4son's DV-Pi comes with the following features:
- 3 GB image ready to go with all common TFT screens.
- Re4son Kali-Pi Kernel 4.4 with touchscreen support.
- Supports Raspberry Pi 0/0W/1/2/3.
- Tool (re4son-pi-tft-setup) to set up all common touchscreens, enable auto-logon, etc.
- Command line tool (dv-pi) for headless operation.
- Each image comes with one vulnerability to get in and one vulnerability to get root.
- Each image has two proof.txt with a hash to proof successful compromise.
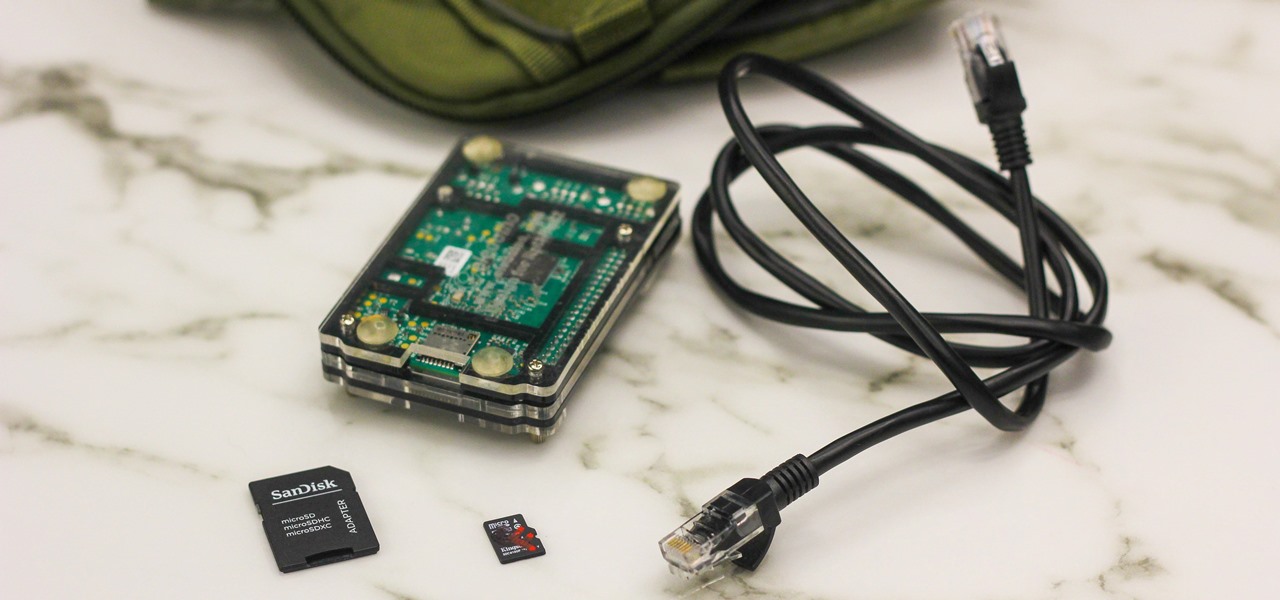
What You'll Need
- a Raspberry Pi 3 (this could work on other Pi models)
- Re4son's DV-Pi image
- a computer to burn the disk image from
- a microSD card (at least 8 GB) and adapter or card reader for your laptop
- an Ethernet cable
- optional — you can set up your DV-Pi from a smartphone instead of a laptop after the image is burned
Step 1: Prepare the Image & SD Card
To begin, we'll need Re4son's DV-Pi image. You can find it on his blog here. We'll start with the "easy-ish" image version linked here.
After downloading the DV-Pi image, unarchive the image and select your favorite disk image burning software, because we'll be burning the image to an SD card. I like Etcher, which is what I use, but you can use anything that will write bootable disk images to an SD card.
At this point, you'll need to insert the SD card you intend to run the DV-Pi on into your laptop. I recommend using no less than 8 GB microSD cards. Put the microSD card into your adapter of choice, and after plugging it into your laptop, ensure you can see it listed with your other drives.
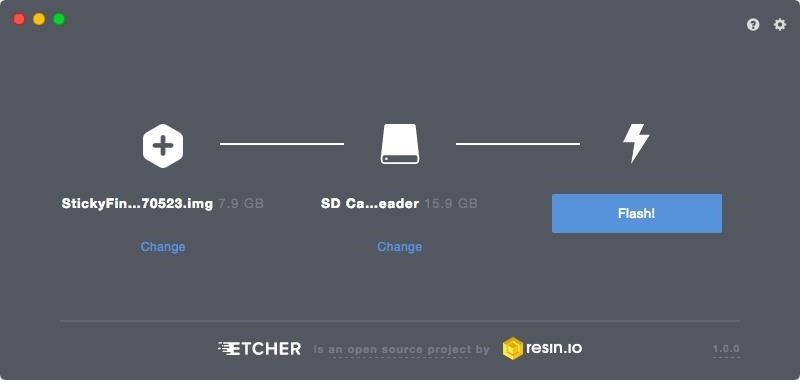
In Etcher (or whatever program you use), select the .img file you downloaded and unarchived, and burn it to the SD card you have inserted; This will give you a bootable image on the card, ready to insert into your Raspberry Pi.
Step 2: Load Your SD Card & Connect Ethernet
After you're finished burning the OS onto the card, load the card into your Raspberry Pi and connect it via Ethernet to your network. Plug in the power, and you'll see the DV-Pi start up. You can also connect it to an HDMI display and watch it boot to ensure everything is working correctly. It should look exactly like this:
[ OK ] Started LSB: Switch to ondemand cpu generator (unless shift key is pressed).
[ OK ] Reached target System Initialization.
[ OK ] Listening on Avahi mDNS/DNS-SD Stack Activation Socket.
[ OK ] Listening on D-Bus System Message Bus Socket.
[ OK ] Reached target Sockets.
[ OK ] Reached target Timers.
Starting Restore Sound Card State...
[ OK ] Reached target Basic System.
Starting Regular background program processing daemon...
[ OK ] Started Regular background program processing daemon.
Starting dhcpcd on all interfaces...
Starting Configure Bluetooth Modems connected by UART...
Starting Login Service...
Starting LSB: triggerhappy hotkey daemon...
Starting LSB: Autogenerate and use a swap file...
Starting Avahi mDNS/DNS-SD Stack...
Starting D-Bus System Message Bus...
[ OK ] Started D-Bus System Message Bus.
[ OK ] Started Avahi mNDS/DSN-SD Stack.
Starting System Logging Service...
Starting Permit User Sessions...
[ OK ] Started Restore Sound Card State.
[ OK ] Started dhcpcd on all interfaces.
[ OK ] Started LSB: triggerhappy hotkey daemon.
[ OK ] Started LSB: Autogenerate and use a swap file.
[ OK ] Started Permit User Sessions.
[ OK ] Reached target Network.
Starting OpenBSD Secure Shell server...
[ OK ] Started OpenBSD Secure Shell server.
Starting /etc/rc.local Compatibility...
[ OK ] Reached target Network is Online.
Starting LSB: Start NTP daemon...
[ OK ] Started System Logging Service.
[ OK ] Started etc.rc.local Compatibility.
[ OK ] Started Login Service.
Starting Terminate Plymouth Boot Screen...
Starting Wait for Plymouth Boot Screen to Quit...
[ OK ] Started Wait for Plymouth Boot Screen to Quit.
[ OK ] Started Terminate Plymouth Boot Screen.
Starting Getty on tty1...
[ OK ] Started Getty on tty1.
[ OK ] Reached target Login Prompts.
[ OK ] Started LSB: Start NTP daemon.
[ OK ] Started Configure Bluetooth Modems connected by UART.
[ OK ] Reached target Multi-User System.
Starting Update UTMP about System Runlevel Changes...
Starting Load/Save RF Kill Switch Status of rfkill1...
Starting Bluetooth service...
[ OK ] Started Load/Save RF Kill Switch Status of rfkill1.
[ OK ] Started Update UTMP about System Runlevel Changes.
[ OK ] Started Bluetooth service.
[ OK ] Reached target Bluetooth.
Raspbian GNU/Linux 8 dv-pi3 tty1
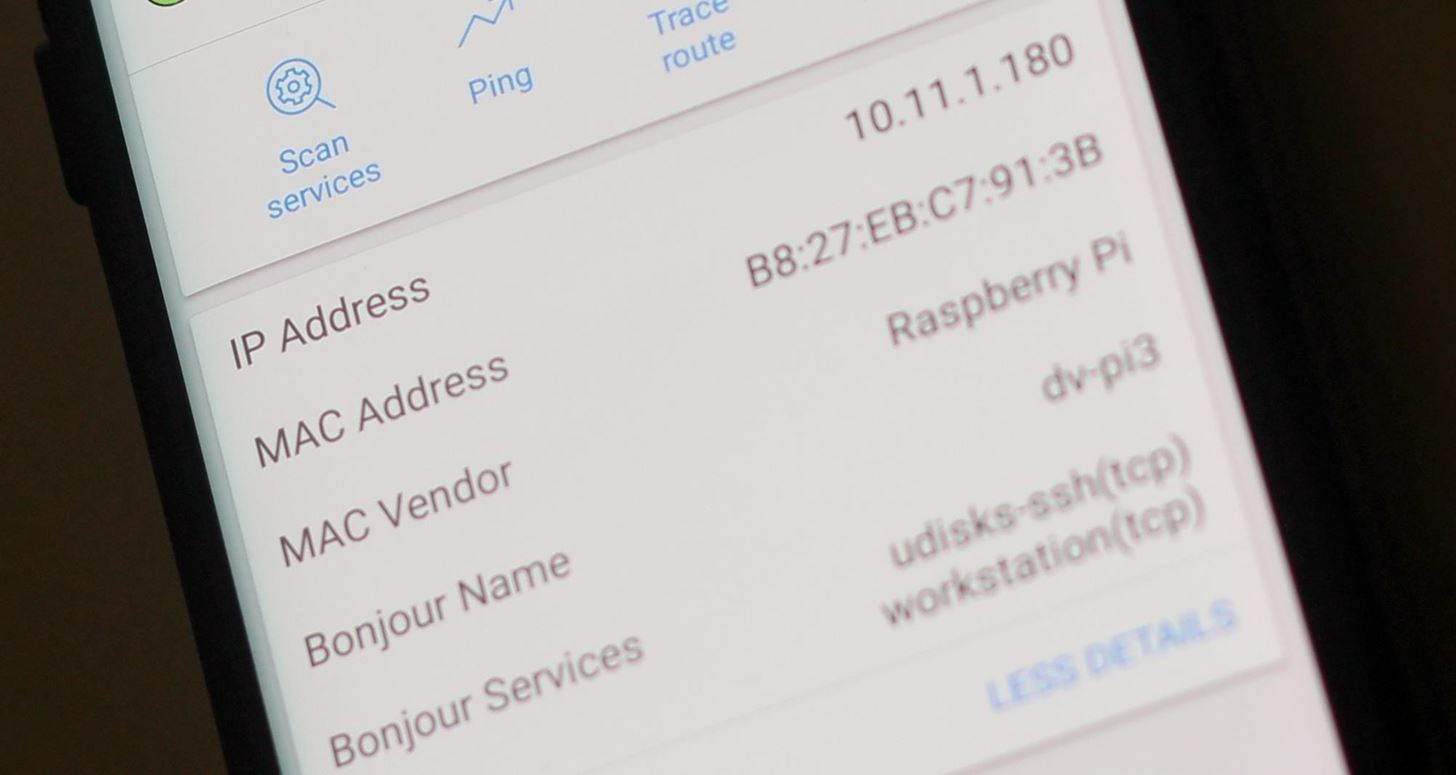
dv-pi3 login:Once the Pi is booted, you should be able to scan your network with arp-scan or Fing network scanner from your laptop or phone to discover the Pi's IP address. When you have the IP address, you'll be able to SSH into the Pi. In this case, the device name we're looking for is "dv-pi3."
- More on Scanning Networks: Using Netdiscover & ARP to Find Internal IP & MAC Addresses
Step 3: SSH into the DV-Pi
Armed with the IP address, we can now SSH into the Raspberry Pi. You can scan the Pi's IP address with Fing Network Scanner to ensure port 22 is open and waiting for a connection.

You can SSH into the Pi via command line from the terminal on your laptop by running:
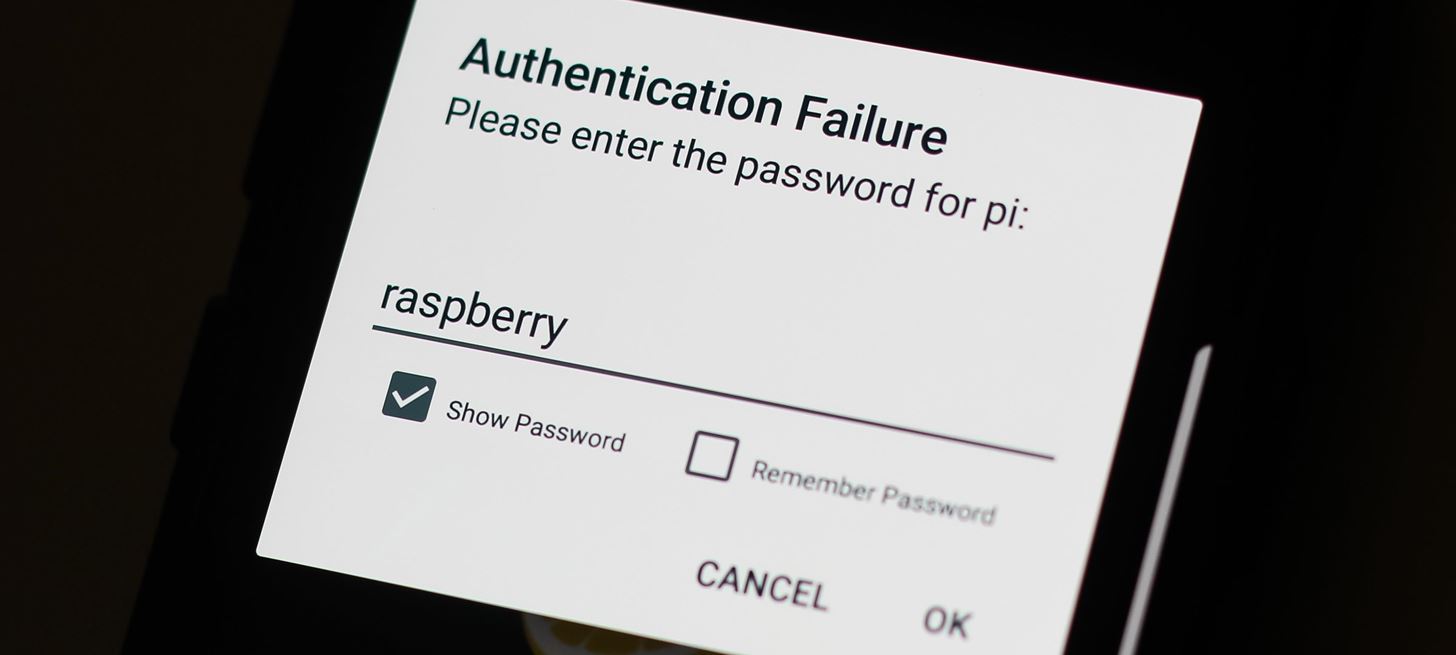
ssh pi@(ip address here)The password will be raspberry. You can also log in on a smartphone using an app like JuiceSSH.
Once you SSH in, you will have access to the DV-Pi's administrative controls! To know you've logged in, you should see a "Message of the Day" screen like below on a successful SSH connection.
pi@10.11.1.180's password:

The programs included with the Debian GNU/Linux system are free software; the exact distribution terms for each program are described in the individual files in /usr/share/doc/*/copyright.

Debian GNU/Linux comes with ABSOLUTELY NO WARRANTY, to the extent permitted by applicable law.
Last login: Thu May 25 16:04:59 2017 from 10.11.3.62
pi@dv-pi3:~ $
Step 4: Check Status & Start the DV-Pi
To check the current status of our Damn Vulnerable Pi, we can use the dv-pi tool helpfully included by Re4son. To check to see if the DV-Pi is running and vulnerable, enter dv-pi status which will show the current status of the device. Initially, it should be off/not vulnerable.
pi@dv-pi3:~ $ dv-pi status

[ STATUS ] DV-Pi is stopped

[ STATUS ] The system is not vulnerable

pi@dv-pi3:~ $
Ready to start hacking? To start the DV-Pi's vulnerable applications, you'll need to run dv-pi start, then authenticate with the password raspberry in the terminal. This will start the vulnerable applications.
pi@dv-pi3:~ $ dv-pi start

[ STATUS ] Starting DV-Pi
[sudo] password for pi:
[ STATUS ] DV-Pi started successfully

[ WARNING ] THE SYSTEM IS VULNERABLE!

pi@dv-pi3:~ $
Step 5: Confirm It's Working
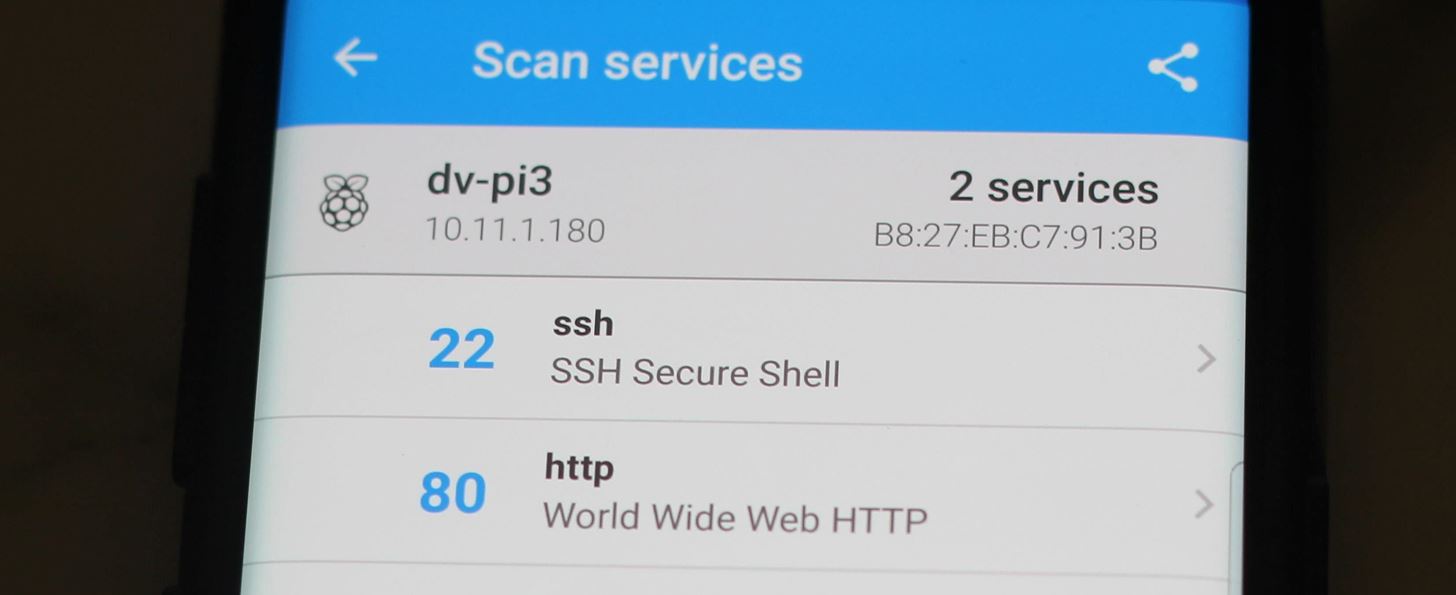
To confirm the DV-Pi is running, scan your network again using Fing to find the Pi's IP address. Tapping on the device will allow you to "scan services" to see that both port 22 and port 80 are open.
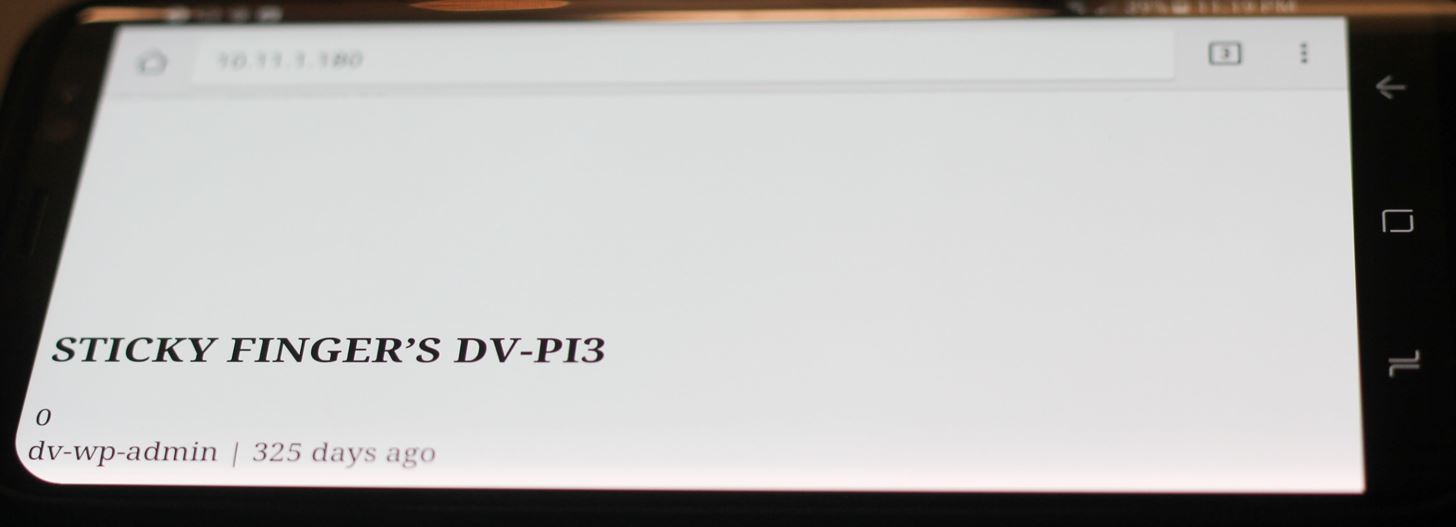
Tap on port 80, or in your browser go to the IP of your Raspberry Pi. A WordPress service to attack should be running on the Pi if the system is vulnerable. If you see the site below, you know the DV-Pi is live!
Hacking the DV-Pi
Once your DV-Pi is set up, you're ready to get started hacking it. To prove you gained access, a fake "customer database" of credit card info is included to simulate exfiltrating real data and provide some excitement upon succeeding. Re4son runs a fantastic blog and responds to comments and questions on his builds, so check out his site in the future for more great work.
Null Byte & the Community
After speaking with Re4son about how useful his images are for our community, he's updated his images to support all versions of the Raspberry Pi, including the new Pi Zero W. Our hope is to bring a custom Null Byte image for our community to practice on, focusing on wireless security techniques using the Pi Zero W as a cheap, easy way to practice offensive Wi-Fi tools.
If there's interest, please mention in the comments and we can start taking community requests for features and look into giveaways for our community!
Stay tuned for tutorials on using the DV-Pi and other DV images on the Pi Zero W, and for word on Re4son's Wi-Fi focused DV-Pi. You can ask me questions here or @sadmin2001 on Twitter or Instagram.
Just updated your iPhone? You'll find new emoji, enhanced security, podcast transcripts, Apple Cash virtual numbers, and other useful features. There are even new additions hidden within Safari. Find out what's new and changed on your iPhone with the iOS 17.4 update.


7 Comments
Cheers for the guide! I'll try it on my Pi!
Let me know how it goes!
I figured out the wordpress vulnerability (I think!) even figured out where the user file is stored but getting a hold of the pw is taking some time.
Right now I'm using Armitage & 30k+ word dictionary but it's taking some time. Without giving away any spoilers any other approach you would suggest to expedite the process?
Thanks and keep the tutorials coming!
Would be very interested! Thank you!
Hi there.
I'm trying to set this up on a RPi 1 model B. I got it booting and everything looks fine as in the picture of the boot, but when i scan my network it doesn't show up.
Any ideas why this won't work, I assume it should be possible on the regular RPi and it doesn't hve to be the RPi 3.
Might be worth mentioning to add the pi's hostname and ip address to etc/hosts on the attacking machine if you want the website to function properly. Instructions are at https://whitedome.com.au/re4son/sticky-fingers-dv-pi/ under Usage.
Also for some reason many of the links on the wordpress website redirect to a weird unresponsive local ip, nikto says it's a RFC-1918 IP when i scanned the site, does anyone know what this is?
Anyway I'm kinda stuck and was wondering if somebody could link a guide to how to get started or help me out because I can barely find any documentation on this thing. I probably should install an easier vulnerable image to start off with. .
Hey! I'll ask the developer about it and see if I can get some more feedback
Share Your Thoughts