

Your home has walls for privacy, but Wi-Fi signals passing through them and can be detected up to a mile away with a directional Wi-Fi antenna and a direct line of sight. An amazing amount of information can be learned from this data, including when residents come and go, the manufacturer of all nearby wireless devices, and what on the network is in use at any given time.
While we've covered Kismet for wardriving, in which we added a GPS to the mix and drove around to geolocate wireless networks, using Kismet in a fixed position can yield more nuanced information about fixed targets. Rather than simply looking for what access points (APs) are out there, Kismet is excellent at displaying relationships between devices over time.
Using Kismet to spy on users draws from signal intelligence techniques, in which we try to learn about something we can't see by the signals it's giving off. In this case, we are dealing with Wi-Fi, and what we are trying to see is routers and connected devices, human activity, and what devices belong to who. This is enough to piece together a lot more than you might think.
If you knew someone could see not just if you were home or not, but whether you were on your PlayStation or your laptop at any given time, you might be more inclined to switch to a wired network or at least turn Wi-Fi off on devices when you're not using them.
To work its magic, Kismet uses a wireless network card put in monitor mode to silently scan all available Wi-Fi channels in range for wireless packets. These packets can be automated beacon frames, which wireless APs broadcast multiple times per second, data packets exchanged from associated devices, or probe frames from devices nearby which aren't yet connected to a network but are searching for a network to connect to.
By decoding and combining this data, Kismet visualizes the networks around you, as well as the activity of devices connected to those networks.
What Can Wi-Fi Tell You?
So what can we do with this? Once we identify a network we wish to watch, we can explore nuanced details about it, like what kind of electronics and hardware a business or person has connected to their network. This can allow you to "fingerprint" different types of setups to recognize what a certain configuration of devices might be for. With this setup, a hidden cluster of 3D printers or connected hydroponics gear is as plain as day to see, as are a bunch of smartphones and laptops.
The usefulness of this data depends on who you are. To a thief, the ability to snoop around every house in wireless range to discover expensive electronics would be very useful. Since Kismet can easily detect wireless security cameras, we can completely avoid or even potentially target one with a jamming attack. And because we can see when client devices appear, disappear, and use data, it's pretty easy to infer when no one is home.
Even better, by simply wardriving around a neighborhood and combining GPS data with the Wi-Fi signal data, a thief can just build a map of what address each wireless network belongs to. In fact, this data may already exist, as Wigle Wifi and Google both have more Wi-Fi networks on the planet mapped.

It should be noted that can also be used as a kind of neighborhood watch to detect suspicious wireless activity in neighborhoods. This can help spot signs of cybercrime, which can be reported to someone who knows how to investigate it since normal cops typically don't. Whatever your intended use, you don't need much to get started diving into peering straight through the walls around you.
What You'll Need
To follow this guide, you'll only need a few things. The first is a Kali-compatible wireless network adapter to scan with, and the second is a Linux system to run Kismet on. While the new version of Kismet can run a variety of wireless cards (including on macOS), we'll be covering the older stable version. We recommend any of the adapters featured in our adapter roundup or a long-range Panda Wireless PAU09 dual-band adapter for capturing on both 2.5 and 5 GHz bands.

Kismet will work both on a virtual machine and a Kali-Pi installation if you'd prefer to run it on your Raspberry Pi.
Step 1: Install Kismet
To install Kismet on Kali Linux, we'll first clone the git repository with the command below.
Depending on which OS you're using, Kismet may not need any dependencies. But to ensure Kismet runs correctly, we should install Kismet's slightly lengthy list of dependencies. These are needed because Kismet deals with detecting, decoding, logging, and sorting lots of wireless data while controlling a wireless card, which requires several libraries to be installed. You can do this by running the following in a terminal window.
sudo apt-get install build-essential git libmicrohttpd-dev zlib1g-dev libnl-3-dev libnl-genl-3-dev libcap-dev libpcap-dev libncurses5-dev libnm-dev libdw-dev libsqlite3-dev
Next, navigate to the Kismet directory we created using cd, and configure the installation.
cd kismet
./configure
This will configure the installation for your particular OS distribution. When that process is complete, create the installation with:
make
When this is complete, we'll run the resulting file to complete the installation with the suidinstall option. This is important because Kismet is directly taking in signals and writing data to your computer. It is a terrible idea to do this as a root user because if any of that data is malicious, it could be executed as root.
When unprivileged users need to accomplish tasks that require privileges, like controlling the wireless network adapter, Linux lets us give privileges to programs instead of users so we don't have to make everyone, including malware, root.
To mitigate [giving root access], Kismet uses separate processes to control the network interfaces and capture packets. These capture programs are much smaller than Kismet itself and do minimal (or no) processing on the contents of the packets they receive.
Run the following to complete the SUID installation.
sudo make suidinstall
After Kismet is installed, add yourself to the Kismet group to be able to capture packets as a non-root user. Be sure to replace "YourUsername" with your actual username.
sudo usermod -a -G kismet YourUsername
Step 2: Put Your Wireless Card in Monitor Mode
Attach your wireless network card to your computer, and if needed, attach it to the virtual machine using the "USB" settings. To find your card, you can use the ip a or ifconfig commands. Your card should be named something like "wlan1" or "wlan0."
Once you have the name of your card, you can put the card in monitor mode by running the command below.
sudo airmon-ng start YourCardName
This will put YourCardName (be sure to replace with your actual card's name) in monitor mode. Your card will be renamed to add a "mon" at the end of the name of the card. So, if it was named "wlan0" before, it will now be named "wlan0mon." This change lets us immediately identify that a card is in wireless monitor mode.
We will use this new name for the card to launch Kismet.
Step 3: Launch Kismet
Starting Kismet is simple. To start as a non-root user, you can simply type the following.
kismet -c YourCardNameMon
Be sure to put the name of the card you put in wireless monitor mode after the -c. Kismet uses the -c to specify the capture source.
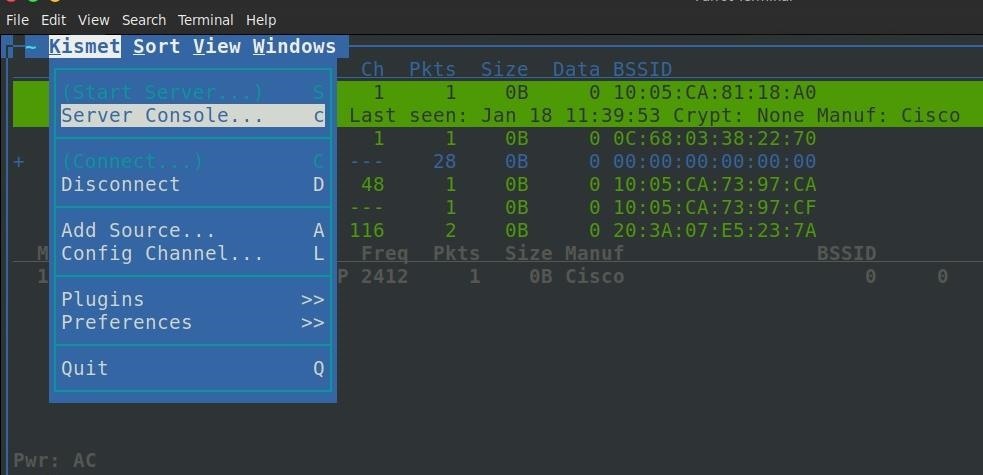
You should see Kismet start up and begin collecting packets. You can press return to go through the menu options until you reach the console window. To go to the main screen, hit the tab button and then press enter to close the console view.
Step 4: Persistent Network Surveillance
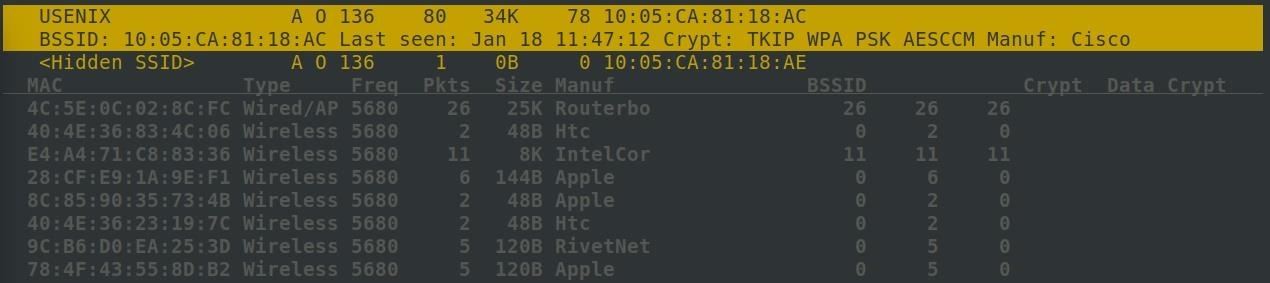
Once we start Kismet, we should see a list of all the Wi-Fi devices we can detect nearby. The number of devices detected will vary depending on if you're scanning 2.4 GHz, 5 GHz, or both. If you have the ability to add an antenna to your wireless network adapter, a higher gain (or directional) antenna can extend your range and the number of devices detected.
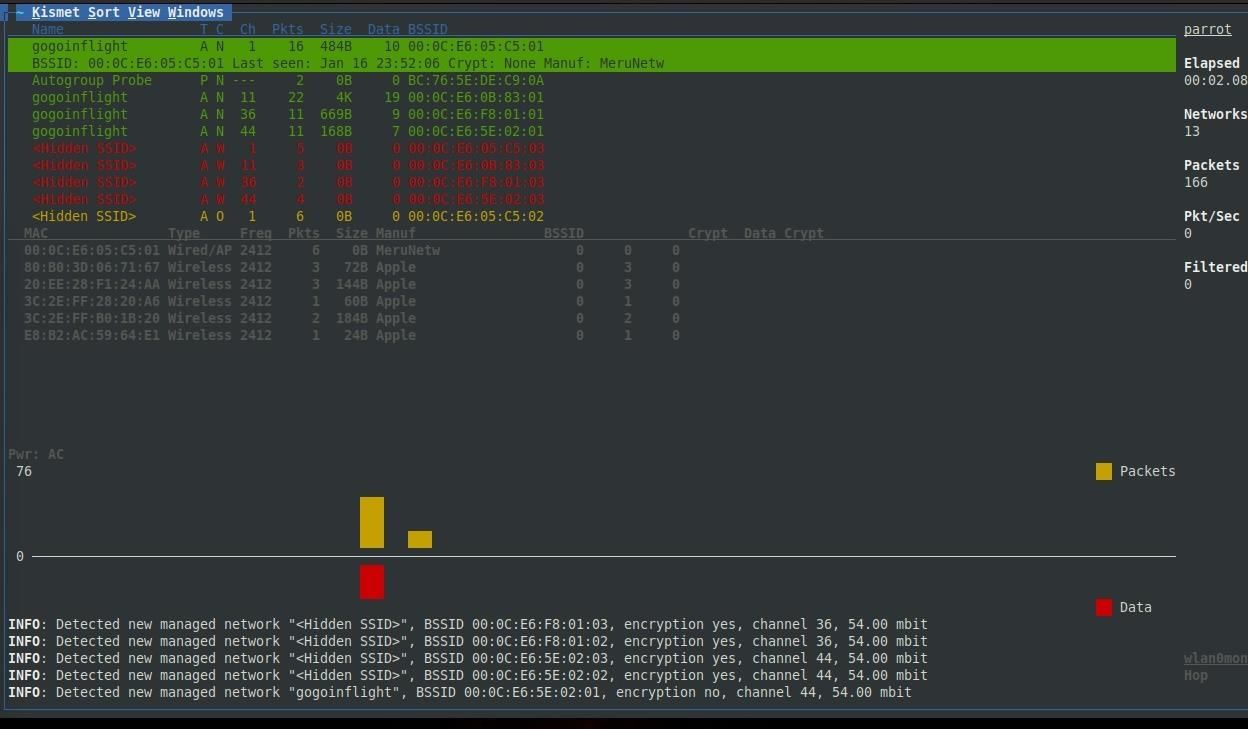
You can arrange these networks by name, signal strength, and other properties. It's advised that you do so by signal strength so that you can see what networks are strongest (and thus closest) first. Once you have a network you'd like to target, click on it (or scroll down to it) in Kismet to learn more information about it.
Upon highlighting a network, the first thing we'll notice is the list of wireless clients appears in the main window. These are clients that are associated with the network.
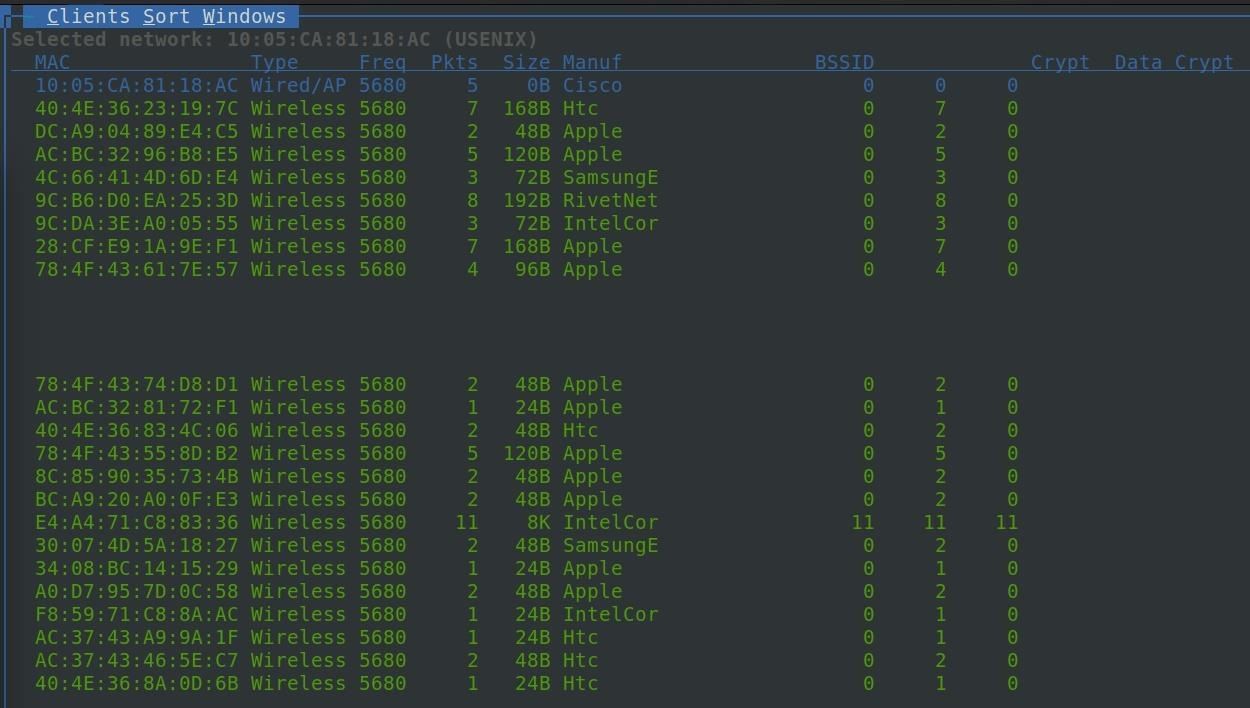
To learn more about a specific network's clients, you can, after highlighting the network, click on "Windows" and then click on "Client List."
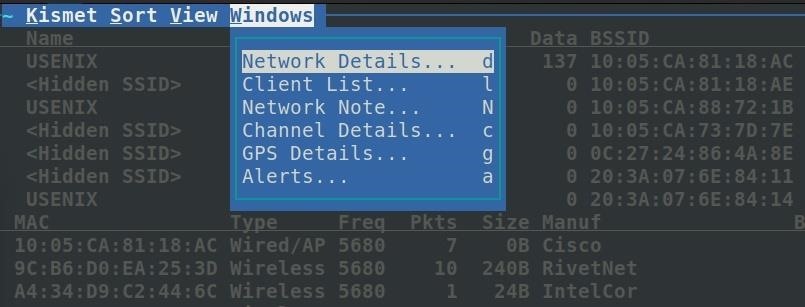
In the client window, we can see more information about each client in real time.
If you have a network that you want to monitor persistently, it's a good idea to note the channel number. Since Kismet is exploring all channels by hopping through them, you will miss all transmissions on one channel while Kismet is scanning another. This packet fragmentation can cause you to lose data, so once you identify the network you wish to watch, you should switch from "scanning" to persistently monitoring one channel. This will allow you to capture all activity on the channel.
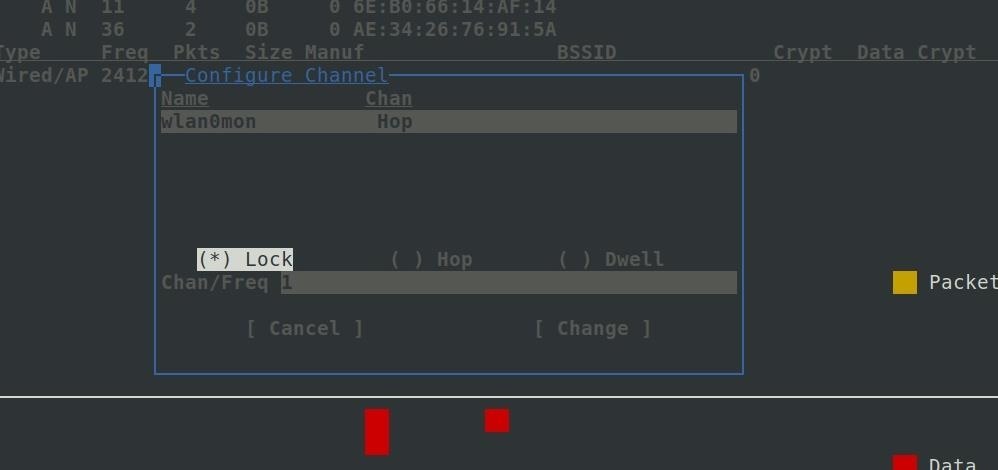
To do this, click on "Kismet" in the top-left corner, and then click on "Config Channel."
In the configuration window, select "Lock," and then enter the number of the channel you want to monitor.
Watch for Patterns & Explore Around You
Human behavior will have an effect on the wireless signals around you, and Kismet can let you watch these normally imperceivable changes in the wireless environment. It doesn't matter that these networks are encrypted because the relationships between them and plaintext portions of packets are more than enough. By watching the type of traffic flowing across networks, we can take a step beyond simply seeing what is around us and instead begin to learn how these networks are used and by whom.
In particular, Kismet has an "Alerts" section in the menu under "Windows" that will warn you of any suspicious wireless behavior. This can detect things like networks switching channels, deauth packets, networks spoofing other networks, and APs that are rapidly switching names. Our writers accidentally turned on a Hak5 Wi-Fi Pineapple while monitoring with Kismet and nearly had a panic attack when a torrent of incredibly serious sounding alert messages started cascading down our screen detecting what was obviously targeted Wi-Fi hacking.
Hiding Your Activity from Cheap & Easy Wireless Surveillance
Earlier, I mentioned that Wi-Fi can be detected nearly a mile away using a directional Wi-Fi antenna. These signals are so strong that they are a backup for GPS navigation for the military via NAVSOP (Navigation via Signals of Opportunity). If the military can fly planes by the light of your Wi-Fi network, maybe it's time to consider if you need it turned to the very highest setting, which it almost definitely is right now, in order to just get Wi-Fi in your house or business.
Most people have logged into their router exactly once and never change any of the settings beyond the required ones. While the instructions are different for each brand of router, nearly every brand will have a power setting. You can turn this down. Way down. Manufacturers jack it all the way up by default so that you don't complain about the signal strength. If you don't have trouble with your Wi-Fi range, reduce it so it only covers the area you need.
Anything you want kept secret should be hard-wired, plain and simple. If you can't block the signals from going out of your house and being picked up by a sensitive antenna, don't put those signals out in the first place. If you have to, you can use Kismet to test the range of when someone can pick up data from your network.
Hiding Your Devices from the Kismet List
For client devices, including smartphones, turn off the Wi-Fi setting whenever you don't need it. Your Wi-Fi card can be used to track you anywhere, not just at home or work. This is true even while you are not connected to Wi-Fi. Devices that rely on Wi-Fi to function you can't do much about.
Smartphone manufacturers try to randomize the MAC address that your phone advertises while walking around, but this goes out the window as soon as the phone tries to associate with a network it thinks it knows. This is super easy to do to a crowd of people, which means it doesn't stand up to a real attack. Don't believe me? If you change your phone's mobile hotspot to "Google Starbucks," nearly every smartphone nearby will connect to you and reveal it's true MAC address, allowing you to track it.
Trust me, just turn it off when you don't need it.
I hope you enjoyed this quick guide to basic signals intelligence with Kismet! Subscribe to our YouTube and make sure to follow us for more content.
Just updated your iPhone? You'll find new emoji, enhanced security, podcast transcripts, Apple Cash virtual numbers, and other useful features. There are even new additions hidden within Safari. Find out what's new and changed on your iPhone with the iOS 17.4 update.


12 Comments
First of all, thank you for the very interesting article... but does scanning a network via Kismet gives more information than scanning it with airodump-ng ??
Yes, Kismet is much more detailed and the output is more useful. The new version of kismet even has a web GUI that gives a ton of information, plus you can monitor and explore relationships in a more nuanced way. Also, Kismet will alert you to any weird wireless behavior going on
Also easier to use on a smartphone via tunnel. Just can't close connection is all, but it's easy to filter out your hotspot from results afterwards if you're working with the data.
Everything works according to your tutorial until I start it. To get any kind of interface I have to use the localhost web address it gives me, which works nothing like you described. Any suggestions appreciated please... (Parrot Security OS)
You installed the new version of kismet, not the old/stable one
Hi.. I have a question.
I just run Kismet on my Kali Linux, but Kismet doesn't show any clients are connected to every single access point.
But on aircrack I have no problem whatsoever, I can see the client are connected on every access point.
Do U have any suggestions? Sorry for my English, not my primary language.
hello Mr.Kody thanks for the tutorials please make some more tutorial using kali and parrot security too
I will, thank you!
Why did he forget to tell us how to uninstall the pre installed version in Kali Linux or Parrot os first? :(
I found the command with help from google.
kali linux:
sudo apt-get remove kismet
Kismet have been updated since this guide was published. Now kismet UI is run in your browser. When you start kismet as in the guide, the startup text in the console will tell you what to write in the web browser to see the new kismet UI.
After writing "localhost:2501" in my case in the browser, the Ui pops up, now we need to make Kismet use the right Wireless Interface In Monitor mode for Wifi Sniffing.
We do this by going to the top left corner, click the 3 lines icon -> data sources -> click on the wifi inetrface in monitor mode you want to use = success.
Now Kismet should be capturing packets and you can in top left corner pick what band and type of signals you want to see :)
Was working until the cd kismet ./configure
Then mine says No such file or directory
?
Share Your Thoughts