
Gathering information on an online target can be a time-consuming activity, especially if you only need specific pieces of information about a target with a lot of subdomains. We can use a web crawler designed for OSINT called Photon to do the heavy lifting, sifting through URLs on our behalf to retrieve information of value to a hacker.
All of this is used to learn as much as possible about the target without tipping them off that they're being watched. This rules out some of the more obvious methods of scanning and enumeration, requiring some creativity in searching for clues.
Knowing What to Search For
Photon OSINT scanner fills this niche by providing a flexible, easy-to-use command line interface for crawling through target webpages. Rather than just looking for vulnerabilities, Photon quickly parses what's out there and displays it to the hacker in a way that's easy to understand.
One of the most useful Photon features is the ability to recognize and extract certain kinds of data automatically, like page scripts, email addresses, and important passwords or API keys that may be exposed by accident.
Aside from looking at current webpages, Photon also allows you to look into the past. You can use preserved previous states of webpages documented on the Wayback Machine as a "seed" for your search, scraping all the URLs off of the now-defunct website as a source for further crawling. While using Photon effectively takes some patience and understanding of the many available filters, it doesn't take much to get started pulling in clues about your target
What You'll Need
Photon is a popular tool because it's cross-platform, meaning it will work on any system with Python installed. I find that it crashes running Python2, so I recommend running it with the python3 command before it, despite what the GitHub instructions say.
To check if your system has Python installed, you can open a terminal window and type python3. If you don't have it installed, you can install it with apt-install python3. If your output looks like below, you're ready to go.
python3Python 3.6.8 (default, Jan 3 2019, 03:42:36)
[GCC 8.2.0] on linux
Type "help", "copyright", "credits" or "license" for more information.
>>>Type quit() to exit the Python shell, and we'll get started installing what we need to run Photon.
Step 1: Download & Install Photon
To get started with Photon, make sure you have Python3 installed. When you do, we'll also need to install some dependencies. In a terminal window, run the following command to download and install the necessary libraries.
pip install tld requestsWhen this is complete, you can download Photon and navigate to its directory with the following commands. Don't skip the cd line.
git clone https://github.com/s0md3v/Photon.git
cd Photon
Step 2: View Photo's Options
Now, we can run python3 photon.py -h to see the list of options we can use to scan.
python3 photon.py -h.
____ __ __
/ __ \/ /_ ____ / /_____ ____
/ /_/ / __ \/ __ \/ __/ __ \/ __ \
/ ____/ / / / /_/ / /_/ /_/ / / / /
/_/ /_/ /_/\____/\__/\____/_/ /_/ v1.2.1
usage: photon.py [-h] [-u ROOT] [-c COOK] [-r REGEX] [-e EXPORT] [-o OUTPUT]
[-l LEVEL] [-t THREADS] [-d DELAY] [-v]
[-s SEEDS [SEEDS ...]] [--stdout STD]
[--user-agent USER_AGENT] [--exclude EXCLUDE]
[--timeout TIMEOUT] [--clone] [--headers] [--dns] [--ninja]
[--keys] [--update] [--only-urls] [--wayback]
optional arguments:
-h, --help show this help message and exit
-u ROOT, --url ROOT root url
-c COOK, --cookie COOK
cookie
-r REGEX, --regex REGEX
regex pattern
-e EXPORT, --export EXPORT
export format
-o OUTPUT, --output OUTPUT
output directory
-l LEVEL, --level LEVEL
levels to crawl
-t THREADS, --threads THREADS
number of threads
-d DELAY, --delay DELAY
delay between requests
-v, --verbose verbose output
-s SEEDS [SEEDS ...], --seeds SEEDS [SEEDS ...]
additional seed URLs
--stdout STD send variables to stdout
--user-agent USER_AGENT
custom user agent(s)
--exclude EXCLUDE exclude URLs matching this regex
--timeout TIMEOUT http request timeout
--clone clone the website locally
--headers add headers
--dns enumerate subdomains and DNS data
--ninja ninja mode
--keys find secret keys
--update update photon
--only-urls only extract URLs
--wayback fetch URLs from archive.org as seedsTo run the most basic scan, the formula is python3 photon.py -u target.com.
Step 3: Map DNS Information
One of the most useful and interesting features of Photon is the ability to generate a visual DNS map of everything connected to the domain. This gives you huge insight into what kind of software is running on the computers behind the targeted domain.
To do this, we'll run a scan with the --dns flag. To generate a map of priceline.com, you can run the command python3 photon.py -u priceline.com --dns in a terminal window.
python3 photon.py -u https://www.priceline.com/ --dnsURLs retrieved from robots.txt: 111
Level 1: 112 URLs
Progress: 112/112
Level 2: 112 URLs
Progress: 112/112
Crawling 0 JavaScript files
--------------------------------------------------
Robots: 111
Internal: 112
--------------------------------------------------
Total requests made: 0
Total time taken: 0 minutes 26 seconds
Requests per second: 0
Enumerating subdomains
79 subdomains found
Generating DNS map
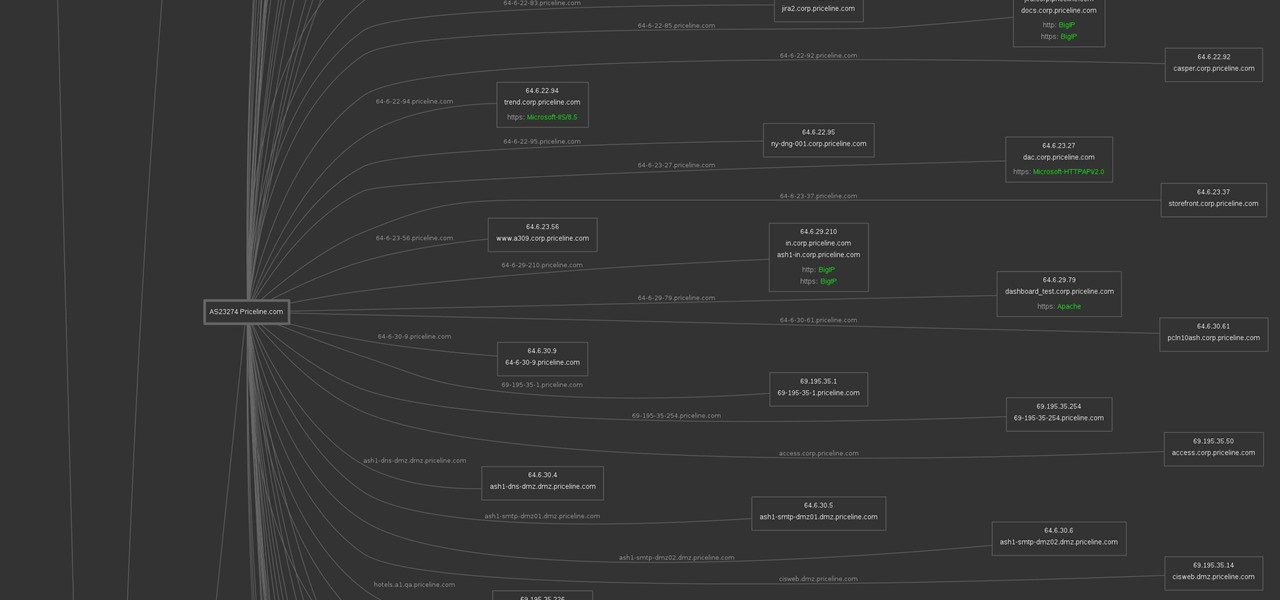
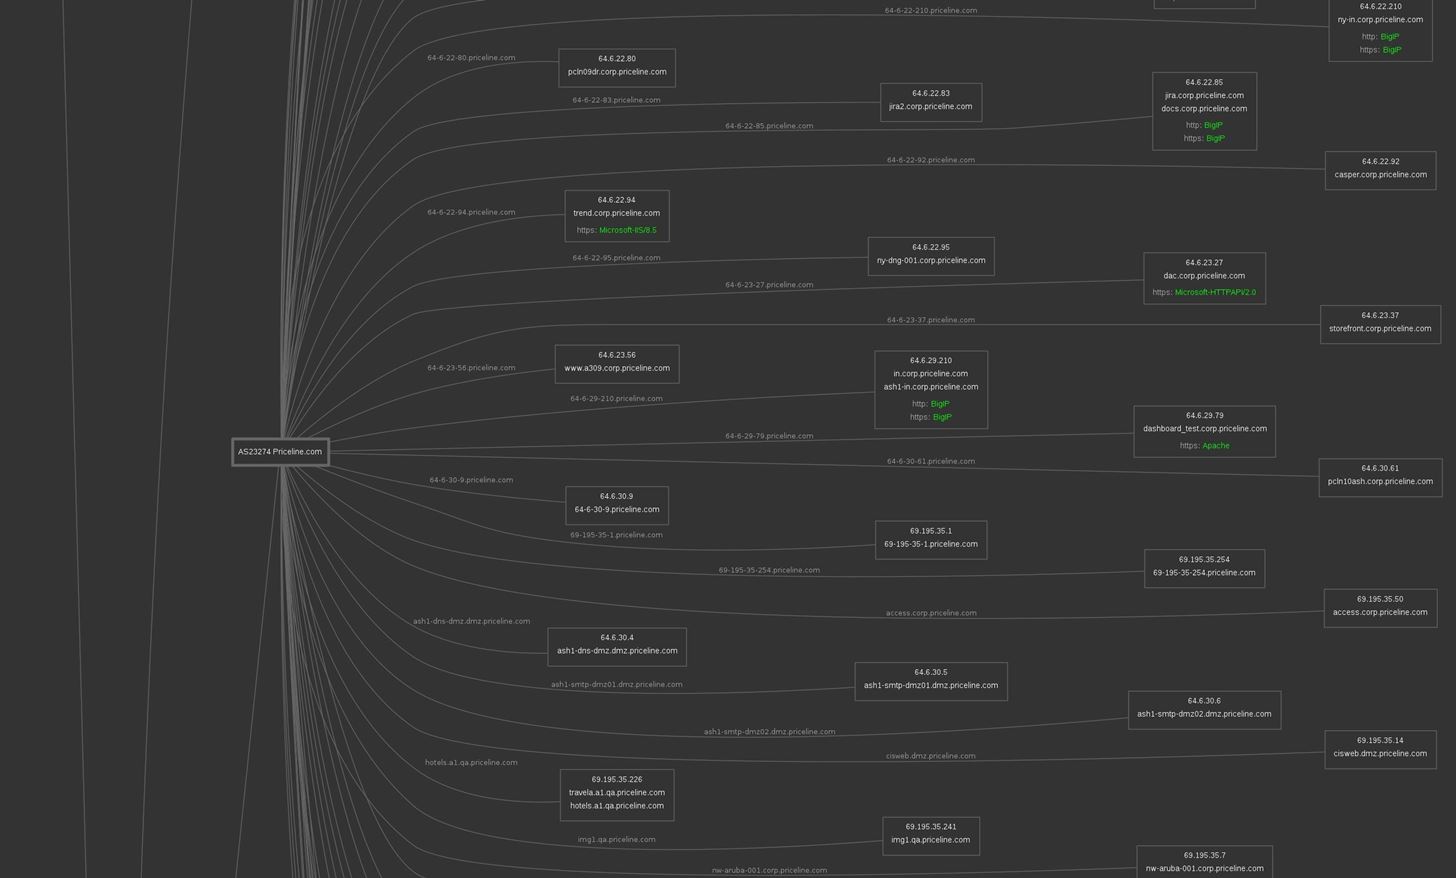
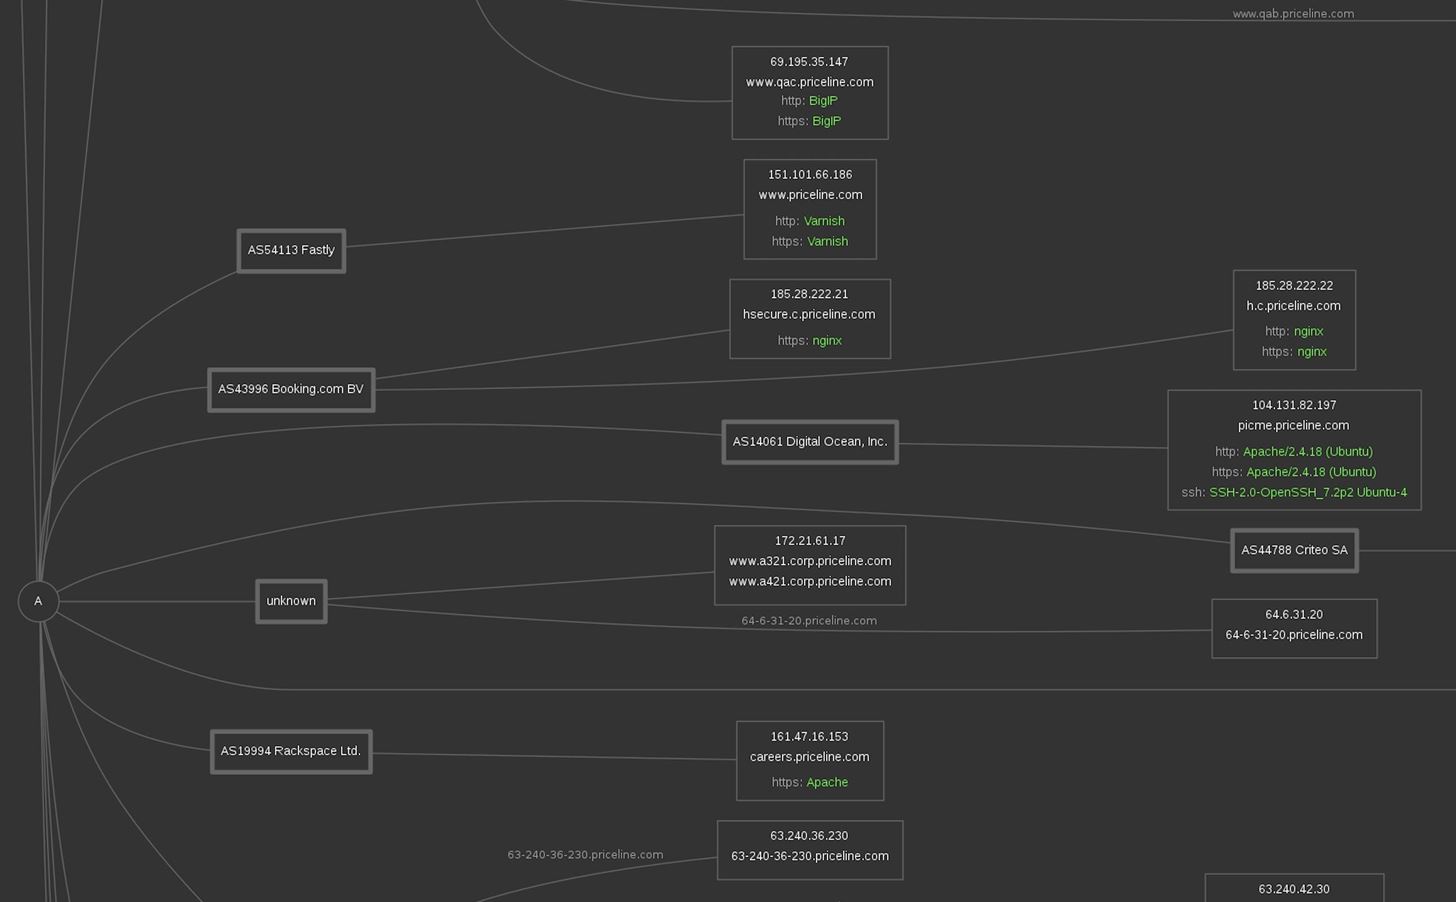
Results saved in www.priceline.com directoryThe resulting subdomain map is huge! It's much too large to fit here, so we'll look at a few segments. We can see servers and IP addresses associated with the Priceline service. Here is a pulled out view:
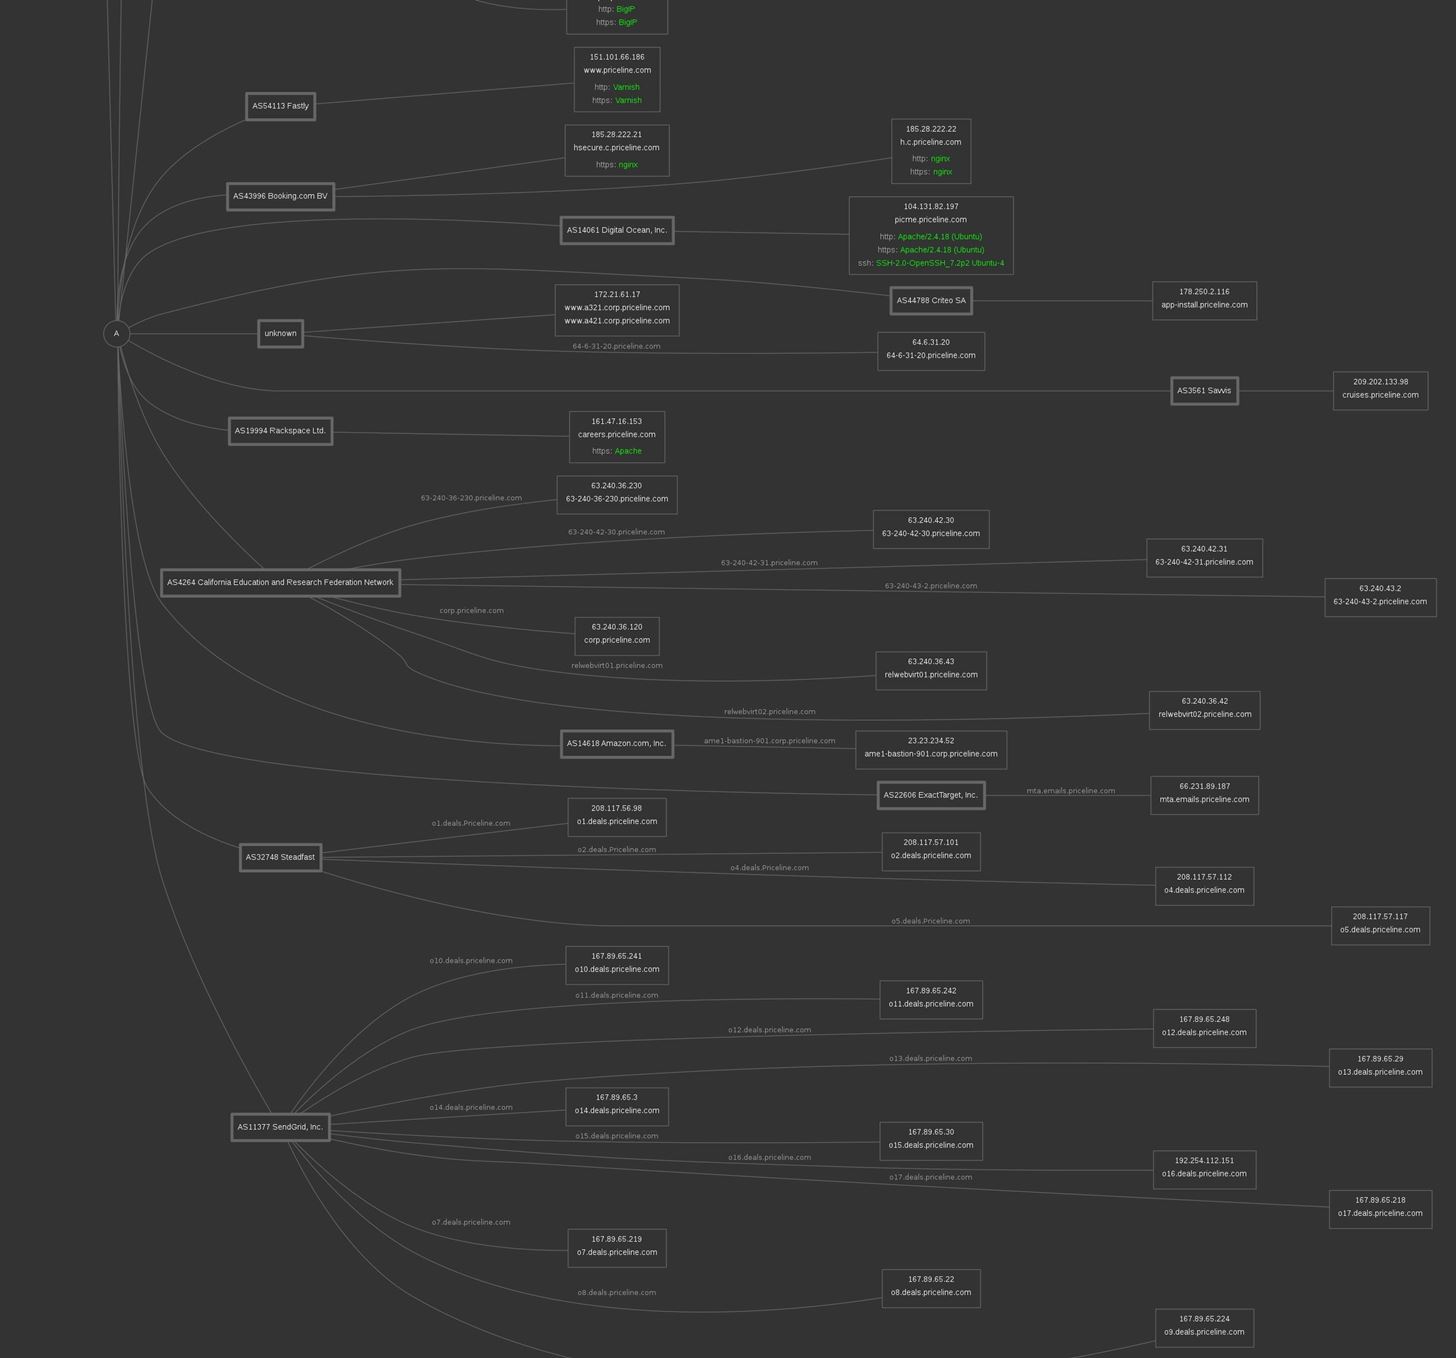
Further down, we can see third-party integrations and other infrastructure connected to Priceline's services. This also gives us information about the mail servers they use and potentially any poorly secured third-party services we could take advantage of to gain access. Again, this is a pulled out view:
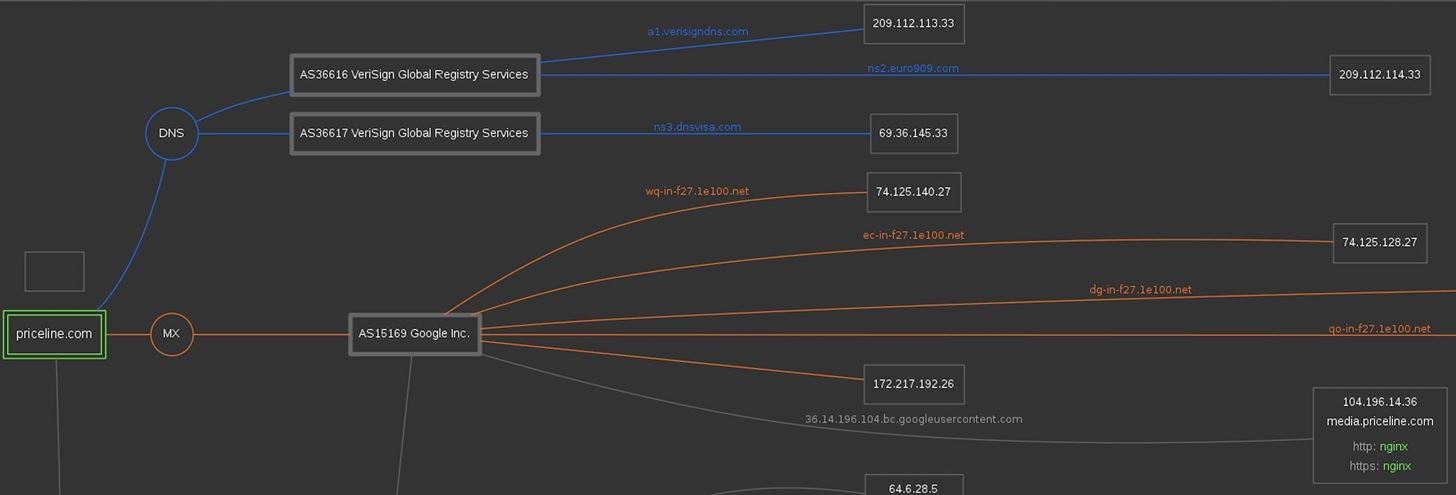
Let's zoom in and look at the MX record, responsible for email service. Clearly, it uses Google services and VeriSign.
Further down, we can zoom in and start to see Varnish, BigIP, and nginx servers detected. Connected to a Digital Ocean account, we see an Ubuntu server running a specific version of openSSH. Hope that's not vulnerable.
Looking closer at Priceline's core services, we see Microsoft, Apache, and Big IP systems. In some cases, we can see the specific versions of the services that these IP addresses are hosting.
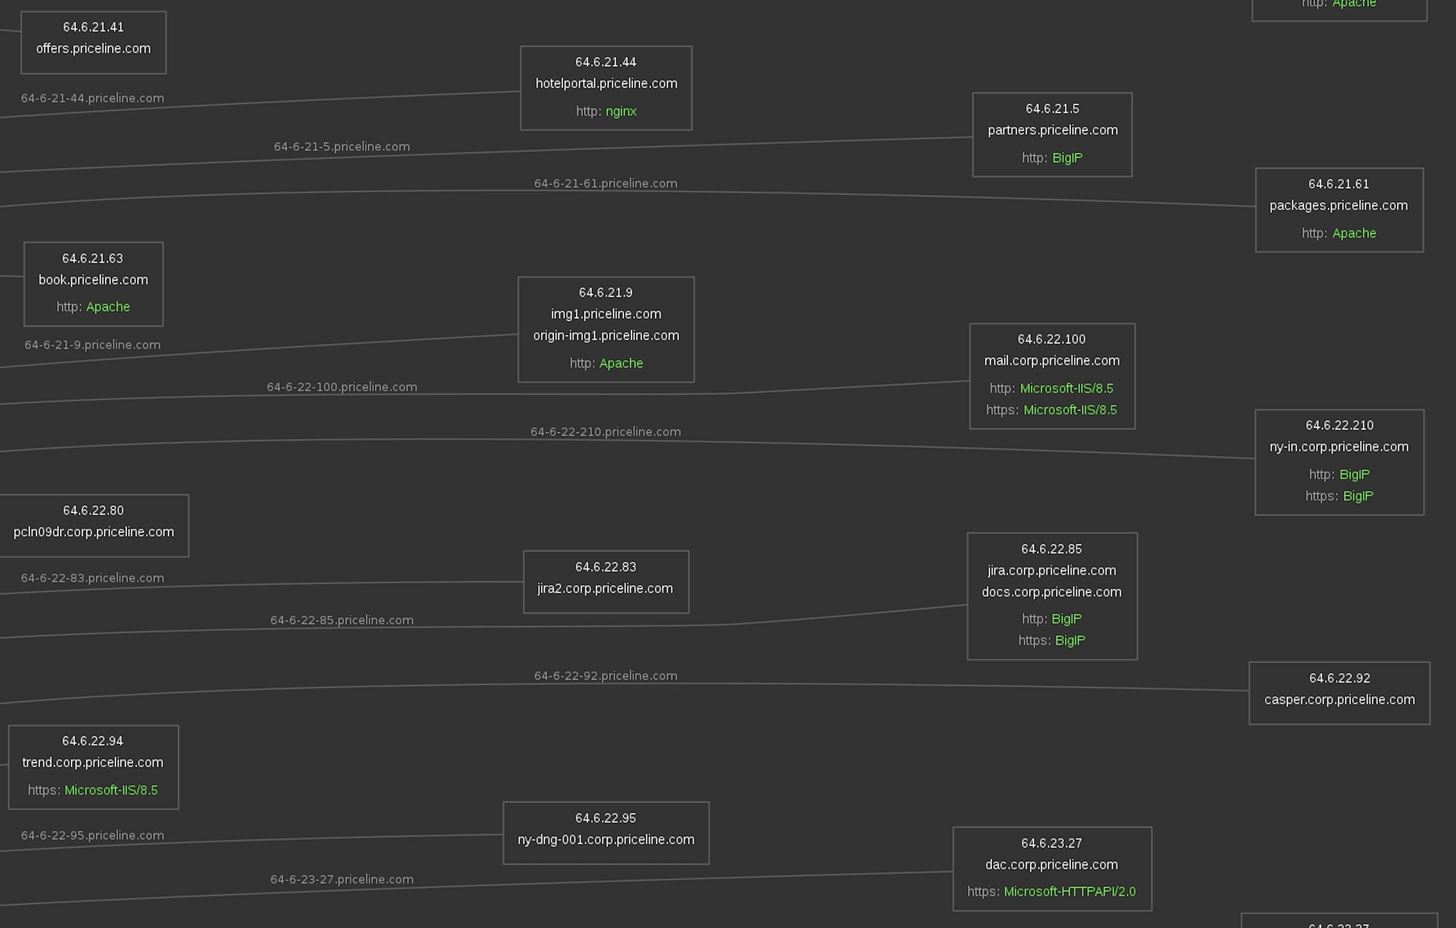
All of this is a goldmine for hackers looking for the most vulnerable system connected to the target.
Step 4: Extract Secret Keys & Intel
Next, let's try to grab some email addresses and keys from a website. We'll use the example of PBS.org.
- Don't Miss: How to Use SpiderFoot for OSINT Gathering
To run the search, we'll add a few other flags to increase the depth and speed of the search. In a terminal window, we can run python3 photon.py -u pbs.org --keys -t 10 -l 3to specify we want to go three levels deep of URLs and we want to open ten threads to do the crawling. The results come back in a file called "intel," of which the first looks like this:
python3 photon.py -u https://www.pbs.org/ --keys -t 10 -l 3b'delaney@delaneyantiqueclocks.com\nshcurry@pbs.org\nandrew@brunkauctions.com\nnansollo@gmail.com\nfrontlinemedia@pbs.org\ninfo@weissauctions.com\nledyer256@aol.com\nstock_sales@wgbh.org\nian.ehling@bonhams.com\nnanchisholm@gmail.com\nCollegeBehindBarsDKC@dkcnews.com\nAppIcon57x57@2x.png\nagm6@advanceguardmilitaria.com\ntravis@bruneauandco.com\nfrontline@pbs.orgWe've captured some email addresses! We were casting a pretty wide net for this search, so there may be many unrelated emails on our list. This is because we scraped three levels of URLs deep and likely scraped some unrelated websites.
While we didn't find any keys on this scan, the flag we set will cause Photon to search for strings likely to API keys or other important details that may have been unintentionally made public on the target's website.
Step 5: Make Requests with a Third Party Using Ninja Mode
Let's say we work from a sensitive IP address like a police station, government office, or even just your home that you don't want the target knowing is visiting their website. You can put distance between yourself and the target by using the --ninja flag, which will send your requests to a third-party website, make the request for you, and pass along the response.
The result is slower but eliminates the risk of the target recognizing the IP address of the organization you work for. Because you have less control over these requests, keep in mind they can take a lot longer to complete.
To run a lighter version of the previous scan in "ninja" mode, we could run the command python3 photon.py -u pbs.com --keys -t 10 -l 1 --ninja in a terminal window.
python3 photon.py -u https://www.pbs.com/ --keys -t 10 -l 1 --ninjaPhoton Makes Scanning Through URLs Lightning-Fast
When it comes to crawling through hundreds of URLs for information, it's very rare you'd want to do it yourself. Photon makes it easy to crawl large amounts of subdomains or several targets, allowing you to scale your research during the recon phase. With the intelligent options built in for parsing and searching for kinds of data like email addresses and important API keys, Photon can catch even small mistakes a target makes that reveal a lot of valuable information.
I hope you enjoyed this guide to using Photon OSINT scanner to crawl websites for OSINT data! If you have any questions about this tutorial on web scraping or if you have a comment, there's the comments section below, and feel free to reach me on Twitter @KodyKinzie.
Just updated your iPhone? You'll find new emoji, enhanced security, podcast transcripts, Apple Cash virtual numbers, and other useful features. There are even new additions hidden within Safari. Find out what's new and changed on your iPhone with the iOS 17.4 update.


6 Comments
When I try to run "python3 photon.py -h" it says,
File "photon.py", line 9, in <module>
import requests
ModuleNotFoundError: No module named 'requests'
I am using a mac, and have already run the command "pip install tld requests"
Please help me with this.
its python3 .. so try pip3 install -r requirements.txt in photon directory
Amazing tools.. I had try to install on Ubuntu 19.04 but i hnew somes difficulty that i solved.
1- I hadn't pip program so i installed it
2-I hadn't git program so i installed it also
3- After Photon's install, when i ran program i got error message about tld.
tld folder was locate after install (step 1 of Tutorial) in my ./.local/lib/python2.7/site-packages/tld
I just copy tld folder to the Photon directory and it's OK. Program works and i can do many test targets
But i don't have --ninja mode, why ?
Hello,
I am also getting the same error. I tried with pip3 install -r requirements.txt but still not resolved. I am using Kali Linux.
Thank you!
DNS Mapping ERROR
Loved the tutorial. I am getting this error when trying to map DNS information.
"AttributeError: 'NoneType' object has no attribute 'group'"
I am having the same problem @josh kriss is having. When I try to run it I get
Traceback (most recent call last):
File "photon.py", line 39, in <module>
from core.utils import (luhn,
File "/home/frank/photon/core/utils.py", line 7, in <module>
import tld
ModuleNotFoundError: No module named 'tld'
When I try the pip install tld requests I get
The directory '/home/frank/.cache/pip/http' or its parent directory is not owned by the current user and the cache has been disabled. Please check the permissions and owner of that directory. If executing pip with sudo, you may want sudo's -H flag.
When I look at line 7 for the utils.py it simply says "import tld". I do have Python 3.6.9, however when I look at /usr/bin I have
lrwxrwxrwx 1 root root 9 Apr 16 2018 python -> python2.7
I am not sure how to fix this
Share Your Thoughts