
The USB Rubber Ducky is a famous attack tool that looks like a USB flash drive but acts like a keyboard when plugged into any unlocked device. The Ducky Script language used to control it is simple and powerful, and it works with Arduino and can run on boards like the ultra-cheap Digispark board.
If you don't care about some of the fancier features of the USB Rubber Ducky, like the ability to change the firmware and its regular thumb drive look, the Digispark is a great way to get started writing your own payloads. Whether you have experience with Arduino or writing Ducky Scripts, it's easy to build your payloads to do whatever you want to a target computer when it's plugged into an open USB port.
Digispark vs. USB Rubber Ducky
While the $50 USB Rubber Ducky changed the way hackers thought about USB drives, the basic concept is a relatively simple one. By acting as an interface device and typing in commands very quickly, we can take advantage of the fact that the computer will trust input from a "keyboard." Because of this, we can type in a bunch of trusted commands quickly, making a few seconds of physical access all we need to backdoor most computers.
The USB Rubber Ducky has another feature that can't be underestimated: stealth. Looking like a regular USB thumb drive, it's capable of blending in, making it the perfect device for when your tools can't be noticeable. One huge and unmistakable difference between the Ducky and cheaper alternatives is the fact that, when put in the right place, a target will probably plug the USB Rubber Ducky into their computer. The same can not be said of cheaper solutions, and the Digispark board is no exception.
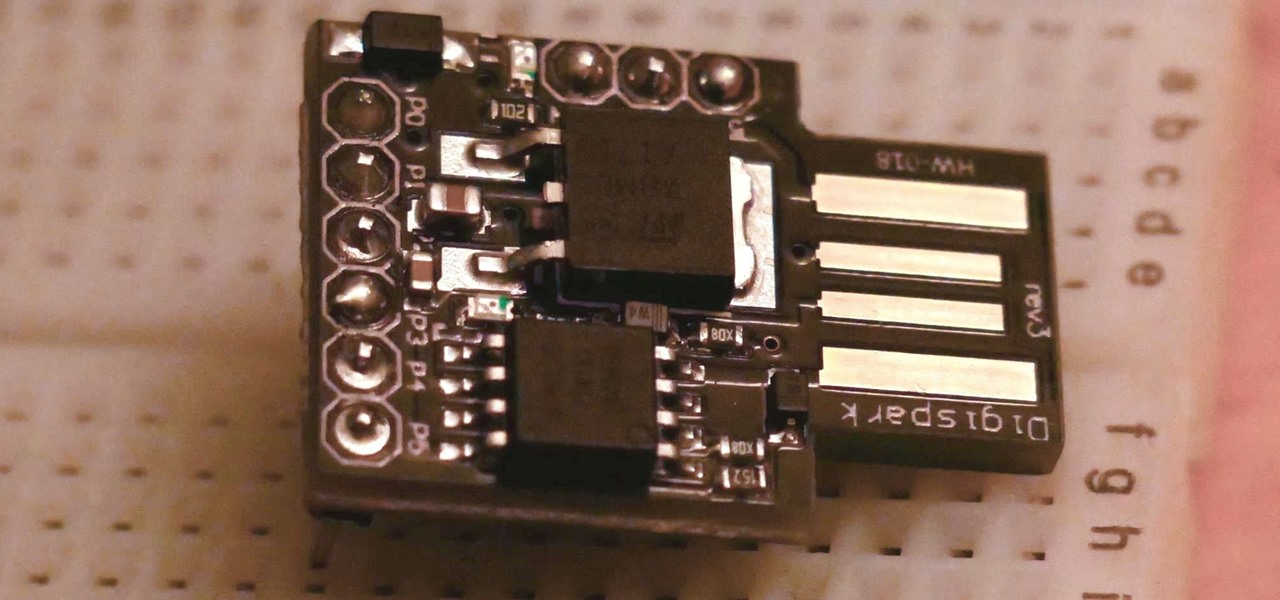
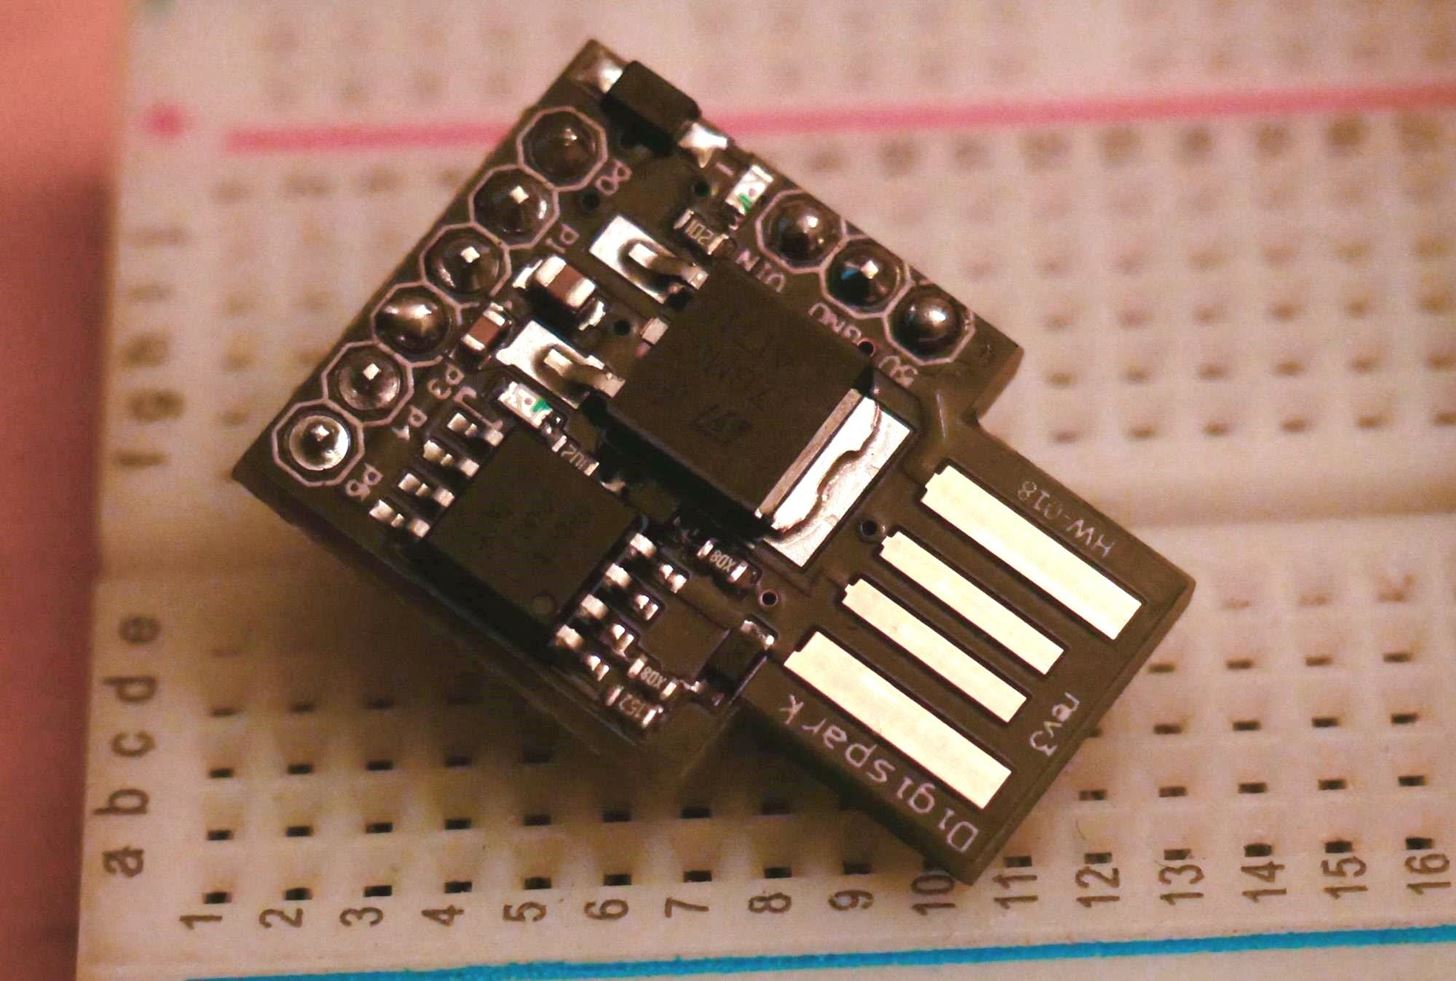
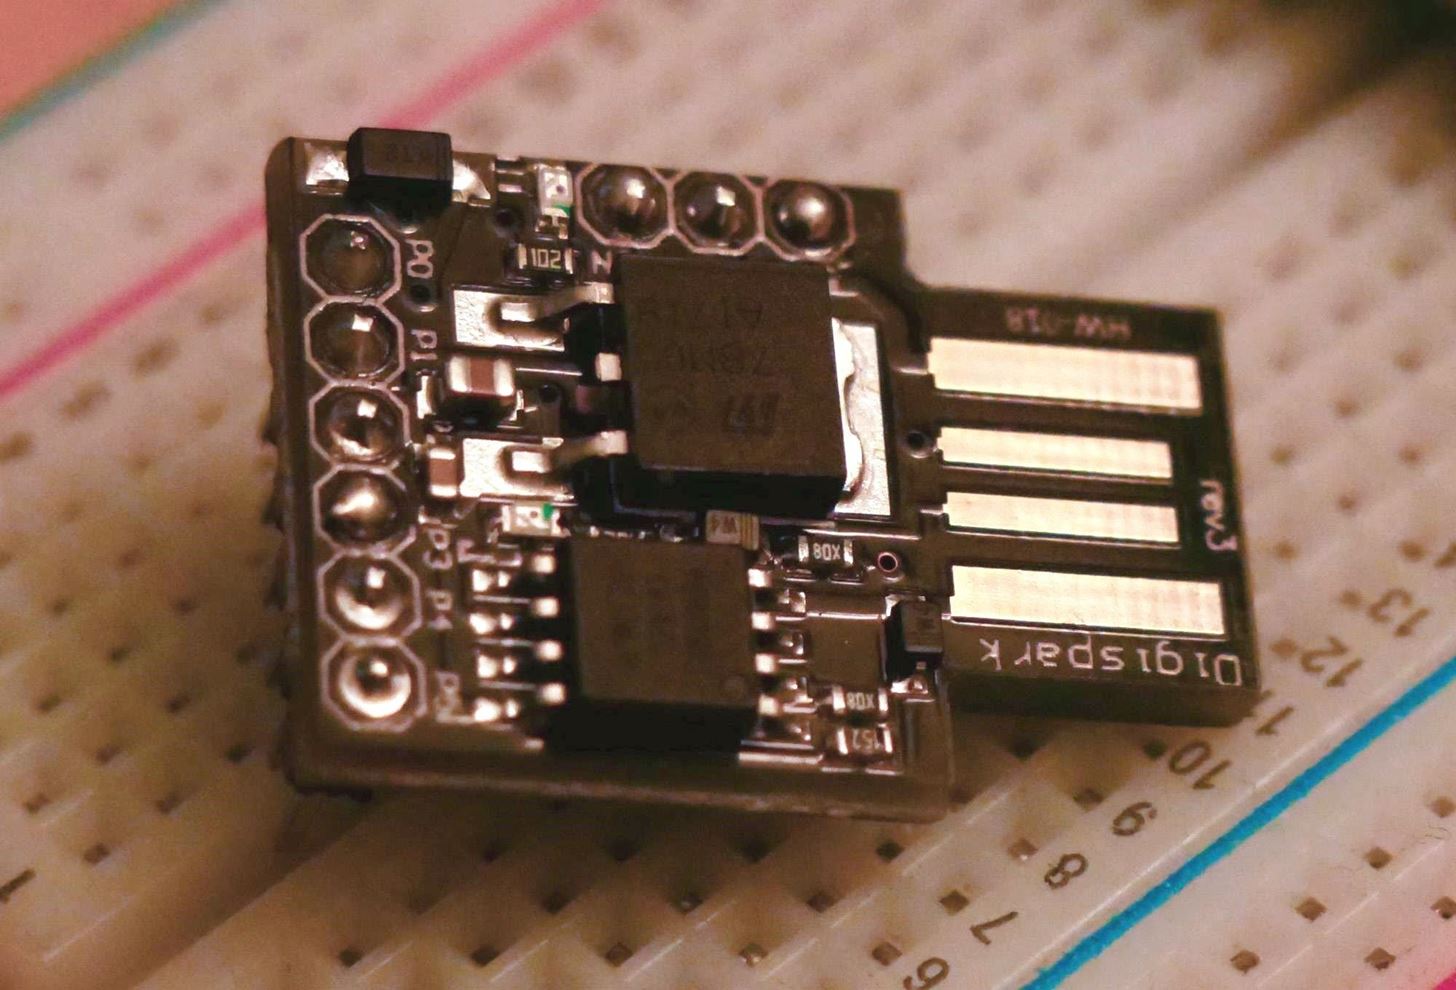
The Digispark is an ATtiny 85-based microcontroller development board, programmable in Arduino. One drawback is that unlike a regular Arduino, it has to emulate a lot of things that are usually taken care of with a dedicated hardware chip with software instead. This stresses the board to the limit but allows us to do some pretty incredible things with a tiny package. One result of that stress is that we have to program it differently, resulting in a five-second delay when we first plug it in.
The delay allows the bootloader to load new code onto the Digispark, but can also mess with the timing of the Ducky Script. Another drawback is how suspicious the Digispark looks. There is almost zero chance that someone would ever plug the Digispark into their computer without being reassured many times it was fine to do so. The device looks very sketchy compared to the sleek mimicry of a USB flash stick that the Rubber Ducky pulls off.
Hacking with Arduino
One thing to get used to when hacking with the Digispark versus the USB Rubber Ducky is that some of the community-developed features of the Rubber Ducky are not present. We're not using an SD card to store the payload, so we can't write to an SD card using special firmware like the USB Rubber Ducky can. In fact, none of the community firmware available for the USB Rubber Ducky is currently available for the Digispark, meaning if you wanted to run the "Twin Duck" firmware, you'd be out of luck on the Digispark.
Where the Digispark does shine is a simple human interface device attack, in which we take advantage of a target being gone for a short amount of time to inject a lot of code. This can be anything from a simple Netcat backdoor to a ransomware payload — that's where many USB Rubber Ducky scripts can be converted and used as a basis to build other payloads from.
To make this work, we can use the Arduino library to write payloads in Ardunio from scratch, or we can use a tool called Duck2Spark to convert the commands from pre-existing Rubber Ducky payloads. Either way, it's become simple to write payloads for cheap devices that use the same principles as the USB Rubber Ducky, if you don't mind the lack of firmware options and the immediately suspicious appearance.
What You'll Need
To follow along, you'll only need a Digispark board, which can be bought online for $2 to $4 each on Amazon or Walmart. AliExpress has even cheaper ones. As of this writing, Digistump, Digispark's official store, is sold out and won't have any ready until early-2020 sometime.
- Amazon: 3-piece Digispark pack for $9.19
- Amazon: 5-piece Digispark pack for $10.99
- Amazon: 5-piece Digispark pack for $11.99
- Walmart: 3-piece Digispark pack for $9.91
- Walmart: 3-piece Digispark pack for $10.65
- Walmart: 3-piece Digispark pack for $9.09
- Walmart: 3-piece Digispark pack for $13.99
Connecting to the Digispark can be a little different depending on which operating system you're using. For more details and troubleshooting, you can check out the Digispark Wiki documentation.
Step 1: Set Up Arduino IDE
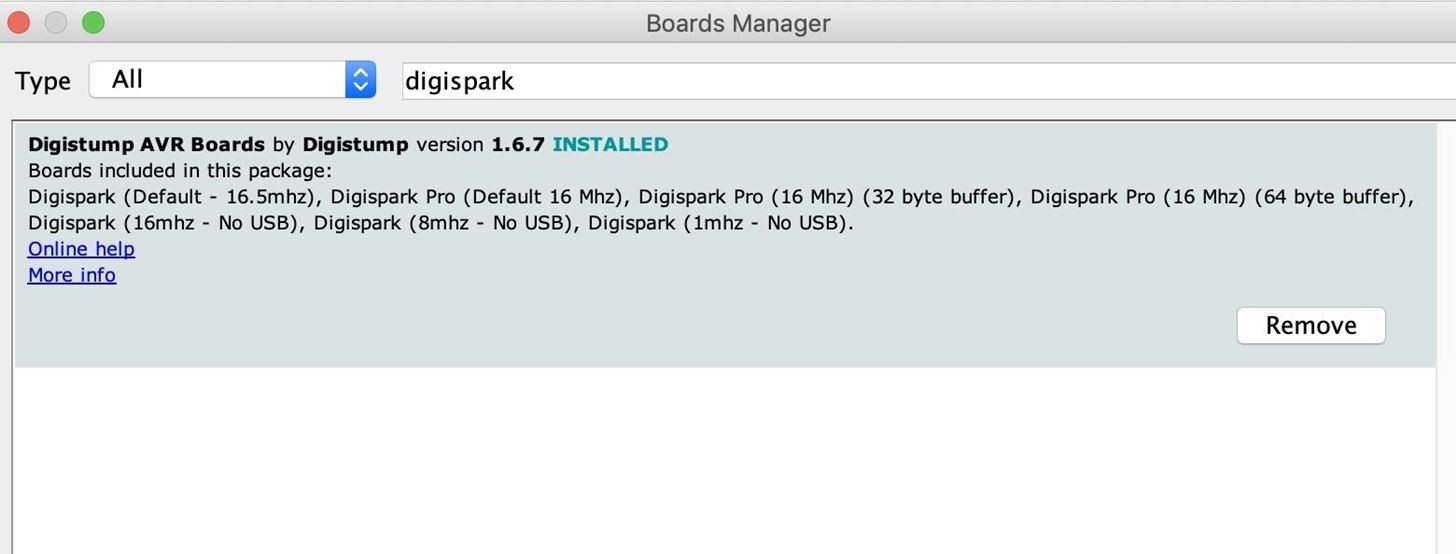
Before we can write code for the Digispark board, we'll need to set up Arduino IDE to work with the board. To do so, copy the following URL and paste it into the Additional Boards Manager URLs field of the "Preferences" menu.
http://digistump.com/package_digistump_index.jsonIf you need more space, you can click the button next to this field to open a window to add more URLs.
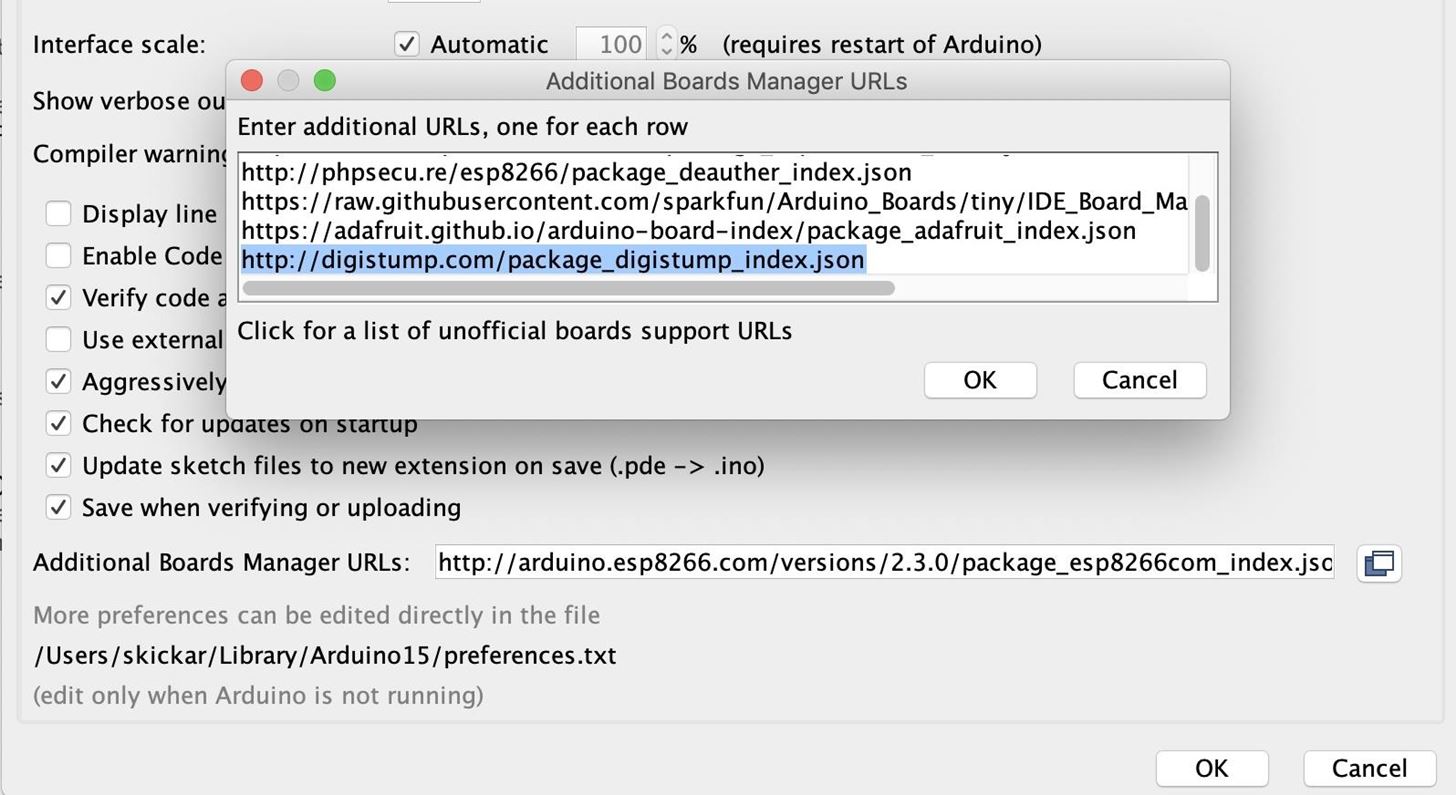
Once it is added, we can select the board and write programs for it. Under the "Tools" menu, go to "Board" then "Boards Manager" and search for "digispark" to locate the Digistump AVR Boards package. Click "Install," and the board and example libraries will be added to your Arduino installation.
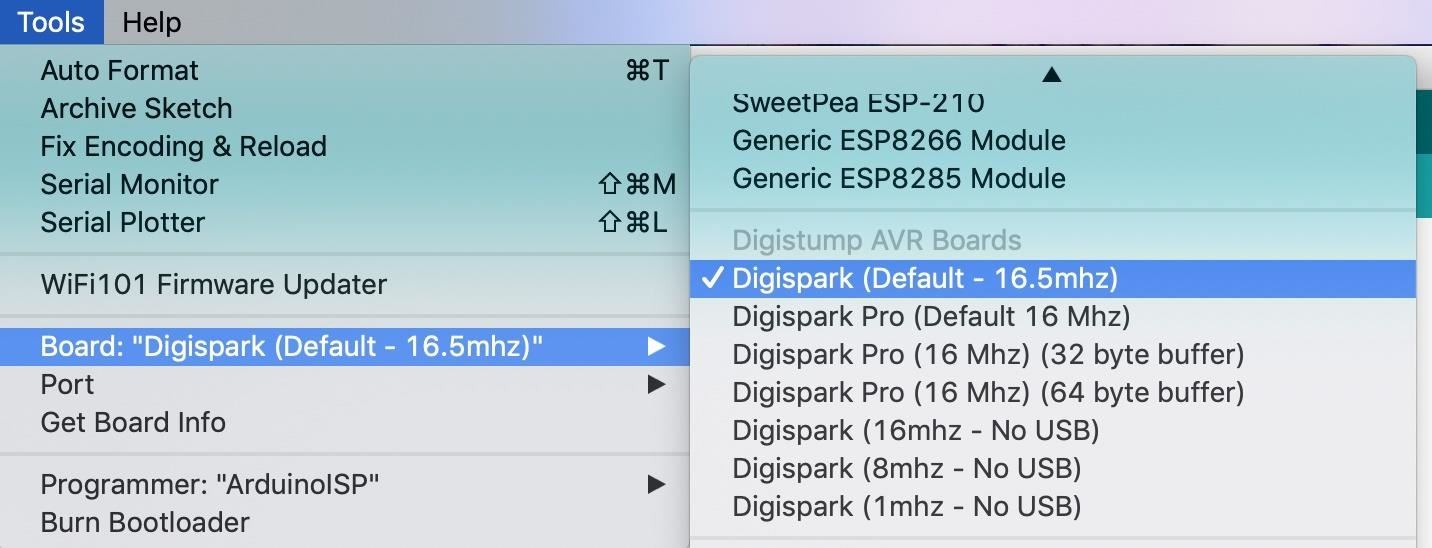
Now, you can select the Digispark by selecting it from the "Boards" drop-down menu. Select the first option, Digispark (Default – 16 MHz), as the board we are working with.
Once complete, we should be able to write to the Digispark board. It works a little different than a regular Arduino, and I'll go over that in the next step.
Step 2: Open & Upload the Basic Digispark Script
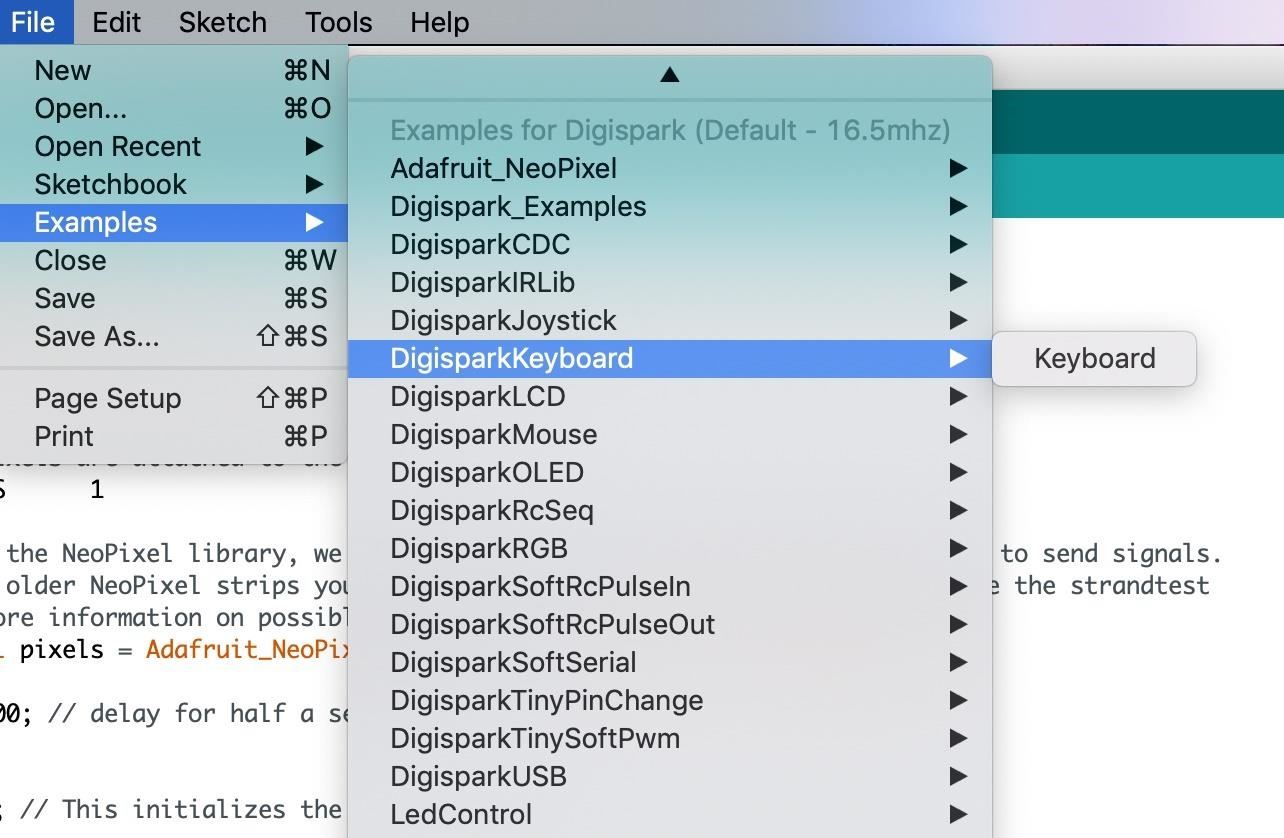
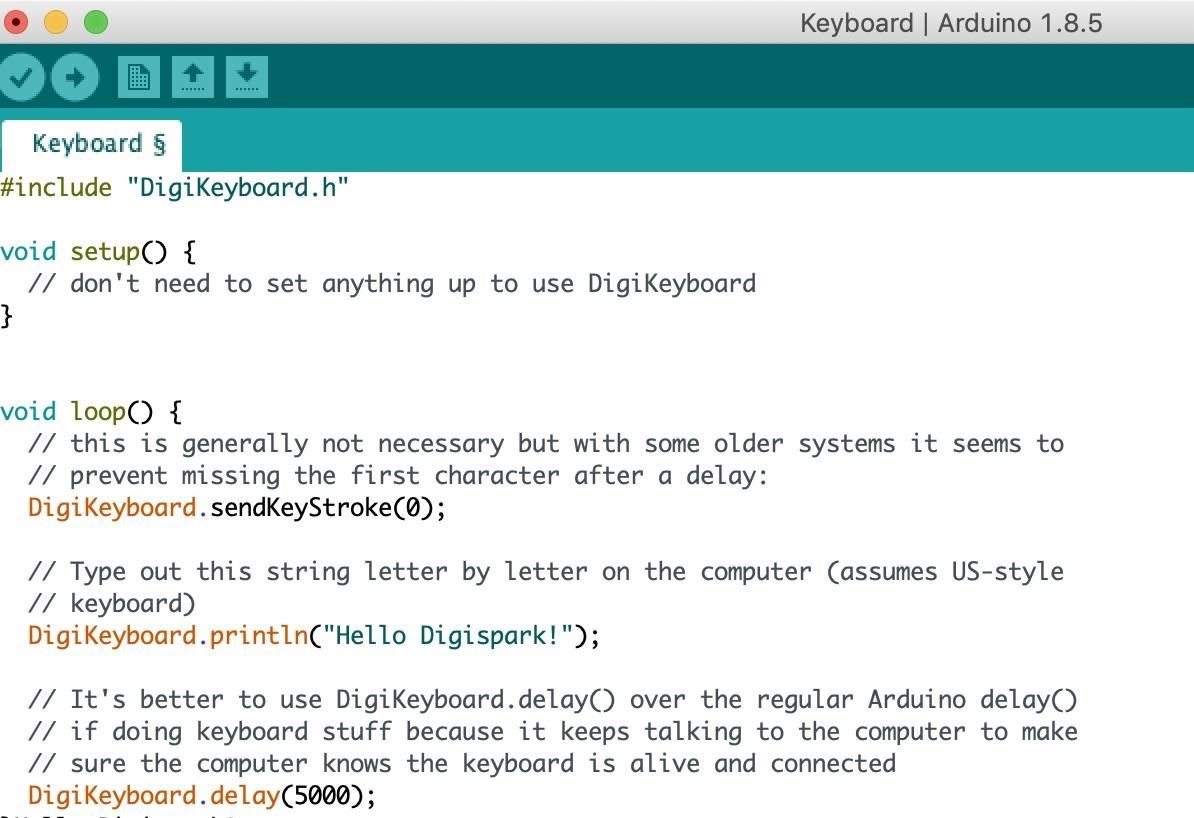
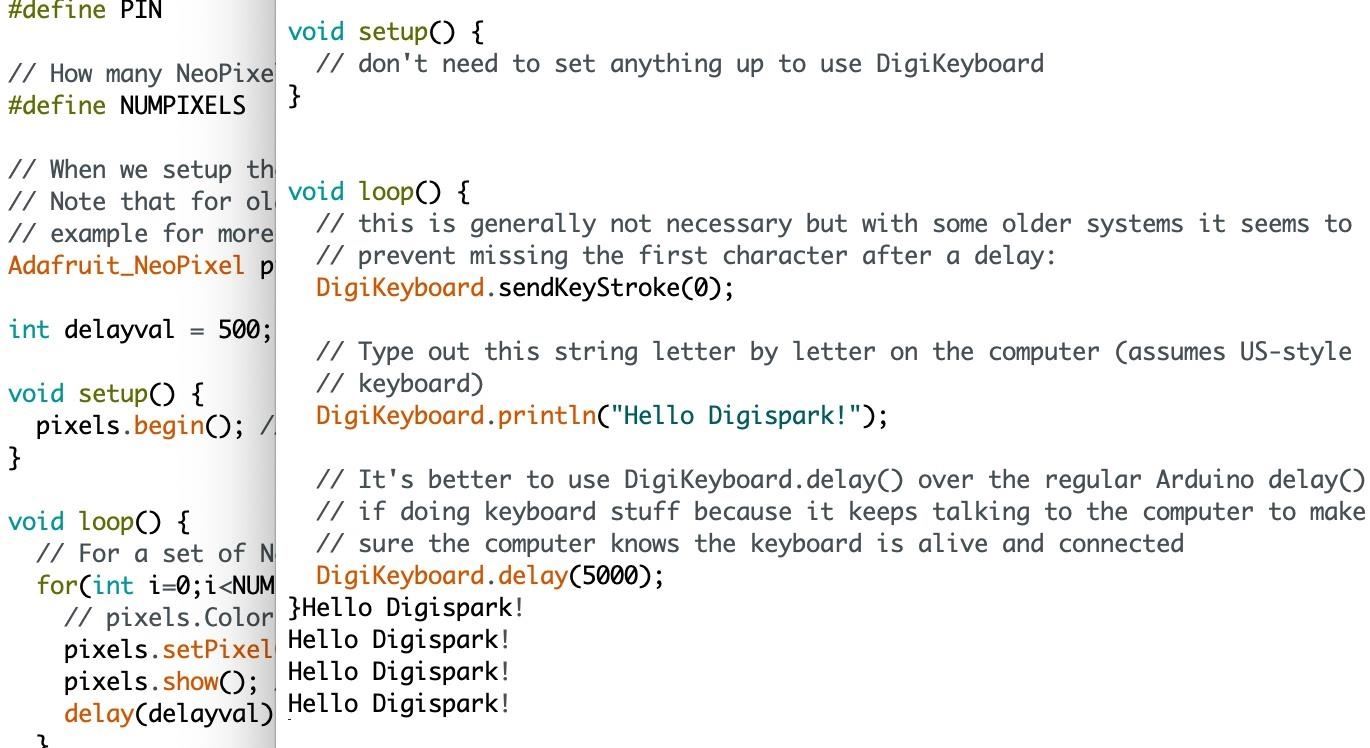
First, we're going to select a default example from the board packages we just downloaded. Go to the "File" drop-down menu, choose "Examples," then "DigiSparkKeyboard," and open the "Keyboard" example.
Open this example and take a look at the code. As you can see, it's very simple. The DigiKeyboard allows us to write commands very easily. In the default code, we'll be telling the Digispark to type "Hello Digispark!" over and over, with a five-second delay each time.
To upload this, you need to know how the Digispark works. Because it's missing a bunch of hardware parts that handle USB communication and would make it more expensive, it emulates the same features with software.
That means it's limited on resources, so it only listens for the first five seconds after it boots for an upload. To upload a program to it, we first need to press the upload button (the green arrow on the top left) in Arduino IDE and then plug the Digispark into our computer within 60 seconds.
If everything works, you should begin seeing "Hello Digispark!" appear on your screen as the Digispark types it in over and over.
Success! We can type out payloads. Now, let's try loading a Ducky Script payload.
Step 3: Convert or Write Your Own Payload
The language the Digispark uses to send keyboard presses is pretty simple and easy to understand. If you'd like to take an existing Ducky Script payload and translate it for the Digispark, you can use tools like Duck2Spark to do the work for you.
We'll be trying out a pre-made script today, which we'll be downloading from CedArctic's GitHub repo. To download the payloads, open a new terminal window and clone the repo.
~$ git clone https://github.com/CedArctic/DigiSpark-Scripts.git

Cloning into 'DigiSpark-Scripts'...
remote: Enumerating objects: 15, done.
remote: Counting objects: 100% (15/15), done.
remote: Compressing objects: 100% (13/13), done.
remote: Total 195 (delta 3), reused 6 (delta 1), pack-reused 180
Receiving objects: 100% (195/195), 46.42 KiB | 1.08 MiB/s, done.
Resolving deltas: 100% (89/89), done.
Then, change into the DigiSpark-Scripts directory and list its contents. You should see the following scripts arranged into folders.
~$ cd DigiSpark-Scripts
~/DigiSpark-Scripts$ ls

 _config.yml                 LICENSE           Wallpaper_Changer
 CONTRIBUTING.md             Rapid_Shell       Wallpaper_Prank
 Create_Account              README.md         WiFi_Profile_Grabber
'DNS Poisoner'               Reverse_Shell     WiFi_Profile_Mailer
 Execute_Powershell_Script   RickRoll_Update   Window_Jammer
 Fork_Bomb                   Talker
Let's do the Rickroll one. To navigate to that folder, type cd Rickroll_Update then open RickRoll_Update.ino to open the script. You should see a window open that looks like the following.
~/DigiSpark-Scripts$ cd RickRoll_Update
~/DigiSpark-Scripts/RickRoll_Update$ open RickRoll_Update.ino
If the open command didn't work for you, just open the Arduino IDE, hit "File," then "Open," and find the "RickRoll_Update.ino" file to open it directly.
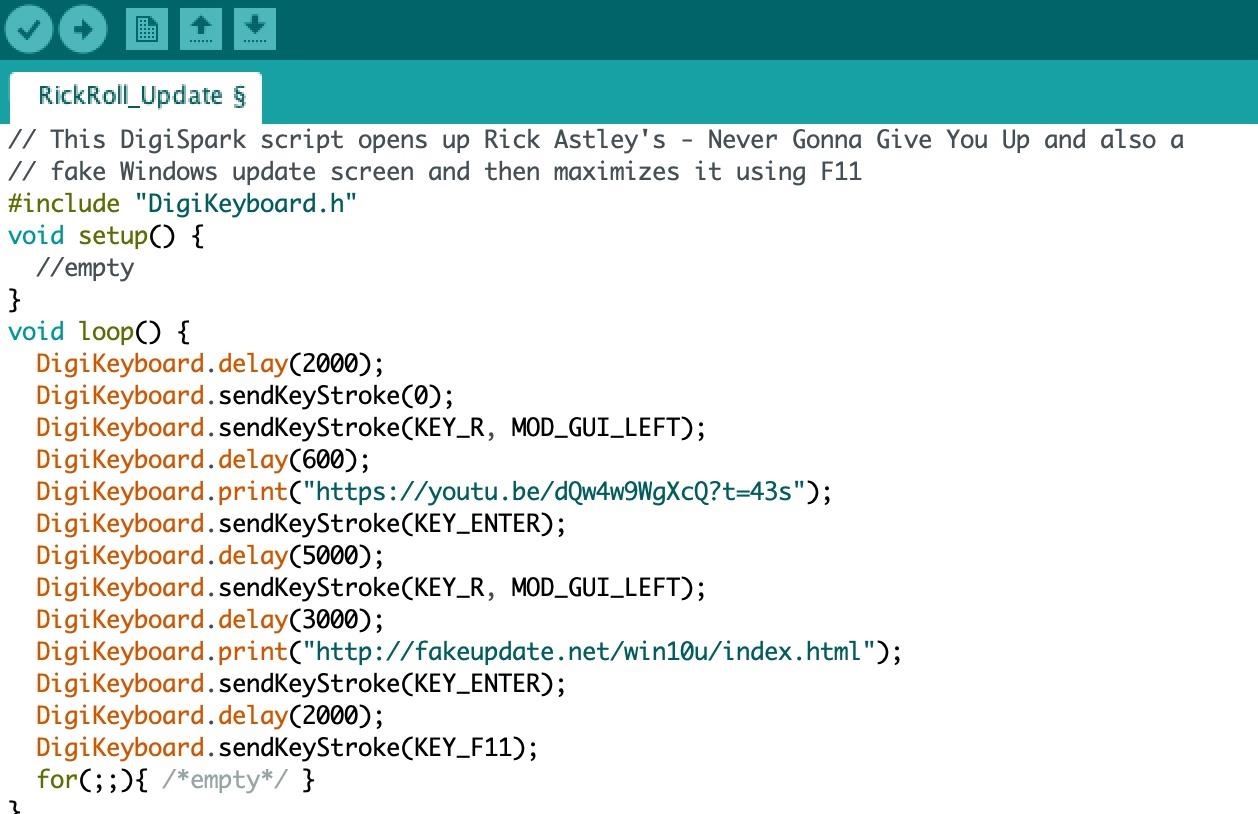
As you can see, the script is programmed to navigate to the best video on YouTube, then fullscreen a fake update page to trick the user into thinking their computer is stuck updating.
//This DigiSpark script opens up Rick Astley's - Never Gonna Give You Up and also a fake Windows update screen and then maximizes it using F11
#include "DigiKeyboard.h"
void setup() {
  //empty
}
void loop() {
  DigiKeyboard.delay(2000);
  DigiKeyboard.sendKeyStroke(0);
  DigiKeyboard.sendKeyStroke(KEY_R, MOD_GUI_LEFT);
  DigiKeyboard.delay(600);
  DigiKeyboard.print("https://youtu.be/dQw4w9WgXcQ?t=43s");
  DigiKeyboard.sendKeyStroke(KEY_ENTER);
  DigiKeyboard.delay(5000);
  DigiKeyboard.sendKeyStroke(KEY_R, MOD_GUI_LEFT);
  DigiKeyboard.delay(3000);
  DigiKeyboard.print("http://fakeupdate.net/win10u/index.html");
  DigiKeyboard.sendKeyStroke(KEY_ENTER);
  DigiKeyboard.delay(2000);
  DigiKeyboard.sendKeyStroke(KEY_F11);
  for(;;){ /*empty*/ }
}
With this open in Arduino, we'll follow the same procedure and upload the sketch by pressing the "Upload" button (the right-facing arrow) and then plugging in the Digispark. After a second or two, the micronucleus bootloader will erase the old data on the Digispark and upload the new code.
You can plug it in and see the results. After a five-second delay, your payload should execute. You can check out the video above to see what this looks like in action!
The Tiny DigiSpark Can Run DuckyScripts at the Cost of Being Suspicious
No one will ever be socially engineered into plugging a Digispark into their computer thinking it's a regular USB thumb drive. It looks very alarming. That being said, the price is so cheap that you could probably stick some fishing wire on it, walk over and plug it into an open USB port while someone is in the restroom, and then pull it out at the last second as they come back. If it snags, just leave. You're out a few bucks. Don't forget to drop the fishing line, though.
I hope you enjoyed this guide to setting up the Digispark to run DuckyScript payloads! If you have any questions about this tutorial on hacking with Arduino or you have a comment, feel free to reach me below in the comments or on Twitter @KodyKinzie.
Just updated your iPhone? You'll find new emoji, enhanced security, podcast transcripts, Apple Cash virtual numbers, and other useful features. There are even new additions hidden within Safari. Find out what's new and changed on your iPhone with the iOS 17.4 update.


5 Comments
This is interesting and even a better method to get it to run... wait and lurk in the background without drawing attention somewhere. Watch everybody... observing the environment. If someone gets up to use the restroom or whatever... casually walk up to the laptop they forgot to lock and plug it in... walk away. Be a gh0st essentially. ;)
This is not working if the victim uses a keyboard other than US. It will neither work with an Apple keyboard.
Instead of typing https ://youtu.be/dQ … the digispark will type something like httpm++youtu:be+dQ… and the payload won't do anything.
Two things I would like to add to this nice article:
Hi, I need help, im using a 4GB Raspberry Pi 4 running raspberry pi os as my personal computer (i have no alternative) and i'm trying to use the digispark attiny85 i bought a couple of days ago, but i've ran into a couple of issues, first, the digistump "micronucleus" found on the board manager was not available for my os, but i managed to get it anyway replacing the suggested json url on preferences by the one posted on the second comment of this post:
forum.arduino.cc/index.php?topic=461404.0
having done that, i was able to select the digispark board and the micronucleus programmer from the tools dropdown menu, BUT i got a new error:
Arduino: 1.8.12 (Linux), Board: "Digispark (Default - 16.5mhz)"
Sketch uses 2788 bytes (46%) of program storage space. Maximum is 6012 bytes.
Global variables use 124 bytes of dynamic memory.
An error occurred while uploading the sketch
/home/pi/.arduino15/packages/digistump/tools/micronucleus/2.0a4/launcher: 1: /home/pi/.arduino15/packages/digistump/tools/micronucleus/2.0a4/launcher: Syntax error: word unexpected (expecting ")")
Having said all this, i must say i'm actually pretty new to all of this, i got the pi on march this year and have become a total addict to this page and the youtube channel, (i even bought an extra sd card to run kali on, we'll see how that goes) anyway, i would REALLY appreciate it if you could either help me deal with this particular problem, OR, and even better and awesomer, if you could make a dedicated video just like the one on this article, but using the arduino IDE on the pi with no extra computer involved :)
Thanks A LOT for all the hard work you clearly put into your videos and articles, you've helped me so much without even knowing.
Cheers from argentina :)
HI! i HAVE A ISSUE WITH MY DEVICE, THIS RUN PERFECTLY ONCE UPLOAD THE SKETCH AND DO WHAT THIS HAVE TO DO, BUT ONCE I UNPLUG AND PLUG AGAIN, IT SEEM THAT ALL THE SKETCH PRELOAD WERE DELETE IT, DOESN'T DO ANYTHING, THE ONLY WAY IT WORKS IS WHEN RUN AND UPLOAD THE SKETCH BY ARDUINO IDE.
DO YOU HACE ANY IDEA HOW TO FIX THIS?
THANKS IN ADVANCE.
Share Your Thoughts