


If you've ever wanted to track down the source of a Wi-Fi transmission, doing so can be relatively easy with the right equipment.
Using a directional Wi-Fi antenna and Wireshark, we can create a display filter to target any device in range to plot the signal strength on a graph. By sweeping the antenna back and forth, we can easily discover which direction the signal is coming from by looking for spikes in signal strength on the graph.
Uses for Wi-Fi Signal Hunting
If you've ever seen a Wi-Fi network that doesn't belong, you might wonder if there is a way to track down where it's coming from. It could be a suspicious rogue access point that appears at your place of work, a new network with a strong signal that shows up at your home, or a Wi-Fi hotspot from a smartphone that seems unusually close and strong.
Whatever it is, signal hunting can help you locate Wi-Fi client devices, meaning you can use it to track down the location of rogue devices that suddenly appear on your WI-Fi network.
The tracking of radio signals isn't new, but for a beginner looking to localize the source of a Wi-Fi network, the options may at first seem limited. By walking around with a device that can display the signal strength, like a smartphone, it's possible to observe when you get further and closer to a targeted broadcast. However, it can be pretty inaccurate due to the way Wi-Fi bounces off walls and other obstacles.
The problem with that approach is that it uses an omnidirectional antenna, which has a radiation field that resembles a doughnut. Its pattern allows excellent reception from a nearby Wi-Fi network from nearly any direction, but it also makes it difficult to tell what direction a signal is coming from.
Instead, it's useful to locate the direction that the signal is broadcasting with a highly directional antenna, like a Yagi, panel, or parabolic grid antenna. Unlike the doughnut-shaped pattern of an omnidirectional antenna, a directional antenna will receive a much stronger signal when pointed directly at the target.
Wireshark for Signals Intelligence
When it comes to visualizing signal strength in a way that's useful for hunting down suspicious Wi-Fi devices, Wireshark is surprisingly good at plotting the strength of transmissions from any nearby Wi-Fi device we want.
While the feature isn't very well-documented, the process of identifying a device to target and graphing its signal strength is surprisingly simple. When paired with a Wi-Fi network adapter that can be put into monitor mode and a highly directional Wi-Fi antenna, Wireshark can quickly reveal the location of any Wi-Fi device operating in range.
Signal hunting in Wireshark has a simple workflow to follow that allows for easy identification and tracking of target devices. First, we put a Wi-Fi network adapter into monitor mode and begin scanning for targets with airodump-ng to locate the channel our target is on. Once we know the channel our target is broadcasting, we can scan only on that channel to get the maximum number of packets for plotting in Wireshark.
After locking onto the correct channel, we can open Wireshark, identify a packet from the device we want to track, and then create a display filter to only show transmissions from that Wi-Fi device. Finally, we use Wireshark's I/O graph to plot the signal strength over time as we move the directional antenna around the room, looking for spikes in signal strength.
What You'll Need
To follow along, you'll need a computer capable of running Wireshark and putting your Wi-Fi network adapter into monitor mode. You can do so on any Kali- or Debian-based Linux computer, as well as in a virtual machine on a macOS or Windows device.
You'll also need an external Wi-Fi network adapter that's capable of being put into monitor mode. I recommend an Alfa Wi-Fi network adapter like the AWUS036NEH or, if you're looking for something more rugged, the Tube-UN adapter is waterproof and meant for outdoors.
- Buy on Amazon: Alfa AWUS036NEH Network Adapter
- Buy on Amazon: Alfa Tube-U(N) Network Adapter
Finally, you'll need a directional Wi-Fi antenna, such as a panel antenna from Alfa. You can also use a Yagi antenna, a parabolic grid, or a cantenna if you want to create your own directional antenna.
- Buy on Amazon: Alfa RP-SMA 7 dBi Panel Antenna
- Buy on Amazon: Tupavco TP512 Yagi Antenna
- Buy on Amazon: ALFA Yagi 18dBi Antenna
- Buy on Amazon: SimpleWiFi G2424 WiFi Extender Directional Parabolic Grid
Put Your Card into Monitor Mode
To get started, plug in your wireless network adapter to your Kali or Debian-based system, then identify its name by running the command ifconfig in a fresh terminal window. You should see your card named something like "wlan1," but if it doesn't automatically appear, run ip a to see if it's attached but not yet up.
If you see your card with ip a but not ifconfig, run ifconfig wlan1 up to bring your card up. Now, it should be visible while running ifconfig.
Now, to put your card into monitor mode, run the following command, assuming your wireless network adapter name is "wlan1" and it's up.
~# airmon-ng start wlan1

Found 3 processes that could cause trouble.
Kill them using 'airmon-ng check kill' before putting
the card in monitor mode, they will interfere by changing channels
and sometimes putting the interface back in managed mode

  PID Name
  538 NetworkManager
  608 wpa_supplicant
 2446 dhclient

PHY Interface   Driver      Chipset

phy0    wlan0       ath9k       Qualcomm Atheros QCA9565 / AR9565 Wireless Network Adapter (rev 01)
phy4    wlan1       rt2800usb   Ralink Technology, Corp. RT5372

        (mac80211 monitor mode vif enabled for [phy4]wlan1 on [phy4]wlan1mon)
        (mac80211 station mode vif disabled for [phy4]wlan1)
Now, your card should be named "wlan1mon" after being placed in monitor mode. With the wireless network adapter in monitor mode, we can start listening in on Wi-Fi traffic by running the following command.
~# airodump-ng wlan1monIdentify the Target & Broadcasting Channel
With the wireless network adapter in monitor mode, we can start listening in on Wi-Fi traffic by running the following command.
~# airodump-ng wlan1monWe should then see a list of nearby Wi-Fi networks we can target.
CH 10 ][ Elapsed: 0 s ][ 2019-08-04 03:33

 BSSID              PWR  Beacons    #Data, #/s  CH  MB   ENC  CIPHER AUTH ESSID

 CC:40:D0:6C:73:D1  -40        2        0    0   8  195  WPA2 CCMP   PSK  SuicideGirls
 C0:8A:DE:B9:CD:D8  -50        2        0    0   1  130  OPN              SpectrumWiFi
 C0:8A:DE:79:CD:D8  -50        2        0    0   1  130  WPA2 CCMP   MGT  SpectrumWiFi Plus
 C0:8A:DE:39:CD:D8  -49        2        0    0   1  130  OPN              CableWiFi
 00:9C:02:D2:5E:B9  -65        2        0    0   1  54e. WPA2 CCMP   PSK  HP-Print-B9-Officejet Pro 8600
 88:96:4E:50:FF:40  -45        3        0    0   1  195  WPA2 CCMP   PSK  ATTMfRfcmS
 78:96:84:00:B5:B0  -48        2        0    0   1  130  WPA2 CCMP   PSK  The Daily Planet

 BSSID              STATION            PWR   Rate    Lost    Frames  Probe

 C0:8A:DE:79:CD:D8  4A:F3:2A:2A:4E:E6  -68    0 - 1      0        2
Press Control-C to stop the capture when you've found what you're looking for. Now, we need to determine the channel the network we want to track is on. Here, we've got several networks available, and we're going to follow the one with the SSID of "ATTMfRfcmS."
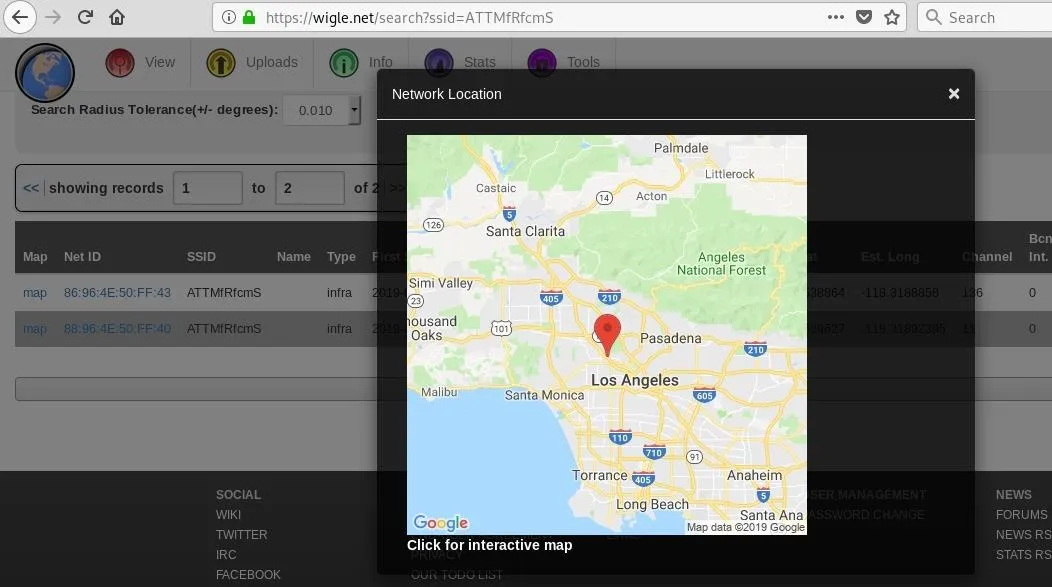
If you want to get a rough idea of where the network has been seen before, you can type the BSSID into Wigle.net and look for any previous observations. Here, we can see that our target was observed twice.
The most important part of the information we get from running airodump-ng is the channel number that our target is transmitting on. Now that we know that it's broadcasting on channel 1, we'll restart our airodump-ng command to only scan on that channel.
Listen on the Channel & Start Wireshark
In our terminal window, we'll start airodump-ng again, but this time, we'll include the -c flag followed by the channel that our target is on. For channel 1, it should look like the following.
~# airodump-ng wlan1mon -c 1It's vital because Wireshark can't control the wireless card by itself, so we need to run airodump-ng to keep it on the correct channel and avoid losing packets while scanning on the wrong channel.
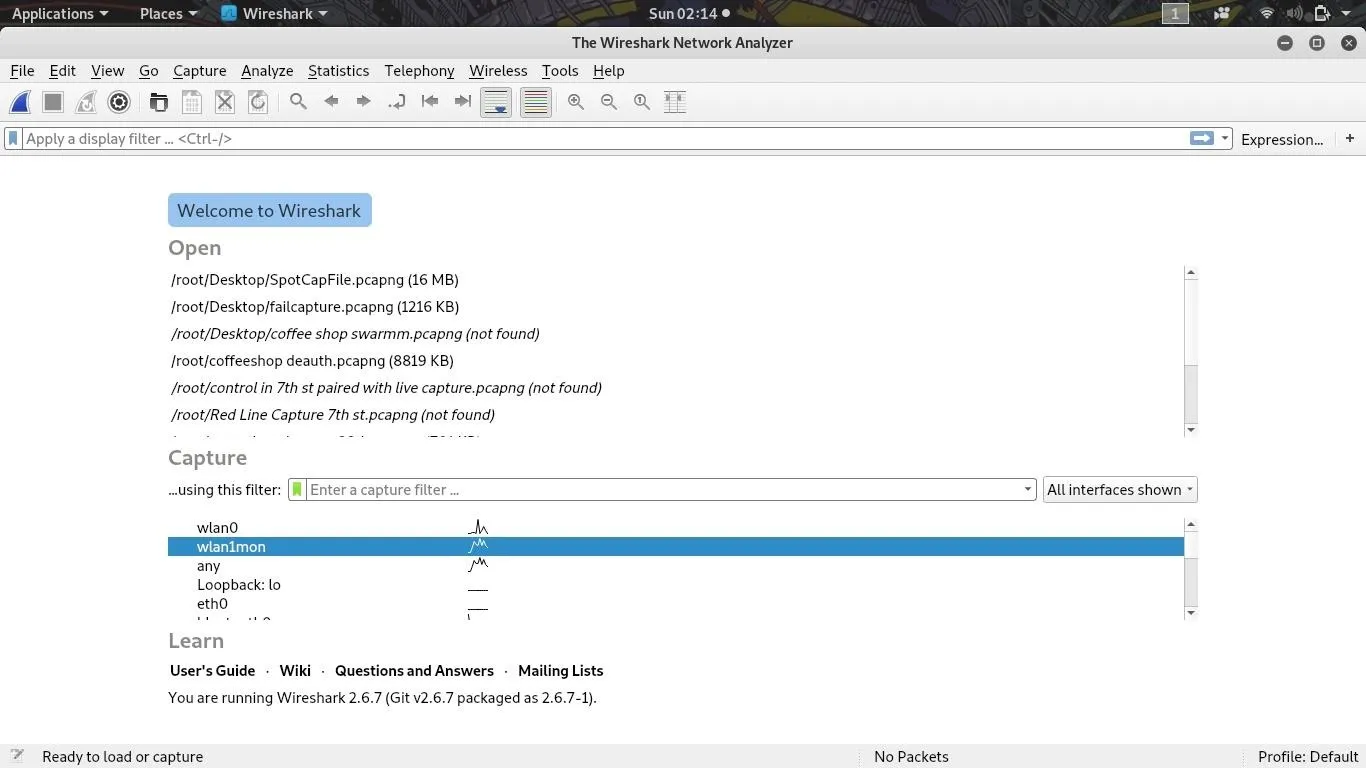
As airodump-ng runs on channel 1, it's time to start Wireshark. After Wireshark opens, select the "wlan1mon" card you have in monitor mode as your capture source, then click the blue shark fin icon on the top left to begin capturing packets on channel 1.
You should now see lots of packets being intercepted by Wireshark! Our next task is to identify a packet from our target and use it to create a display filter.
Identify & Filter the Target
Now that we've got some packets to search through, we can quickly look for beacon frames that contain the name of the network we're looking for. After clicking on the beacon frame, click on the arrow next to "IEEE 802.11" and look for the "Transmitter address" or "Source address" field. That's what we'll use to build our capture filter to show only the device we're hunting for.

Right-click on the "Transmitter address" to show a list of options, select "Apply as filter," and then "Selected" to create a display filter that only shows packets transmitted from this device's BSSID. It should show all Wi-Fi transmissions from our network of interest and nothing from unrelated networks.
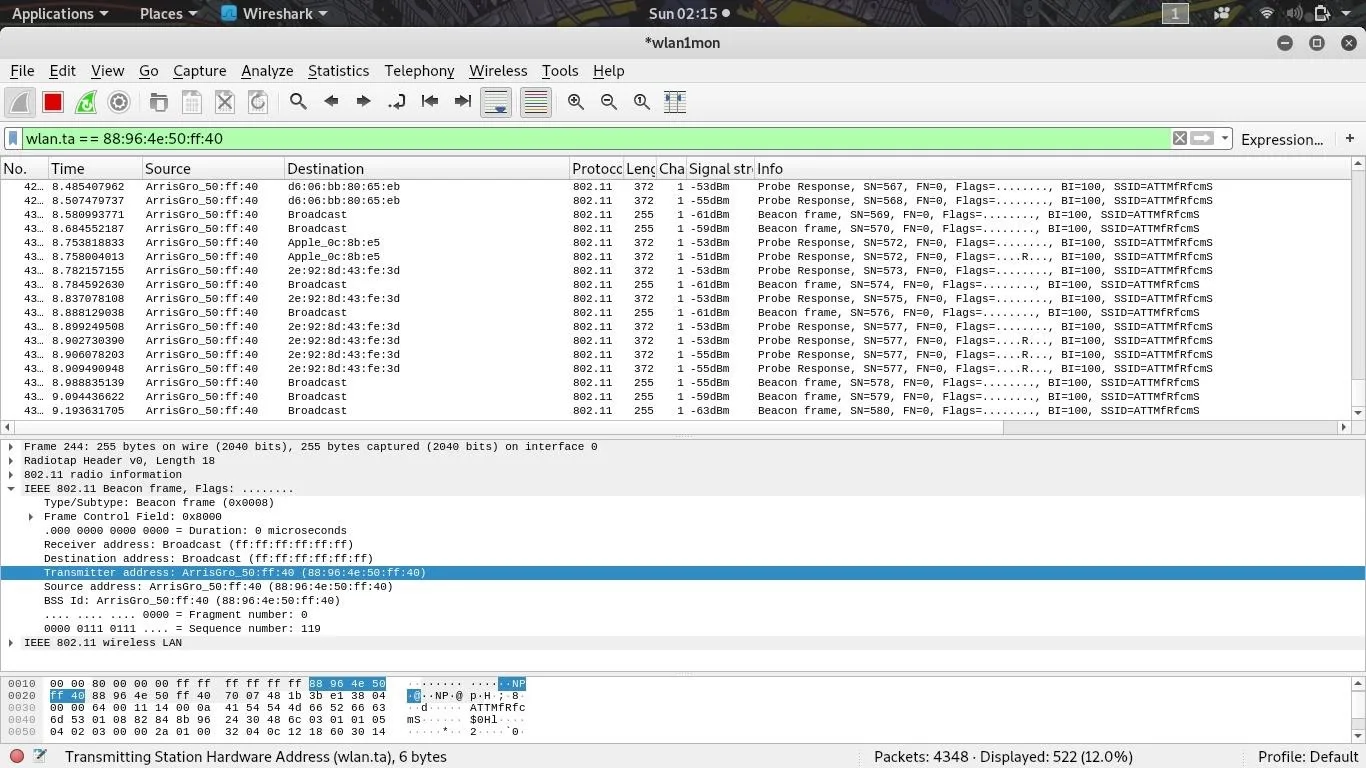
You should notice a new filter in the filter bar that looks like "wlan.ta ==" and the BSSID of the target Wi-Fi device. The capture filter simply says, "show only packets with a transmitter address that matches this one."
The result is that we've isolated one Wi-Fi device, first by finding the channel it's on, and then by creating a filter to only show transmissions from the device we want to track. Now that we've isolated the signal we're following, it's time to start visualizing signal strength.
Graph the Filtered Signal Strength
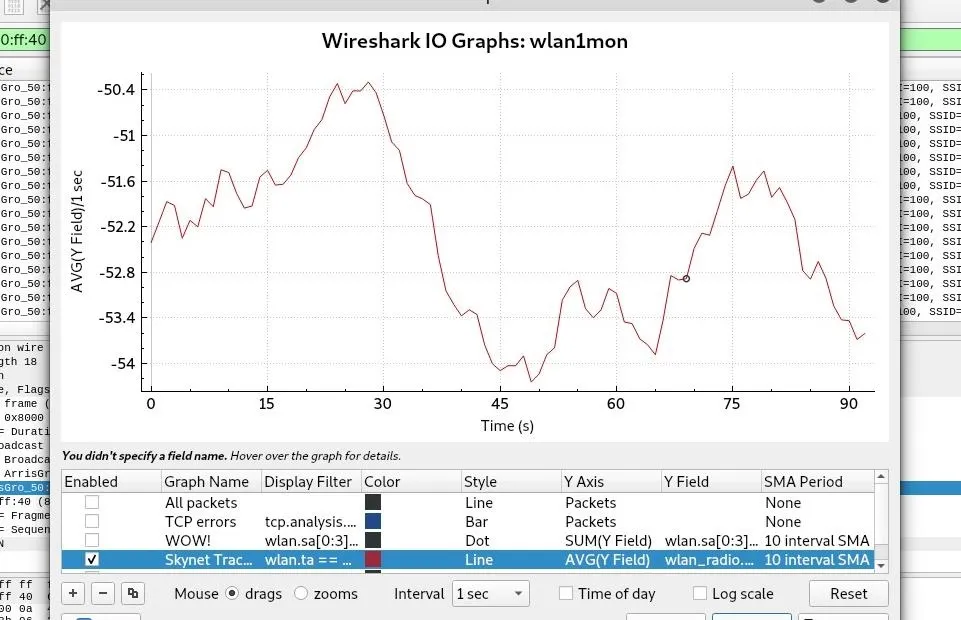
To start graphing signal strength, copy the display filter created, click on "Statistics," then "I/O Graph" to launch Wireshark's graphing window. Click the plus (+) icon to create a new graph, and uncheck any other graphs that may be enabled.
Name your graph something you'll remember, and then, paste your display filter into the Display Filter field. Next, paste wlan_radio.signal_dbm into the Y Field box, and select "AVG(Y Field)" as the Y Axis. Finally, set the Style to "Line," then the SMA Period to "10 Interval SMA."
Once you've finished, your settings should look like below, and your signal strength graph should begin.
That graph is showing us the average signal strength of packets from our targeted device over time. Without moving the directional antenna of your adapter, let this average out for a minute to get a baseline reading. The signal may seem to vary wildly at first because Wireshark is graphing a small change in signal, but the graph will make more sense as we sweep around the room and encounter stronger and weaker signals that will stretch out the averages of the graph.
Sweep the Area for Signal Spikes
Now, it's time for the moment of truth. Slowly rotate your directional antenna 360 degrees, watching for spikes in signal strength that reveal the direction from which the transmissions are coming from.
In our graph below, I slowly rotated a panel antenna from one side to the other and saw a huge spike when the antenna was pointed directly at the signal source.
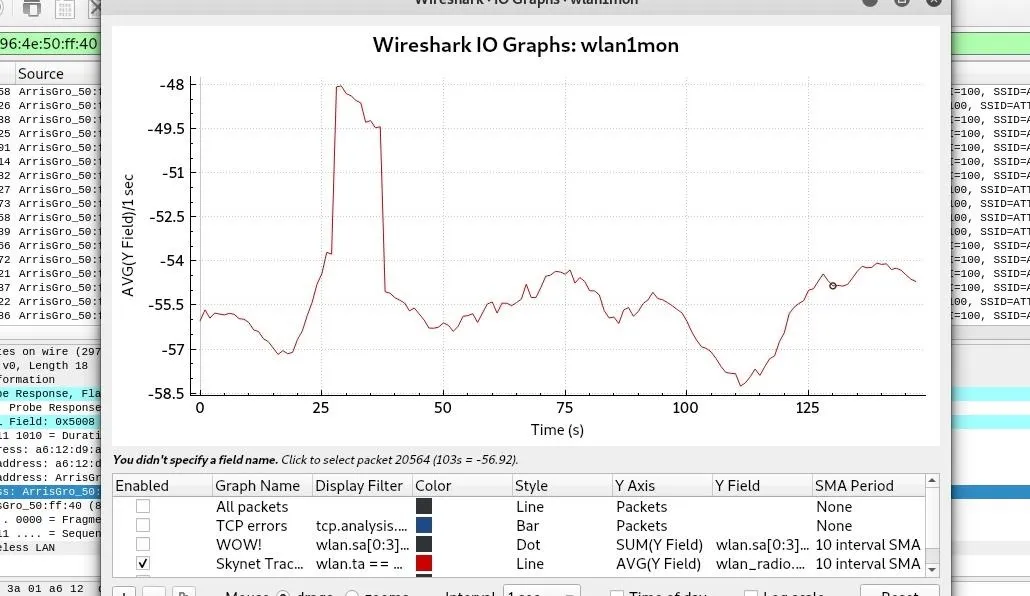
After sweeping back and forth a few times, you should be able to identify a spike in the signal. Walk towards the direction of the peak, and repeat a sweep for the signal to narrow down the location of any transmitting Wi-Fi device systematically.
Tracking Down Wi-Fi Devices Is Easy with the Right Gear
Whenever a Wi-Fi network appears where it shouldn't or a device starts connecting to your Wi-Fi without permission, Wireshark and a network adapter can tell you where the signal is coming from. This valuable skill makes it easy to determine where a rogue AP might be hidden or who might be joining a network without permission. If you suspect your neighbor's been connecting to your Wi-Fi network and you haven't been able to prove it, this technique could provide you with all the evidence you need.
I hope you've enjoyed this guide to tracking down Wi-Fi devices with Wireshark! If you have any questions about our tutorial on tracking devices via signal strength, leave a comment below, and feel free to reach me on Twitter @KodyKinzie.
Cover image and screenshots by Kody/Null Byte


Comments
Be the first, drop a comment!