
If left unattended, a hacker with a USB Rubber Ducky and physical access to the computer can infiltrate even the most secure computer. Such attacks often go undetected without the use of a tool like USBRip, which can provide you with assurance that your device hasn't been compromised.
While it can be hard to know if your device has been accessed in the past, enabling logging can make it easier to determine when a suspicious device has been inserted into a port. USBRip can't look through old system logs to catch past events, but it can keep an eye on everything that happens after installing it, to guard against being hacked in the future.
What Are HID Attacks?
A human-interface device, or HID, is any device that is used by a person to control a computer; keyboards and computer mice are prominent examples. HIDs have elevated privileges compared to a program or a script because the operating system assumes that commands from an HID are coming from a person with permission to use the computer.
Hackers have created tools, such as the USB Rubber Ducky, which exploits the inherent trust between a computer and an HID. While a USB Rubber Ducky mimics the look of a standard flash drive, when plugged into a computer, it acts as a keyboard that can input prerecorded keystrokes and commands at lightning speeds.
The types of attacks that hackers have conducted using a USB Rubber Ducky, Digispark, and similar tools are wide-reaching; they range from planting a backdoor on macOS and Windows computers to sending an email with a screenshot of all of the user's credentials stored in Firefox.
Detecting the Ducky
Because the computer believes that the USB Rubber Ducky is just another keyboard, it will execute the commands immediately without giving the target any visible warning that they were compromised. As long as the Ducky Script is careful about cleaning up after itself — by closing all windows it opened, erasing the terminal history, and making the computer appear to be in the same state that the target left it in — an attack can go completely undetected.
That doesn't mean it's impossible to prevent against or detect these kinds of attacks. There are some tools out there, such as DuckHunter, that aim to limit the impact of HID attacks by watching for suspicious behavior like keystrokes that are typing too fast. While the DuckHunter project hasn't been updated since 2017, there is another tool that can provide evidence of an HID attack, which is both powerful and currently maintained.
USBRip takes advantage of system logs to show a complete history of every USB device that was plugged into a Linux computer. While an attacker could delete these logs as part of the cleanup process, it's much less likely that they did so over more critical and time-consuming cleanup steps like removing any direct evidence of having accessed the computer. Even better, because the USB Rubber Ducky and Digispark were both made by specific manufacturers, USBRip can look through the logs for devices with suspicious fingerprints.
What You Will Need
USBRip is written in Python, which is cross-platform and should allow USBRip to run on most Linux systems. However, because it's mostly parsing Linux system logs, it currently only runs on Linux devices. For this guide, we're using Kali Linux, but for steps on a different system, check out our video for another example.
Make sure your system is fully updated and upgraded using the apt update and apt upgrade commands, and then make sure Python is installed by typing python in a terminal window. If you get an interactive Python shell, you've got everything you need and can type quit() to exit. Otherwise, you can install Python by running apt install python.
~# python

Python 2.7.16 (default, Apr  6 2019, 01:42:57)
[GCC 8.3.0] on linux2
Type "help", "copyright", "credits" or "license" for more information.

>>> quit()
I'd also recommend installing Python3:
~# apt install python3-venv p7zip-full -y

Reading package lists... Done
Building dependency tree
Reading state information... Done
p7zip-full is already the newest version (16.02+dfsg-7).
python3-venv is already the newest version (3.7.5-3).
The following packages were automatically installed and are no longer required:
  dh-python libdouble-conversion1 liblinear3
Use 'apt autoremove' to remove them.
0 upgraded, 0 newly installed, 0 to remove and 1853 not upgraded.
Step 1: Reconfigure Some Linux Files
To allow USBRip to parse the system logs correctly, we have to configure some files in the root folder. First, we will have to remove a line from the /rsyslog.conf file. In case you want to uninstall USBRip and restore your computer to its original state, it will be simpler just to comment it out.
Using a terminal window, open the rsyslog.conf file with your favorite text editor. It will be located in your /etc directory, and you can jump right into editing the file. In our case, we're using nano, so we go to nano /etc/rsyslog.conf, and the file will open. If you're not root, use sudo with it and many of the other commands throughout the guide below.
~# cd
~# nano /etc/rsyslog.conf
After it opens, scroll down and comment out the line that says:
$ActionFileDefaultTemplate RSYSLOG_TraditionalFileFormatNext, place a # in front of it. That part should look something like this now:
#### GLOBAL DIRECTIVES ####
###########################

#
# Use traditional timestamp format.
# To enable high precision timestamps, comment out the following line.
#
#$ActionFileDefaultTemplate RSYSLOG_TraditionalFileFormat

#
# Set the default permissions for all log files.
#
$FileOwner root
$FileGroup adm
$FileCreateMode 0640
Now, save and exit the file, being careful not to change the file's name. After modifying the old way that our computer stores system logs, we have to replace it with the method that USBRip can use. In the same terminal window, enter the command below.
~# echo '$ActionFileDefaultTemplate RSYSLOG__FileFormat' | tee /etc/rsyslog.d/usbrip.conf

$ActionFileDefaultTemplate RSYSLOG__FileFormat
That creates a new .conf file that USBRip will use with a different format for storing system logs. Next, we have to purge our computer of its current system logs, which are in the wrong format. We can do that with the following command.
~# rm -f /var/log/syslog* /var/log/messages*Finally, we need to restart rsyslog with the command below. After that's done, we can move on to installing the program.
~# systemctl restart rsyslogStep 2: Install USBRip
Now that the system files have been properly configured, we can install USBRip. Start by navigating to a directory of your choosing in a terminal window and cloning the git repository with the following command.
~# git clone https://github.com/snovvcrash/usbrip.git

Cloning into 'usbrip'...
remote: Enumerating objects: 130, done.
remote: Counting objects: 100% (130/130), done.
remote: Compressing objects: 100% (89/89), done.
remote: Total 1266 (delta 70), reused 77 (delta 39), pack-reused 1136
Receiving objects: 100% (1266/1266), 1.14 MiB | 4.83 MiB/s, done.
Resolving deltas: 100% (790/790), done.
After that, navigate to the cloned directory and begin installing the required Python libraries and dependencies. To do so with pip, and to use the setup.py installer, check out our video guide.
~# cd usbrip
~/usbrip# chmod +x ./installers/install.sh
~/usbrip# sudo -H ./installers/install.sh -s

>>>> Creating directory: '/opt/usbrip'
>>>> /opt/usbrip already exists. First run:
sudo uninstall.sh --all
Next, exit the /usbrip folder, and start up the help page to check out what's there.
~/usbrip# cd
~# usbrip -h

sage: usbrip [-h] {banner,events,storage,ids} ...

positional arguments:
  {banner,events,storage,ids}
    banner              show tool banner
    events              work with USB events
    storage             work with USB event storage
    ids                 work with USB IDs

optional arguments:
  -h, --help            show this help message and exit
Now, we can check that USBRip has been installed correctly by typing usbrip into the terminal and making sure that we get the following splash screen.
~# usbrip

         _     {{4}}    {v2.2.1-1}
 _ _ ___| |_ ___[E]___
| | |_ -| . |  _[n] . |
|___|___|___|_| [5]  _|
               x[!]_|   https://github.com/snovvcrash/usbrip

Usage: /usr/local/bin/usbrip [-h]
If you see that, then we've got the first step of installing USBRip finished.
Step 3: Search Entire USB Event History
Now that USBRip has been installed, let's see the history of all of the USB events that have happened on our computer. We can do this with the following command.
~# usbrip events history

         _     {{4}}    {v2.2.1-1}
 _ _ ___| |_ ___[e]___
| | |_ -| . |  _[n] . |
|___|___|___|_| [5]  _|
               x[I]_|   https://github.com/snovvcrash/usbrip

[*] Started at 2020-02-14 17:11:37
[17:11:37] [INFO] Trying to run journalctl...
[17:11:37] [INFO] Successfully runned journalctl
[17:11:37] [INFO] Reading journalctl output
100%|█████████████████████████████████| 2089/2089 [00:00<00:00, 251208.49line/s]
[?] How would you like your event history list to be generated?

    1. Terminal stdout
    2. JSON-file

[>] Please enter the number of your choice (default 1):
It now gives the option to either print the USB history in the terminal or save it as a JSON file. For now, let's just see it in the terminal by entering 1.
[>] Please enter the number of your choice (default 1): 1

[17:13:34] [INFO] Preparing collected events
−−−−−−−−−−−−−−−−−−−−−−−−−−−−−−−−−−−−−−−−−−−−−−−−
Connected:      2020-02-14 15:42:48
User:           kubuntu
VID:            046d
PID:            c52b
Product:        USB Receiver
Manufacturer:   Logitech
Serial Number:  ∅
Bus-Port:       1-1
Disconnected:   ∅
−−−−−−−−−−−−−−−−−−−−−−−−−−−−−−−−−−−−−−−−−−−−−−−−
[*] Shut down at 2020-02-14 17:13:34
[*] Time taken: 0:01:57.087803
As you can see above, the list of USB events is limited to the Logitech Bluetooth mouse receiver that I plugged into my laptop.
Unfortunately, because we had to remove all the incorrectly formatted system logs, we can only see USB event history since we installed USBRip. Despite that limitation, we were still able to learn some interesting information about the USB device, such as the timestamp when it was connected and disconnected (or if it was ever disconnected).
We can also see the VID and PID, which are numbers used by computers to identify a USB device to know which drivers need to be installed. The VID is assigned by usb.org, and the PID determines the manufacturer. We also learn what the device is, the name of the manufacturer, and which USB port the device was plugged into.
After a couple of days, the number of USB events on your computer will begin to pile up, and we will want to condense the list to a more readable format. We can narrow down the request to the last 20 USB events and format it as a condensed table instead of a list.
~# usbrip events history -n 20 --table
_ {{4}} {v2.2.1-1}
_ _ ___| |_ ___[E]___
| | |_ -| . | _[N] . |
|___|___|___|_| [5] _|
x[1]_| https://github.com/snovvcrash/usbrip
[*] Started at 2020-02-14 22:18:00
[22:18:00] [INFO] Trying to run journalctl...
[22:18:00] [INFO] Successfully runned journalctl
[22:18:00] [INFO] Reading journalctl output
100%|█████████████████████████████████| 2095/2095 [00:00<00:00, 364532.95line/s]
[22:18:00] [INFO] Filtering events
[?] How would you like your event history list to be generated?
1. Terminal stdout
2. JSON-file
[>] Please enter the number of your choice (default 1): 1
[22:18:02] [INFO] Preparing collected events
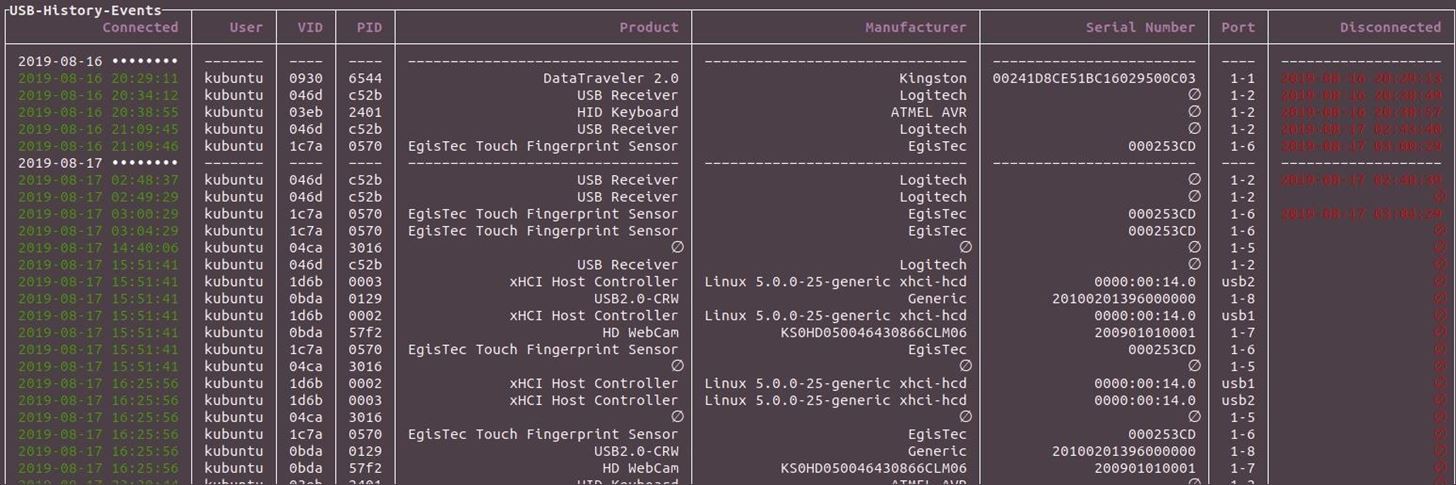
[22:18:02] [INFO] Representation: tableThat should display something like this:
┌USB-History-Events───┬─────────┬──────┬──────┬──────────────────────────────────┬─────────────────────────────────┬──────────────────────────┬──────┬─────────────────────┐
│           Connected │    User │  VID │  PID │                          Product │                    Manufacturer │            Serial Number │ Port │        Disconnected │
├─────────────────────┼─────────┼──────┼──────┼──────────────────────────────────┼─────────────────────────────────┼──────────────────────────┼──────┼─────────────────────┤
│ 2020-02-14 •••••••• │ −−−−−−− │ −−−− │ −−−− │ −−−−−−−−−−−−−−−−−−−−−−−−−−−−−−−− │ −−−−−−−−−−−−−−−−−−−−−−−−−−−−−−− │ −−−−−−−−−−−−−−−−−−−−−−−− │ −−−− │ −−−−−−−−−−−−−−−−−−− │
│ 2020-02-14 17:30:04 │ kubuntu │ 1d6b │ 0002 │             xHCI Host Controller │ Linux 5.0.0-25-generic xhci-hcd │             0000:00:14.0 │ usb1 │                   ∅ │
│ 2020-02-14 18:05:23 │ kubuntu │ 0930 │ 6544 │                 DataTraveler 2.0 │                        Kingston │ 00241D8CE51BC16029500C03 │  1-2 │ 2020-02-14 18:07:23 │
│ 2020-02-14 18:22:56 │ kubuntu │ 1c7a │ 0570 │ EgisTec Touch Fingerprint Sensor │                         EgisTec │                 000253CD │  1-6 │ 2020-02-14 18:24:45 │
│ 2020-02-14 18:32:16 │ kubuntu │ 1c7a │ 0570 │ EgisTec Touch Fingerprint Sensor │                         EgisTec │                 000253CD │  1-6 │                   ∅ │
│ 2020-02-14 19:59:54 │ kubuntu │ 1d6b │ 0003 │             xHCI Host Controller │ Linux 5.0.0-25-generic xhci-hcd │             0000:00:14.0 │ usb2 │                   ∅ │
│ 2020-02-14 19:59:54 │ kubuntu │ 04ca │ 3016 │                                ∅ │                               ∅ │                        ∅ │  1-5 │                   ∅ │
│ 2020-02-14 19:59:54 │ kubuntu │ 1c7a │ 0570 │ EgisTec Touch Fingerprint Sensor │                         EgisTec │                 000253CD │  1-6 │                   ∅ │
│ 2020-02-14 19:59:54 │ kubuntu │ 0bda │ 57f2 │                        HD WebCam │          KS0HD050046430866CLM06 │             200901010001 │  1-7 │                   ∅ │
│ 2020-02-14 19:59:54 │ kubuntu │ 046d │ c52b │                     USB Receiver │                        Logitech │                        ∅ │  1-1 │                   ∅ │
│ 2020-02-14 19:59:54 │ kubuntu │ 1d6b │ 0002 │             xHCI Host Controller │ Linux 5.0.0-25-generic xhci-hcd │             0000:00:14.0 │ usb1 │                   ∅ │
│ 2020-02-14 19:59:54 │ kubuntu │ 0bda │ 0129 │                       USB2.0-CRW │                         Generic │        20100201396000000 │  1-8 │                   ∅ │
│ 2020-02-14 20:46:17 │ kubuntu │ 1d6b │ 0003 │             xHCI Host Controller │ Linux 5.0.0-25-generic xhci-hcd │             0000:00:14.0 │ usb2 │                   ∅ │
│ 2020-02-14 20:46:17 │ kubuntu │ 04ca │ 3016 │                                ∅ │                               ∅ │                        ∅ │  1-5 │                   ∅ │
│ 2020-02-14 20:46:17 │ kubuntu │ 1d6b │ 0002 │             xHCI Host Controller │ Linux 5.0.0-25-generic xhci-hcd │             0000:00:14.0 │ usb1 │                   ∅ │
│ 2020-02-14 20:46:17 │ kubuntu │ 046d │ c52b │                     USB Receiver │                        Logitech │                        ∅ │  1-1 │ 2020-02-14 20:47:22 │
│ 2020-02-14 20:46:17 │ kubuntu │ 1c7a │ 0570 │ EgisTec Touch Fingerprint Sensor │                         EgisTec │                 000253CD │  1-6 │ 2020-02-14 20:48:17 │
│ 2020-02-14 20:46:17 │ kubuntu │ 0bda │ 0129 │                       USB2.0-CRW │                         Generic │        20100201396000000 │  1-8 │                   ∅ │
│ 2020-02-14 20:46:17 │ kubuntu │ 0bda │ 57f2 │                        HD WebCam │          KS0HD050046430866CLM06 │             200901010001 │  1-7 │                   ∅ │
│ 2020-02-14 21:00:06 │ kubuntu │ 046d │ c52b │                     USB Receiver │                        Logitech │                        ∅ │  1-1 │ 2020-02-14 21:04:08 │
│ 2020-02-14 21:20:15 │ kubuntu │ 046d │ c52b │                     USB Receiver │                        Logitech │                        ∅ │  1-2 │ 2020-02-14 21:40:45 │
└─────────────────────┴─────────┴──────┴──────┴──────────────────────────────────┴─────────────────────────────────┴──────────────────────────┴──────┴─────────────────────┘
[*] Shut down at 2020-02-14 22:18:08
[*] Time taken: 0:00:42.650509Step 4: Create a JSON File for Filtering Trusted Devices
Because most USB events are with devices that you trust — your mouse, keyboard, flash drive, and internal devices such as webcams or fingerprint scanners — the event history can become cluttered with USB events that are not of interest. When trying to track malicious activity on your computer, it creates clutter and makes it harder to see a real threat.
One way to fix that issue is to create a whitelist of devices we trust so that we can suppress reports of trusted USB devices we'd otherwise have to ignore.
We can create a JSON file of trusted devices easily using USBRip. We can create a .json file called "auth.json" containing every USB device that was connected to the computer on Feb. 14, 2020, using the following command.
~# usbrip events gen_auth auth.json -d '2020-02-14'

usage: usbrip events [-h] {history,open,genauth,violations} ...
If we open the "auth.json" file in our USBRip directory, we'll see the following.
{
    "manufact": [
        "EgisTec",
        "Generic",
        "KS0HD050046430866CLM06",
        "Linux 5.0.0-25-generic xhci-hcd",
        "Logitech"
    ],
    "pid": [
        "0002",
        "0003",
        "0129",
        "0570",
        "3016",
        "57f2",
        "c52b"
    ],
    "prod": [
        "EgisTec Touch Fingerprint Sensor",
        "HD WebCam",
        "USB Receiver",
        "USB2.0-CRW",
        "xHCI Host Controller"
    ],
    "serial": [
        "0000:00:14.0",
        "000253CD",
        "200901010001",
        "20100201396000000"
    ],
    "vid": [
        "046d",
        "04ca",
        "0bda",
        "1c7a",
        "1d6b"
    ]
}
We can now restrict a USBRip search to any USB event which is not in auth.json using:
~# usbrip events violations auth.json --table
_ {{4}} {v2.2.1-1}
_ _ ___| |_ ___[e]___
| | |_ -| . | _[N] . |
|___|___|___|_| [5] _|
x[i]_| https://github.com/snovvcrash/usbrip
[*] Started at 2020-02-14 23:06:02
[22:20:08] [INFO] Trying to run journalctl...
[22:20:08] [INFO] Successfully runned journalctl
[22:20:08] [INFO] Reading journalctl output
100%|█████████████████████████████████| 2101/2101 [00:00<00:00, 296000.56line/s]
[22:20:08] [INFO] Opening authorized device list: "/root/usbrip/auth.json"
[22:20:08] [INFO] Searching for violations
100%|█████████████████████████████████████████| 3/3 [00:00<00:00, 15534.46dev/s]
[?] How would you like your violation list to be generated?
1. Terminal stdout
2. JSON-file
[>] Please enter the number of your choice (default 1): 1
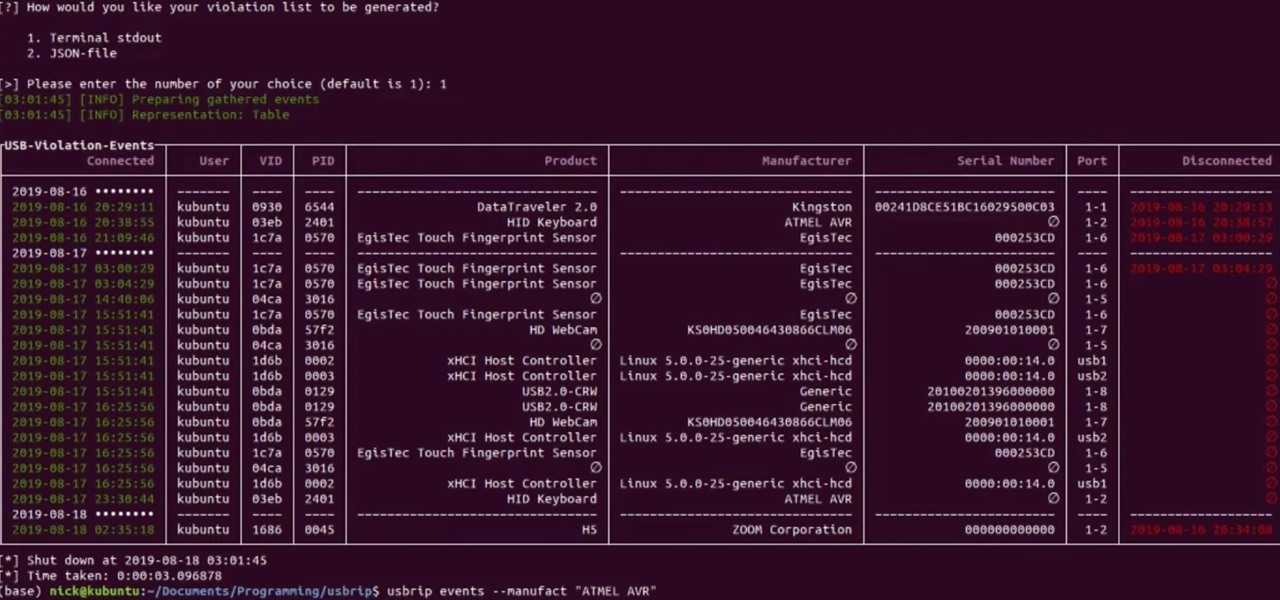
[22:20:12] [INFO] Preparing collected eventsThat returns a table of all devices which are not on the list of trusted devices.
┌USB-Violation-Events─┬─────────┬──────┬──────┬──────────────────────────────────┬──────────────────┬──────────────────────────┬──────┬─────────────────────┐
│           Connected │    User │  VID │  PID │                          Product │     Manufacturer │            Serial Number │ Port │        Disconnected │
├─────────────────────┼─────────┼──────┼──────┼──────────────────────────────────┼──────────────────┼──────────────────────────┼──────┼─────────────────────┤
│ 2020-02-14 •••••••• │ −−−−−−− │ −−−− │ −−−− │ −−−−−−−−−−−−−−−−−−−−−−−−−−−−−−−− │ −−−−−−−−−−−−−−−− │ −−−−−−−−−−−−−−−−−−−−−−−− │ −−−− │ −−−−−−−−−−−−−−−−−−− │
│ 2020-02-14 22:29:11 │ kubuntu │ 0930 │ 6544 │                 DataTraveler 2.0 │         Kingston │ 00241D8CE51BC16029500C03 │  1-1 │ 2020-02-14 22:33:55 │
│ 2020-02-14 22:38:55 │ kubuntu │ 03eb │ 2401 │                     HID Keyboard │        ATMEL AVR │                        ∅ │  1-2 │ 2020-02-14 22:40:44 │
│ 2020-02-14 22:40:44 │ kubuntu │ 03eb │ 2401 │                     HID Keyboard │        ATMEL AVR │                        ∅ │  1-2 │                   ∅ │
│ 2020-02-14 22:41:18 │ kubuntu │ 1686 │ 0045 │                               H5 │ ZOOM Corporation │             000000000000 │  1-2 │ 2020-02-14 22:44:48 │
│ 2020-02-14 22:44:51 │ kubuntu │ 0930 │ 6544 │                 DataTraveler 2.0 │         Kingston │ 00241D8CE51BC16029500C03 │  1-2 │ 2020-02-14 22:54:51 │
│ 2020-02-14 22:46:10 │ kubuntu │ 0930 │ 6544 │                 DataTraveler 2.0 │         Kingston │ 00241D8CE51BC16029500C03 │  1-2 │ 2020-02-14 22:57:10 │
│ 2020-02-14 22:50:54 │ kubuntu │ 1c7a │ 0570 │ EgisTec Touch Fingerprint Sensor │          EgisTec │                  00253CD │  1-6 │                   ∅ │
│ 2020-02-14 22:51:33 │ kubuntu │ 0930 │ 6544 │                 DataTraveler 2.0 │         Kingston │ 00241D8CE51BC16029500C03 │  1-2 │ 2020-02-14 22:59:39 │
│ 2020-02-14 23:05:23 │ kubuntu │ 0930 │ 6544 │                 DataTraveler 2.0 │         Kingston │ 00241D8CE51BC16029500C03 │  1-2 │ 2020-02-14 23:06:12 │
└─────────────────────┴─────────┴──────┴──────┴──────────────────────────────────┴──────────────────┴──────────────────────────┴──────┴─────────────────────┘
[*] Shut down at 2020-02-14 23:06:12
[*] Time taken: 0:01:17.904624
All of the devices on this list should be carefully inspected to determine if they are trustworthy or not.
Looking at the data above, it's clear that the HID keyboard would be a suspicious device to have been plugged into a computer like a laptop without the need for an external keyboard. Research would show that the manufacturer, Amtel, is responsible for the chip inside the USB Rubber Ducky, meaning there is a high chance this log entry shows a USB Rubber Ducky has been plugged into the system.
Step 5: Sort by Manufacturer to Quickly Find Suspicious USB Events
Now that we know that manufacturer of the USB Rubber Ducky is Atmel, we can quickly search through the USB event history for devices that may be a USB Rubber Ducky. To do so, enter the command below.
~# usbrip events history –manufact ‘ATMEL AVR’That will return the list of USB devices with a chip manufactured by Atmel. It is important to remember that not all devices manufactured by Atmel are going to be a USB Rubber Ducky, but if you feel like your computer may have been compromised, this is a good quick and dirty check for suspect devices.
Logging Suspect USB Events Is Easy with USBRip
While USBRip isn't a tool for gathering past data, it can enable advanced logging of USB activities, which makes it easy to detect future HID attacks. If a hacker with a USB Rubber Ducky or a Digispark plugs a payload into your computer while it's left unattended, the logs they leave will enable you to identify the manufacturer and time the device was plugged in and removed. If you recognize a timestamp consistent with the length of a USB Rubber Ducky payload, it can be obvious when a computer was compromised.
I hope you enjoyed this tutorial about catching USB Rubber Duckies using USBRip. If you have any more questions or an idea for a future article, hit me up on Twitter @nickgodshall.
Just updated your iPhone? You'll find new emoji, enhanced security, podcast transcripts, Apple Cash virtual numbers, and other useful features. There are even new additions hidden within Safari. Find out what's new and changed on your iPhone with the iOS 17.4 update.


1 Comment
Good post @nickgodshall and thank you.
How then will I remove or stop the further exploit of HID attack by the attacker on the compromised system after it has been detected by USBrip?
Share Your Thoughts