

ARP spoofing is an attack against an Ethernet or Wi-Fi network to get between the router and the target user. In an ARP-spoofing attack, messages meant for the target are sent to the attacker instead, allowing the attacker to spy on, deny service to, or man-in-the-middle a target. One of the most popular tools for performing this attack is Ettercap, which comes preinstalled on Kali Linux.
On a regular network, messages are routed over Ethernet or Wi-Fi by associating the MAC address of a connected device with the IP address used to identify it by the router. Usually, this happens via an address resolution protocol (ARP) message indicating which device's MAC address goes with which IP address. It lets the rest of the network know where to send traffic — but it can be easily spoofed to change the way traffic is routed.
In an ARP-spoofing attack, a program like Ettercap will send spoofed messages attempting to get nearby devices to associate the hacker's MAC address with the IP address of the target. When successful, they're stored temporarily in a configuration setting on other network devices. If the rest of the network starts delivering packets intended for the target to the attacker instead, the attacker effectively controls the target's data connection.
Types of ARP Spoofing Attacks
There can be three primary outcomes after an attacker gains initial success in poisoning the ARP cache of other hosts on the network:
- The attacker can spy on traffic. They can lurk in the shadows, seeing everything that the target user does on the network. It's pretty self-explanatory.
- The attacker can intercept and modify the packets in a man-in-the-middle attack. They can intercept passwords typed into an HTTP website, see DNS requests, and resolve IP addresses the target is navigating to in order to see what sites the target is visiting. In a man-in-the-middle attack, the attacker has the opportunity not only to see what's happening on the network but manipulate it as well. For instance, they can attempt to downgrade the encryption the connection is using by deliberately requesting insecure versions of webpages to make the attacker's job of sniffing passwords easier. Also, a hacker can simply be a nuisance. For example, they can replace words in the text of a website, flip or replace images, or modify other types of data flowing to and from the target.
- The attacker can drop the packets meant for the target to create a denial-of-service attack. This is possibly the most frustrating to a target. While a Wi-Fi authentication attack is by far the more common cause of a Wi-Fi network being attacked, ARP spoofing can be much more challenging to figure out. If the attacker chooses not to forward on the packets now being sent to it instead of the target, the target will never receive them. The Wi-Fi network can be jammed from the inside, getting between the target and the router and then dropping the packets flowing between.
Ettercap Graphical
One of the most intriguing programs installed by default in Kali Linux is Ettercap. Unlike many of the programs that are command-line only, Ettercap features a graphical interface that's very beginner-friendly. While the results may sometimes vary, Ettercap is an excellent tool for newbies to get the hang of network attacks like ARP spoofing. If you don't already have it (like if you downloaded a light version of Kali), you can get it by typing the following into a terminal window.
~# apt install ettercap-graphical

Reading package lists... Done
Building dependency tree
Reading state information... Done
ettercap-graphical is already the newest version (1:0.8.2-10+b2).
Ettercap isn't the only tool for this, nor is it the most modern. Other tools, such as Bettercap, claim to do what Ettercap does but more effectively. However, Ettercap proves useful enough to feature for our demonstration. The general workflow of an Ettercap ARP spoofing attack is to join a network you want to attack, locate hosts on the network, assign targets to a "targets" file, and then execute the attack on the targets.
- Don't Miss: How to Conduct a Simple Man-in-the-Middle Attack
Once we do all of that, we can figuratively watch over the target's shoulder as they browse the internet, and we can even kill the connection from websites we want to steer them away from. We can also run various payloads, like isolating a host from the rest of the network, denying them service by dropping all packets sent to them, or running scripts to attempt to downgrade the security of the connection.
Step 1: Connect to the Network
The first step of ARP spoofing is to connect to the network you want to attack. If you're attacking an encrypted WEP, WPA, or WPA2 network, you'll need to know the password. This is because we're attacking the network internally, so we need to be able to see some information about the other hosts on the network and the data passing within it.
You can connect to a network for ARP spoofing in two ways. The first is to connect via Ethernet, which is very effective but may not always be practical and is rarely subtle. Instead, many people prefer to use a wireless network adapter and perform the ARP spoofing over Wi-Fi.
Step 2: Start Ettercap
In Kali, click on "Applications," then "Sniffing & Spoofing," followed by "ettercap-graphical." Alternatively, click on the "Show Applications" option in the dock, then search for and select "Ettercap."
Once it starts up, you should find yourself on the Ettercap main screen. You'll see the spooky Ettercap logo, and a few drop-down menus to start the attack from. In the next step, we'll start exploring the "Sniff" menu.
At this point, make sure you have an active connection to the network before you continue.
Step 3: Select Network Interface to Sniff On
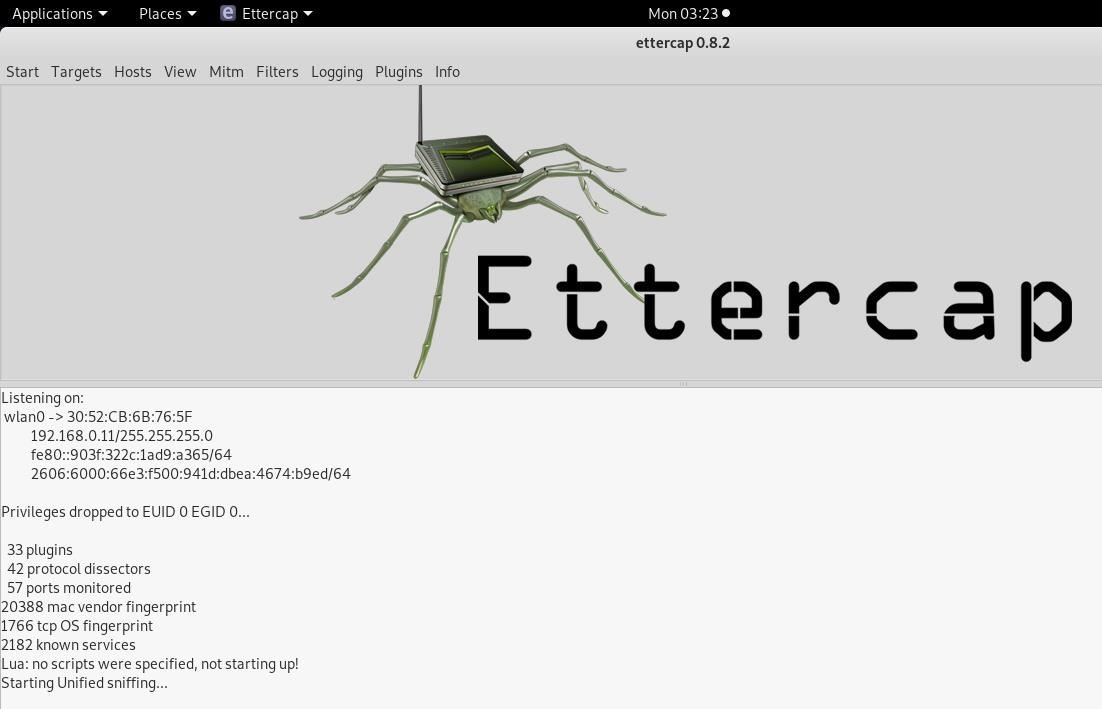
Click on the "Sniff" menu item, and then select "Unified sniffing." A new window will open asking you to select which network interface you want to sniff on. You should select the network interface that is currently connected to the network you're attacking.

Now, you'll see some text confirming that sniffing has started, and you'll be able to access more advanced menu options such as Targets, Hosts, Mitm, Plugins, etc. Before we get started using any of them, we'll need to identify our target on the network.
Step 4: Identify Hosts on a Network
To find the device we want to attack on the network, Ettercap has a few tricks up its sleeve. First, we can do a simple scan for hosts by clicking "Hosts," then "Scan for hosts." A scan will execute, and after it finishes, you can see the resulting hosts Ettercap has identified on the network by clicking "Hosts," then "Hosts list."
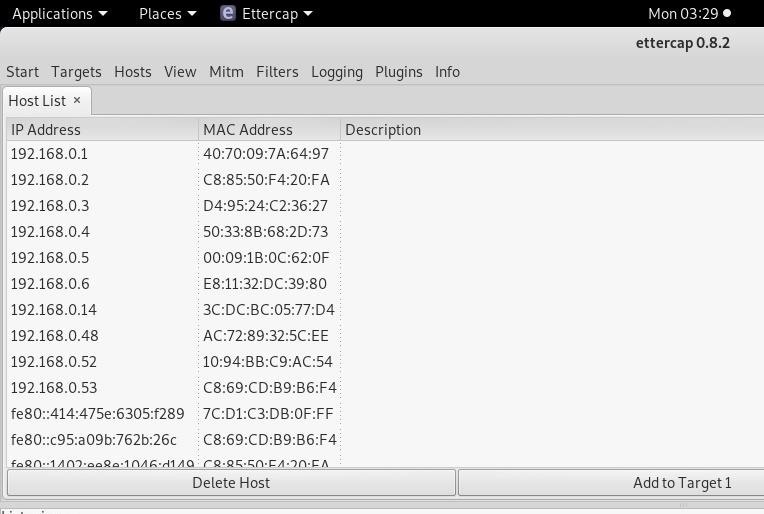
We can now see a list of targets we've discovered on the network. Want to see what they're doing or narrow down the targets? Click on "View," then "Connections" to start snooping on connections.
- Don't Miss: How to Perform Situational Awareness Attacks
Once in the Connections view, you can filter the connections by IP address, type of connection, and whether the connection is open, closed, active, or killed. This gives you a lot of snooping power, which can be augmented by clicking the "View," then "Resolve IP addresses." This means Ettercap will try to resolve the IP addresses it sees other devices on the network connecting to.
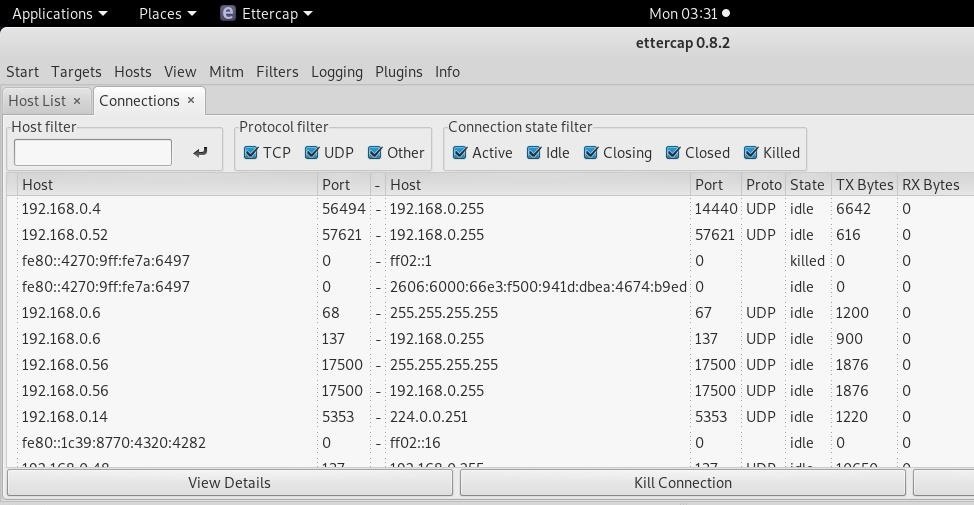
If you want to identify a target on a network and know what they're browsing, look over their shoulder at what website they're on, and match the website to an IP address with an active connection to the same website. Otherwise, you can usually tell by the MAC address, as you can look it up online to see the manufacturer.
Step 5: Select Hosts to Target with ARP Spoofing
Now that we've identified our target's IP address, it's time to add them to a target list. Once we do this, we'll be telling Ettercap that we want to designate that IP address as one we want to pretend to be, so that we're receiving messages from the router that were meant to be sent to the target.
Go back to the "Hosts" screen, and select the IP address of the target you want to target. Click the IP address to highlight it, then click on"Targets," followed by "Target list," to see a list of devices that have been targeted for ARP spoofing.
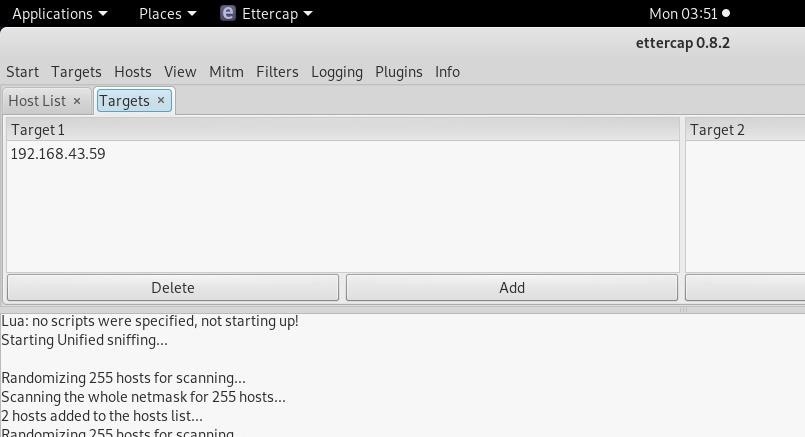
Now, we can go to the "Mitm" menu to start our attack on this target.
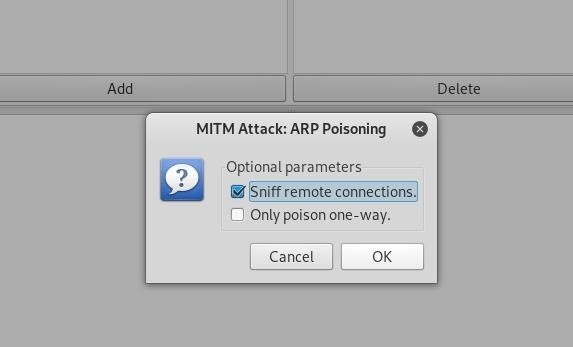
Step 6: Launch Attack on Targets
Click on the "Mitm" menu, and select "ARP poisoning." A popup will open, and you'll select "Sniff remote connections" to begin the sniffing attack.
Once this attack has begun, you'll be able to intercept login credentials if the user you're targeting enters them into a website that doesn't use HTTPS. This could be a router or a device on the network or even a website that uses poor security.
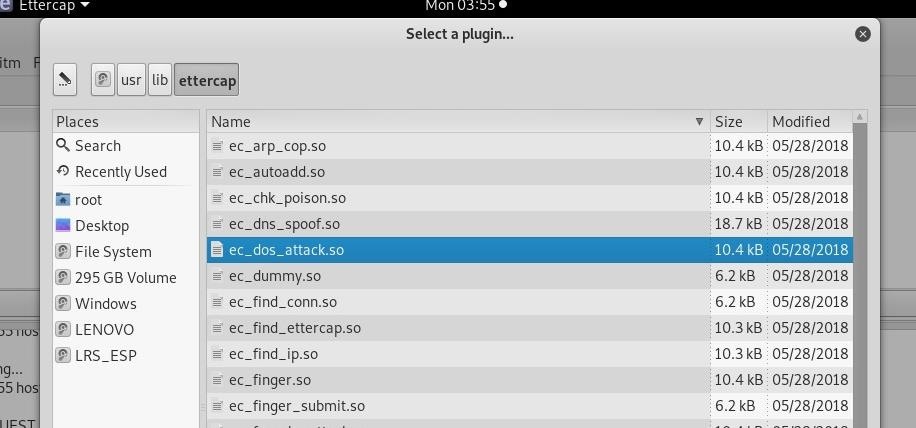
To try another attack, you can click on "Plugins," then "Load plugins," to show the plugin menu. If you select the DOS attack, it will begin dropping the packets sent to this target, cutting off their internet access.
Step 7: Try Intercepting a Password
Now, let's actually try intercepting a password. A website that's great for testing is aavtain.com, which deliberately uses bad security so that you can intercept credentials. On the target device, navigate to aavtrain.com. Once it loads, you'll see a login screen you can enter a fake login and password into.

Enter a username and password, then hit "Submit." If Ettercap is successful, you should see the login and password you typed appear on the attacker's screen!
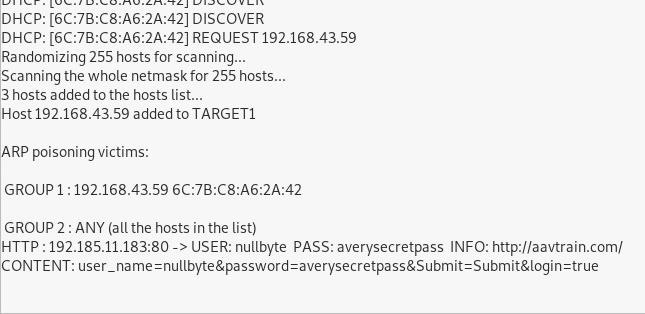
In this result above, we can see that Ettercap successfully ARP poisoned the target and intercepted an HTTP login request the target was sending to an insecure website.
ARP Poisoning Is a Powerful Tool with Some Limitations
The major obvious limitation of ARP spoofing is that it only works if you're connected to a Wi-Fi network. This means it works on open networks but may not work well against networks that have more sophisticated monitoring or firewalls that may detect this sort of behavior.
ARP spoofing attacks are another example of why it's so essential to pick strong passwords for your networks and limit access to those you trust. You're giving away a lot of trust when you give someone your network password or an Ethernet connection, so remember to pick your passwords carefully and who you share them with.
I hope you enjoyed this guide to using the graphical version of Ettercap for ARP poisoning attacks! If you have any questions about this tutorial on ARP poisoning or you have a comment, do so below, and feel free to reach me on Twitter @KodyKinzie.
Just updated your iPhone? You'll find new emoji, enhanced security, podcast transcripts, Apple Cash virtual numbers, and other useful features. There are even new additions hidden within Safari. Find out what's new and changed on your iPhone with the iOS 17.4 update.


5 Comments
I'm getting these IP addresses when I scan for hosts.what does it means?
it means there are 3 hosts in this network, if the results don't match try comparing them using an nmap scan
While using arp poisoing in ettercap, it's downloading data, filling up my root storage and i dont know what it's downloading and where.
Can you please help me in this.
in daily uses ,, i rarely see any website using HTTP. connection for there work..attack based on HTTP protocol obsolete
That's true, but there are still a lot of websites that do use HTTP and there are some attacks to attempt to downgrade a connection to HTTP.
Share Your Thoughts