

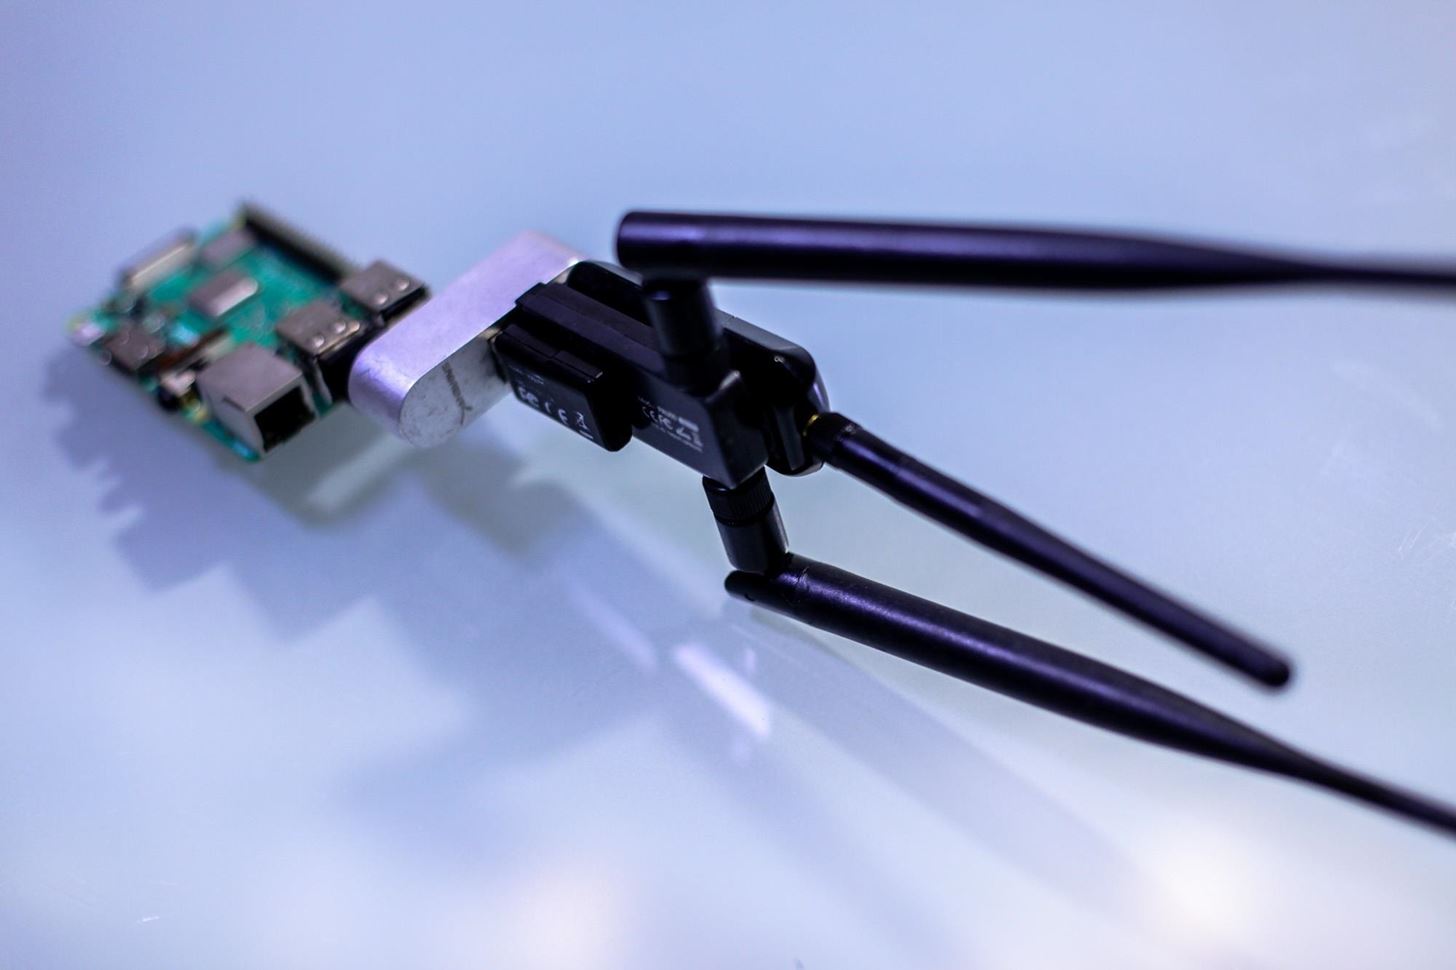
If you want to carry a variety of network adapters without looking suspicious, a perfect solution is accessing them through Airserv-ng. Tucked away in the Aircrack-ng suite, this tool allows a hacker to plug any number of network adapters into a Raspberry Pi and access them over a Wi-Fi or Ethernet connection.
Hacking Wi-Fi requires you to have a compatible wireless network adapter, which usually means plugging it directly into your computer. But, that may not always be appropriate or possible, as an external network adapter can draw attention to you or be difficult to connect to certain types of devices. Thanks to tools like the Raspberry Pi, it's easy to have a second computer out of sight and connected to a network adapter suitable for hacking.
Raspberry Pi's for Wi-Fi Hacking
A typical scenario might be a penetration tester who wants to be able to conduct offensive network operations like MITM attacks or handshake gathering, but doesn't want to be the only person in the office with a bulky external network adapter card visibly blinking away. Some attacks may even require multiple external wireless cards to be effective, which I've found can alone be enough to be reported to management at co-working spaces.
Instead, plugging all of the required network cards into a Raspberry Pi and then accessing the Pi over Wi-Fi allows the penetration tester to keep the adapters out of sight while using less suspicious devices to access the Pi and issue commands. The only problem that remains is how to connect to the Pi, which is usually accomplished by an SSH connection.
While SSH is encrypted, which is great if we're using a Wi-Fi network where someone might be intercepting traffic, it comes with some limitations. First, you're connecting to the Pi and running commands from the Pi remotely, which means that you have to use the tools on the Raspberry Pi. You also don't have direct access to the tools on your primary computer while doing so, because you're running command-line tools on the Pi through your computer. For things like Wi-Fi password cracking, the Pi doesn't have the speed to be very effective.
While it's possible to use some tools on the Pi over SSH and then copy files back and forth to do things like password cracking that the Pi isn't good at, there is a cleaner solution. By creating an encrypted Wi-Fi network on the Pi and connecting to it from our primary computer, we can access all of the network adapters plugged into the Pi directly from our computer as though they were directly plugged in.
Airserv Makes Wi-Fi Cards Network Resources
Airserv-ng provides access to the Wi-Fi network adapters differently than SSH, allowing us to use more powerful tools on our primary computer. Instead of using the Pi to run the attacks, we use it to serve up the Wi-Fi network adapters, then use tools on our primary computer as though we had the Wi-Fi adapters directly plugged into it.

In this setup, we create an encrypted network between the internal cards of our primary computer and the Raspberry Pi. Over this Wi-Fi network, the Raspberry Pi serves any network adapters we plug into it on the network at any port number we want. When set up correctly, we can then access a particular network adapter by typing the IP address, and then the port number on which airserv-ng is serving the adapter.
Using Programs with Airserv-Ng Interfaces
Normally, we'd start scanning the Wi-Fi traffic around us with a command like airodump-ng wlan1mon. This command is running the program airodump-ng on the interface wlan1mon, which is plugged into our computer. If, however, we were connected to the same Wi-Fi network as a Raspberry Pi running Airserv-ng on a Wi-Fi adapter, we could run a command that looks like airodump-ng 192.168.0.16:666 to do the same thing.
So what is this doing? We're still running airodump-ng on an interface, but this time we're specifying the IP address of the Raspberry Pi on the network plus the default port number Airserv-ng is hosting the Wi-Fi adapter on. We can also run programs like besside-ng to grab handshakes this way, taking care not to attack the Wi-Fi link between the primary computer and the Pi.
What You'll Need
To use airserv-ng, we'll need to have the aircrack-ng suite installed on the computer on which we want to serve a network interface. In our example with a Raspberry Pi, we'll also need either to be running either Raspbian or Kali Linux on our Pi.
Step 1: Install Aircrack-Ng
First, we'll need to install the aircrack-ng suite. This comes preinstalled on Kali Linux, but on Raspbian, it's easy to install. In a terminal window, type the following to install the aircrack-ng suite.
sudo apt install aircrack-ngOnce this finishes downloading, you should have several useful programs, including airserv-ng.
To check if you've correctly installed the program, run man airserv-ng to look at the manual entry for the program. You should see something like below.
man airserv-ng
NAME
       airserv-ng - a wireless card server

SYNOPSIS
       airserv-ng <options>

DESCRIPTION
       airserv-ng  is a wireless card server which allows multiple wireless application programs to independently use a
       wireless card via a client-server TCP network connection. All operating system and wireless card driver specific
       code is incorporated into the server. This eliminates the need for each wireless application to contain the com‐
       plex wireless card and driver logic. It is also supports multiple operating systems.

OPTIONS
       -h     Shows the help screen.

       -p <port>
              TCP port to listen on (by default: 666).

       -d <iface>
              Wifi interface to use.

       -c <chan>
              Lock interface to this channel.

       -v <level>
              Debug level. There are 3 debug levels.  Debug level of 1 shows client connection/disconnection (default).
              Debug level of 2 shows channel change requests and invalid client command requests in addition to the de‐
              bug level 1 messages.  Debug level of 3 displays a message each time a packet (and its length) is sent to
              the client. It also include messages from level 2 (and 1).
You can hit Q to exit. Now that we have this installed, we're ready to try serving up a Wi-Fi card.
Step 2: Prepare Your Wi-Fi Adapters
After plugging in a Wi-Fi network card you want to serve, we'll need to consider how we're going to be using it. If we need to put it into monitor mode, then we may want to do this first.
First, find the name of your card by running ifconfig or iwcondig. In Kali, it should look something like wlan1. Next, we'll put it into monitor mode by running the following command.
sudo airmon-ng start [name of wifi card here]Keep in mind that if you select the Wi-Fi card you're currently using to accesst internet, the program will probably crash. If you only have one Wi-Fi card but you're using ethernet, you should be able to serve up your Wi-Fi card over your ethernet connection just fine.
root@nickles:~# airmon-ng start wlan1

Found 4 processes that could cause trouble.
Kill them using 'airmon-ng check kill' before putting
the card in monitor mode, they will interfere by changing channels
and sometimes putting the interface back in managed mode

  PID Name
  541 NetworkManager
  604 wpa_supplicant
 5143 dhclient
 5157 dhclient

PHY Interface   Driver      Chipset

phy0    wlan0       ath9k       Qualcomm Atheros QCA9565 / AR9565 Wireless Network Adapter (rev 01)
phy3    wlan1       rt2800usb   Ralink Technology, Corp. RT5572

        (mac80211 monitor mode vif enabled for [phy3]wlan1 on [phy3]wlan1mon)
        (mac80211 station mode vif disabled for [phy3]wlan1)
When we run ifconfig again, we should see the network card is now named wlan1mon. It's in monitor mode and ready to go.
Step 3: Connect to the Same Network & Serve the Card
Now, we can specify a port for each Wi-Fi adapter we want to serve. If we have a Raspberry Pi and a USB hub with multiple Wi-Fi adapters plugged in, you could assign a port number by the name of the network adapter, like port 111 for wlan1 and port 222 for wlan2.
Once you've decided how to keep track of which port leads to which adapter, we can serve it using the following command.
root@nickles:~# airserv-ng -d wlan1mon -p 111
Opening card wlan1mon
Setting chan 1
Opening sock port 666
Serving wlan1mon chan 1 on port 111
In this command, the -d flag refers to which device we're serving, and the -p command refers to which port we're serving it on.
Step 4: Access Your Wi-Fi Cards Over the Network
Now, let's try to grab a handshake through the card we are serving. We can do this from any computer connected to the same local area network, or even from our own computer.
First, check to see what our IP address is on the network. We can do this using ifconfig, and it should be something like 192.168.0.2.
Now, we'll open Iairodump-ng and try listening for a handshake. Rather than use the command as through the card were directly connected, like airodump-ng wlan1mon, we'll use it via the airserv-ng interface, using our IP address and the port number instead.
root@nickles:~# airodump-ng 192.168.0.37:111
Connecting to 192.168.0.37 port 111...
Connection successful
Connecting to 192.168.0.37 port 111...
Connection successful
airodump-ng: osdep.c:46: wi_set_ht_channel: Assertion `wi->wi_set_ht_channel' failed.

 CH  0 ][ Elapsed: 36 s ][ 2019-04-14 10:36 ][ WPA handshake: 40:70:09:7A:64:90

 BSSID              PWR  Beacons    #Data, #/s  CH  MB   ENC  CIPHER AUTH ESSID

 40:70:09:7A:64:90  -39      323     1447   33   6  195  WPA2 CCMP   PSK  spot 2.4 ghz
 8C:A2:FD:01:2B:28  -66      237       27    0   6  195  WPA2 CCMP   PSK  Donna :)
 0E:A2:FD:01:2B:28  -65      114        0    0   6  195  WPA2 CCMP   PSK  Donna :)_Guest
 C0:C1:C0:B6:F3:71  -77      116       15    0   6  130  WPA2 CCMP   PSK  SilverHorse
 C0:C1:C0:B6:F3:72  -78      132       10    0   6  130  OPN              SilverHorse-guest
 8C:A2:FD:00:C5:8E  -78      212       34    0   6  195  WPA2 CCMP   PSK  LavishBest
 70:3A:CB:ED:A4:58  -76        5       11    0   6  130  WPA2 CCMP   PSK  jlc
 60:19:71:F1:A3:20  -78       42        0    0   6  195  WPA2 CCMP   PSK  Red Polish
Just like that, we're using the interface on our device from a computer across the network. If we were using a Raspberry Pi, we would bring all of our network cards up and then create a Wi-Fi access point from the internal card of the Pi to facilitate any Wi-Fi hacking needed, picking a different port number each time. If we serve cards wlan1 on port 111, we can access it from our IP number with a :111 at the end.
Airserv-Ng Makes Network Cards More Flexible
Airserv-ng is a handy tool to make multiple Wi-Fi network cards more accessible and more subtle to access, especially when used with a Raspberry Pi. In addition to allowing a single Raspberry Pi to serve many Wi-Fi adapters over its internal card, multiple people on one team can also share a single adapter as needed, without needing to attach the adapter to their computer physically. While this solution makes using Wi-Fi adapters as a network resource easier, it should be noted that this is not encrypted at all, so be careful when using this in an environment where someone else on the network might be listening in.
I hope you enjoyed this guide to using Airserv-ng to make Wi-Fi hacking easier! If you have any questions about this tutorial on using Airserv-ng with the Raspberry Pi, leave a comment below, and feel free to reach me on Twitter @KodyKinzie.
Just updated your iPhone? You'll find new emoji, enhanced security, podcast transcripts, Apple Cash virtual numbers, and other useful features. There are even new additions hidden within Safari. Find out what's new and changed on your iPhone with the iOS 17.4 update.


5 Comments
oh its such a nice relief getting new content.
thanks for taking the time to write this up ;)
He protecc,
He attacc
But most importantly
HE CAN HACC
Sorry for that one..
Hey Kody!
You have written iwcondig instead of iwconfig in step 2.
Best regards :)
HEY KODY!
Can you do a tutorial about creating the hotspot on the Raspberry Pi? Maybe in addition to this article? I was searching for a proper tutorial for months and tried so many different ways but no one of them were working..
Greetings
Share Your Thoughts